Select Categories
How to Create a Normal Voucher
August 6, 2024Section 1: Introduction
Normal Voucher: A standard voucher available for general use, business mostly use normal vouchers to offer their promotion discount
Section 2: How to create a Normal Storewide Voucher
Storewide voucher is a voucher that offers a discount applicable to all products throughout the entire ecommerce store.
Step1: Access to the Voucher Page
Method 1: Search “Create Normal Voucher” in the search menu bar
Method 2: Search “Voucher List” > Click “Create New Voucher” > Click “Normal Voucher”
Method 3: Go to My Sales > Marketing Tools > Voucher > Click “Create New Voucher” > Click “Normal Voucher”

Step 2: Set your voucher name and voucher code

Step 3: Choose Store Wide Voucher

Step 4: Set voucher claim start time and end time
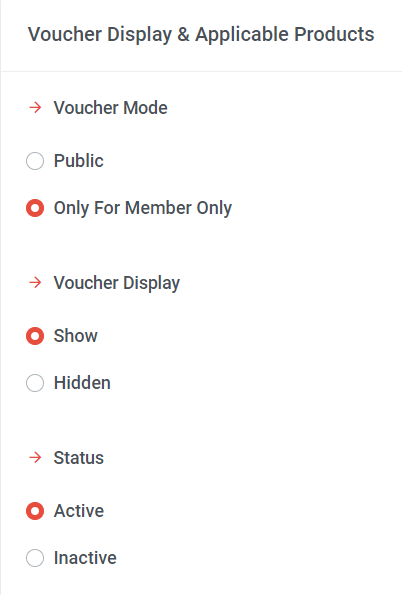
Step 5: Choose Voucher Mode
a) Public: Available for all customers, whether they are normal customers or members; no limitation on claimed quantity for the public voucher mode.
b) Only For Members: Available for members only. Members need to log in as members to use the voucher. Additionally, you can set the maximum quantity that each member can claim in step 10.
Step 6: Choose Voucher Display
a) Show: The voucher will be visible on the website.
b) Hidden: This voucher is not displayed on the website. Merchants need to privately message customers the voucher code, and customers can redeem the voucher by entering the provided code in checkout page.
Step 7: Set voucher status
a) Active: Select “Active” if you want the voucher available for redemption.
b) Inactive: Select “Inactive” if you want to deactivate the voucher. *** Vouchers cannot be deleted; they can only be deactivated.

Step 8: Choose discount type
a) Fix Amount
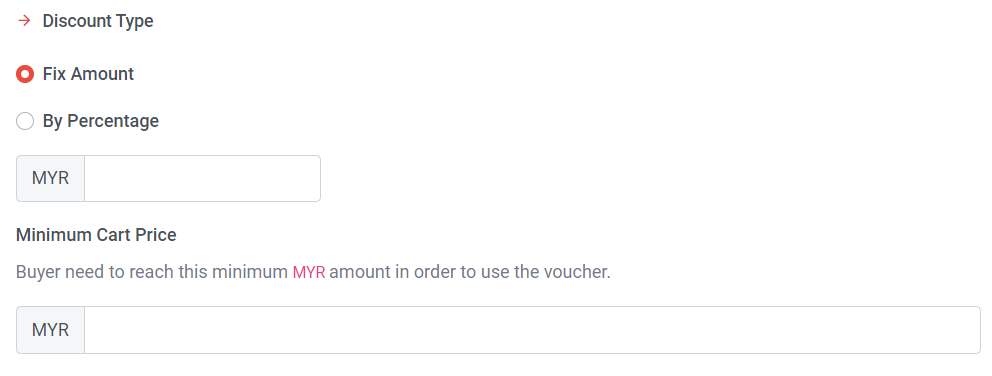
Choose Fix Amount > Set discount amount > Set a minimum cart price (if no minimum is required, proceed to the next step).
b) By Percentage
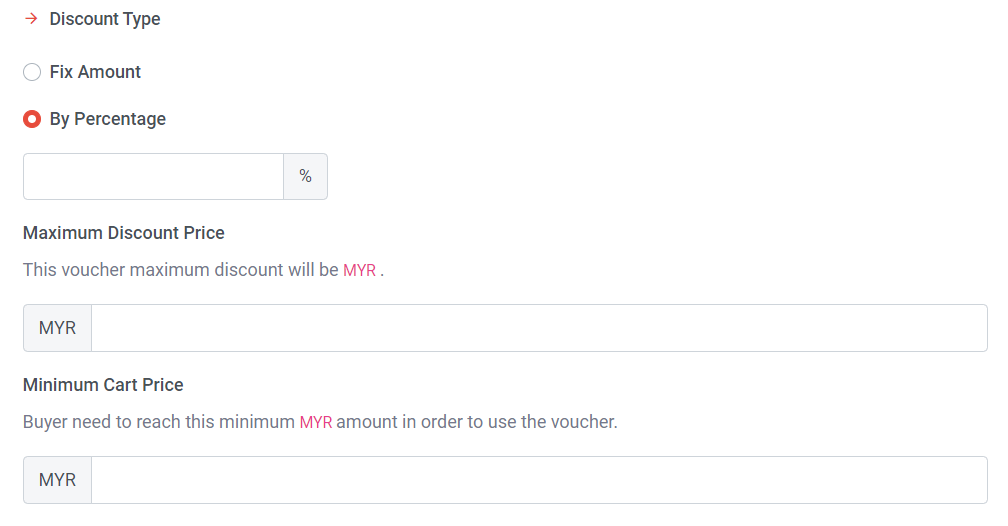
Choose By Percentage > Set discount % > Set Maximum Discount Price > Set a minimum cart price (if no minimum is required, proceed to the next step).

Step 9: Set the total quantity of vouchers available for redemption.
Step 10: Set Redemption Limit (Per Member)
This option is visible only when you activate the 'Only for Members' voucher mode.
If “Set Redemption Limit (Per Member)” is not turned on, members can use this voucher without any (Voucher quantity) limitations.

If “Set Redemption Limit (Per Member)” is turned on, you can set the maximum usage of the voucher per member. If you want each member to redeem this voucher only once, you can set the limit to 1.
Step 11: Once done, click “Create”
Section 3: How to create a Product Voucher
A product voucher is a voucher that provides a discount specifically tied to a particular product or a group of products.
Step1: Access to the Voucher Page
Method 1: Search “Create Normal Voucher” in search menu bar
Method 2: Search “Voucher List” > Click “Create New Voucher” > Click “Normal Voucher”
Method 3: Go to My Sales > Marketing Tools > Voucher > Click “Create New Voucher” > Click “Normal Voucher”

Step 2: Set your voucher name and voucher code

Step 3: Choose Product Voucher

Step 4: Set voucher claim start time and end time
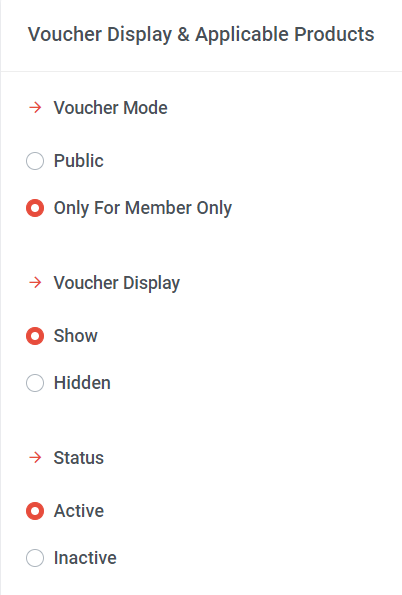
Step 5: Choose Voucher Mode
a) Public: Available for all customers, whether they are normal customers or members; no limitation on claimed quantity for the public voucher mode.
b) Only For Members: Available for members only. Members need to log in as members to use the voucher. Additionally, you can set the maximum quantity that each member can claim in step 10.
Step 6: Choose Voucher Display
a) Show: The voucher will be visible on the website.
b) Hidden: This voucher is not displayed on the website. Merchants need to privately message customers the voucher code, and customers can redeem the voucher by entering the provided code in checkout page.
Step 7: Set voucher status
a) Active: Select “Active” if you want the voucher available for redemption.
b) Inactive: Select “Inactive” if you want to deactivate the voucher. *** Vouchers cannot be deleted; they can only be deactivated.

Step 8: Choose the discount type
a) Fix Amount
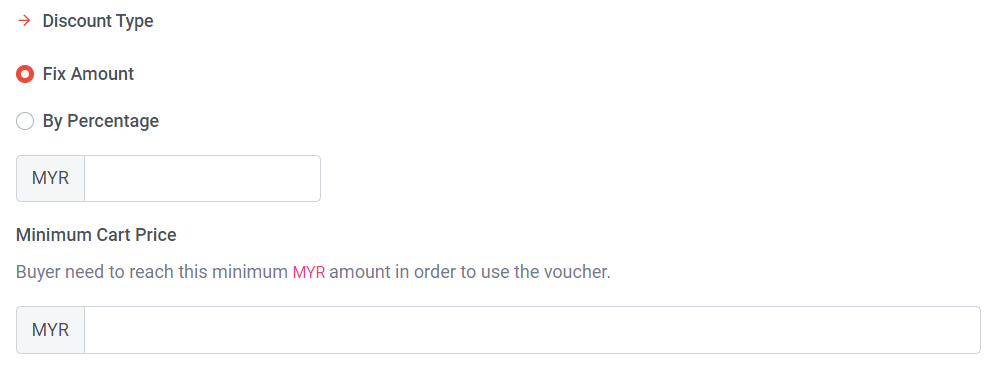
Choose Fix Amount > Set discount amount > Set a minimum cart price (if no minimum is required, proceed to the next step).
b) By Percentage
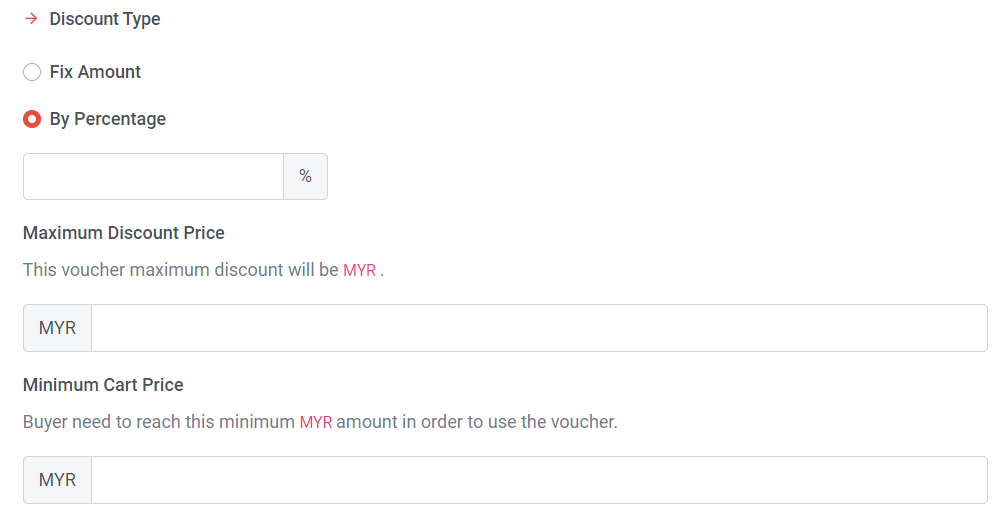
Choose By Percentage > Set discount % > Set Maximum Discount Price > Set a minimum cart price (if no minimum is required, proceed to the next step).

Step 9: Set the total quantity of vouchers available for redemption.
Step 10: Set Redemption Limit (Per Member)
This option is visible only when you activate the 'Only for Members' voucher mode.
If “Set Redemption Limit (Per Member)” is not turned on, members can use this voucher without any (Voucher quantity) limitations.

If “Set Redemption Limit (Per Member)” is turned on, you can set the maximum usage of the voucher per member. If you want each member to redeem this voucher only once, you can set the limit to 1.

Step 11: Click “Add Product”
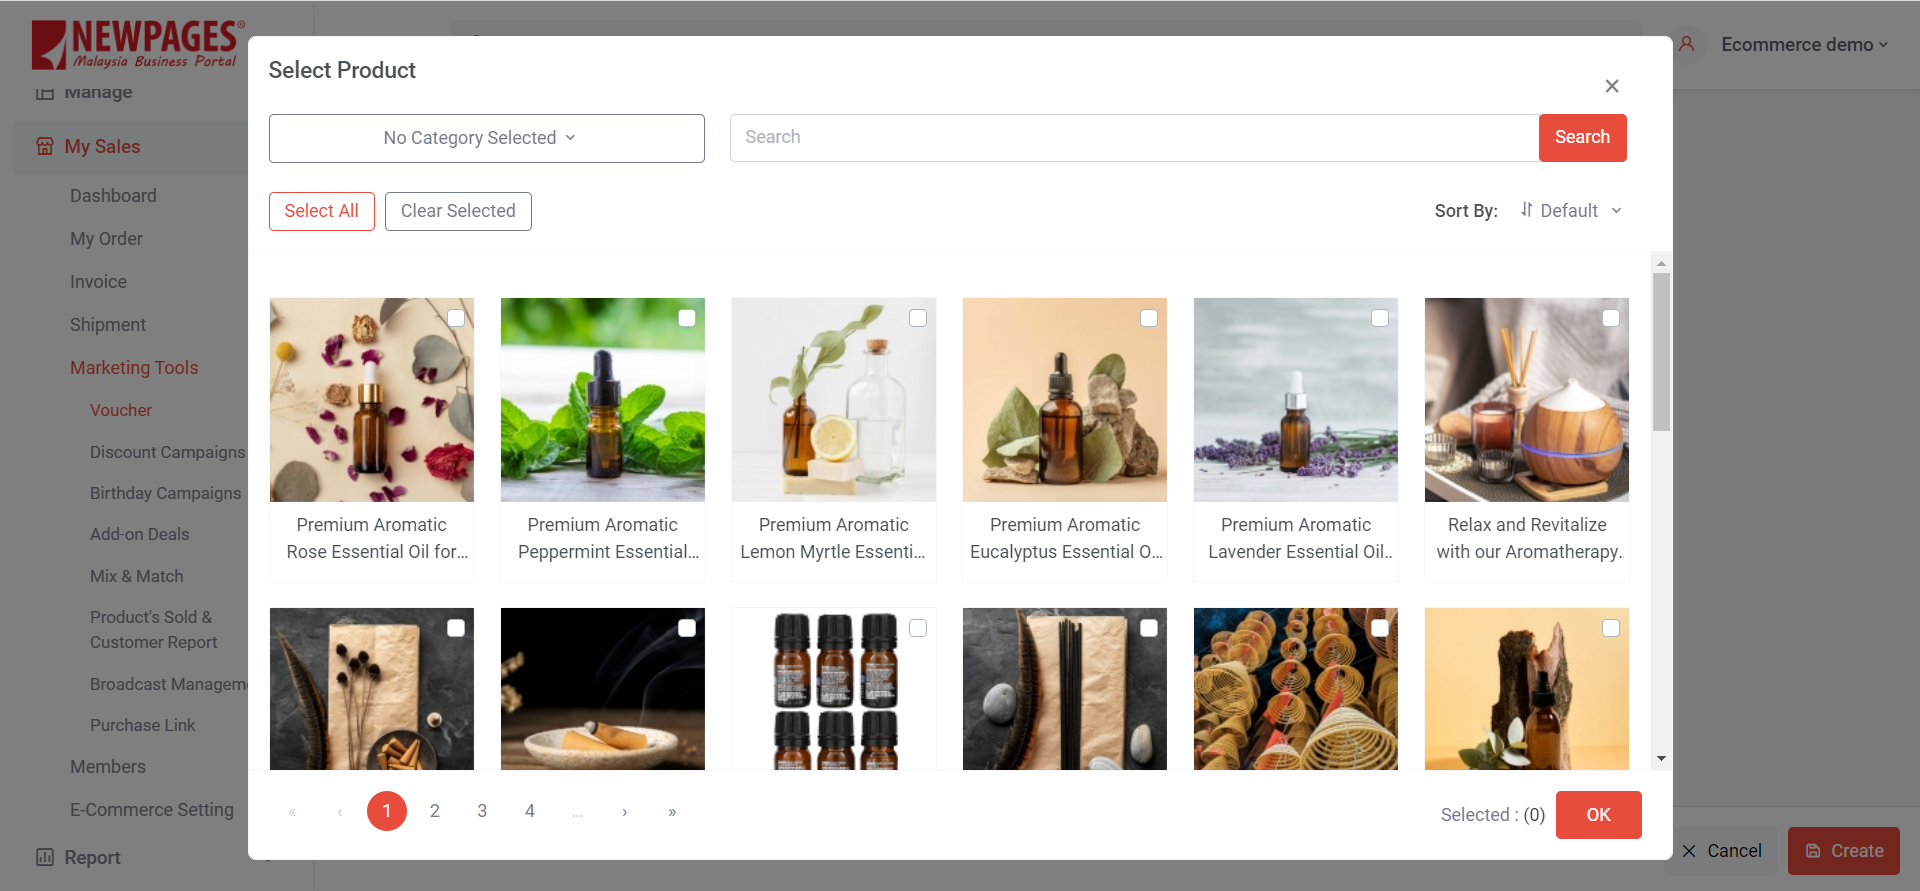
Step 12: Tick the products > Click “OK”
Step 13: Once done, click “Create”
Section 4: How to create a free shipping voucher
Free shipping voucher is a voucher that allows customers to partially or fully waive shipping fees.
Step1: Access to the Voucher Page
Method 1: Search “Create Normal Voucher” in search menu bar
Method 2: Search “Voucher List” > Click “Create New Voucher” > Click “Normal Voucher”
Method 3: Go to My Sales > Marketing Tools > Voucher > Click “Create New Voucher” > Click “Normal Voucher”

Step 2: Set your voucher name and voucher code

Step 3: Choose Free Shipping Voucher

Step 4: Set voucher claim start time and end time
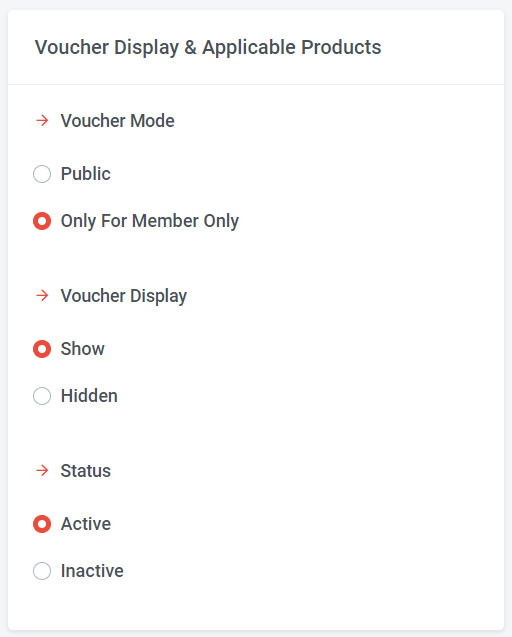
Step 5: Choose Voucher Mode
a) Public: Available for all customers, whether they are normal customers or members; no limitation on claimed quantity for the public voucher mode.
b) Only For Members: Available for members only. Members need to log in as members to use the voucher. Additionally, you can set the maximum quantity that each member can claim in step 10.
Step 6: Choose Voucher Display
a) Show: The voucher will be visible on the website.
b) Hidden: This voucher is not displayed on the website. Merchants need to privately message customers the voucher code, and customers can redeem the voucher by entering the provided code in checkout page.
Step 7: Set voucher status
a) Active: Select “Active” if you want the voucher available for redemption.
b) Inactive: Select “Inactive” if you want to deactivate the voucher. *** Vouchers cannot be deleted; they can only be deactivated.

Step 8: Choose discount type
a) With Capped Amount
"With Capped Amount" refers to the maximum amount or limit to which a discount can be applied.
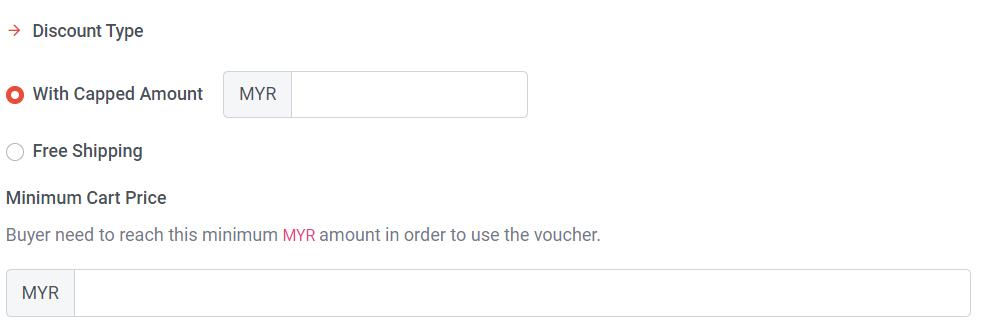
Choose With Capped Amount > Set discount amount > Set a minimum cart price (if no minimum is required, proceed to the next step).
For example, if I set a capped amount of RM10, and the shipping fee is RM15, I can apply a discount of RM10, and only RM5 needs to be paid.
b) Free Shipping
This is a 100% free shipping discount. With this setting, customers don't need to pay any shipping fees.
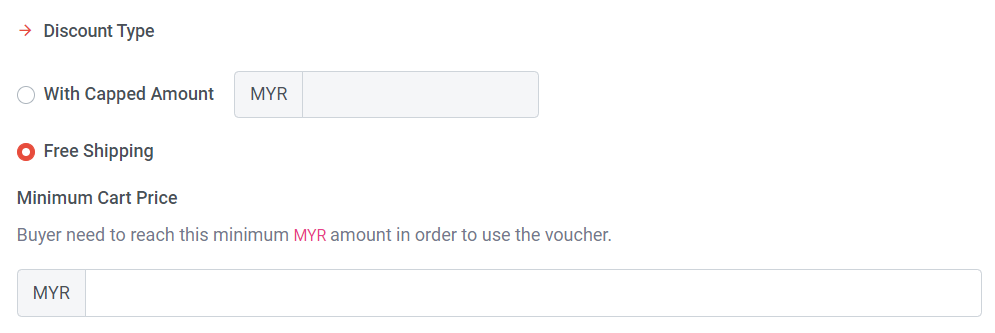
Choose Free Shipping > Set a minimum cart price (if no minimum is required, proceed to the next step).

Step 9: Set the total quantity of vouchers available for redemption.
Step 10: Set Redemption Limit (Per Member)
This option is visible only when you activate the 'Only for Members' voucher mode.
If “Set Redemption Limit (Per Member)” is not turned on, members can use this voucher without any (Voucher quantity) limitations.

If “Set Redemption Limit (Per Member)” is turned on, you can set the maximum usage of the voucher per member. If you want each member to redeem this voucher only once, you can set the limit to 1.
Step 11: Once done, click “Create”