Email Setup
Desktop
Thundebird
Outlook
Mobile
Android
Iphone
AI Features
AI Handbook
AI Positioning
AI Suggestion
AI Product Tools
AI Customer Service
Website Management
Login NEWPAGES Merchant System (NMS)
NMS Switch Language
Manage Products
Manage Service
Manage Photoalbum
Manage News / Promotion
Manage Ratings & Reviews
Manage Google Reviews
NMS Merchant App
Support
Update Form
NP Merchant Points
NMS Credit
Report
Profile Setting
Content Generator
Manage Others (Gallery)
Manage Download
Website Setting
Account Setting
Manage Testimonials
Manage YouTube
Manage Career
SEO Guide
On-page Optimization
e-Commerce (My Sales)
Dashboard
Order Management
Invoice
Shipping
Delivery List
Packaging & Picklist
Self Pick Up Setting
Shipping Setting
No available shipping method
Easyparcel
Lalamove
Tracking.my
Members
Marketing Tools
Voucher
Birthday Campaign
Discount Campaign
Add-on Deals
Mix & Match
Purchase Link
Broadcast Management
Product Sold & Customer Report
Ecommerce Mail Setting
Popup & Social Proof
Checkout Cart Setting
Website Header Setting
Additonal Charges Setting
Notification Setting
e-Commerce Process (Add to Cart Flow)
Plugins
Activate Plugin
Marketplace Synchronization
Shopee Sync
Lazada Sync
Tiktok Sync
Affiliate Marketing & Referral
Membership & Loyalty Program
Checkout & Payment Link
Quotation Pro
Sales Landing Page
Whatsapp Cart & Chat
Product Comparison
Social Media Synchronization
Facebook My Chatbot
Booking System
BusinessTag
Background Removal
PDF Encryptor
E-Invoice Customer Profile
Warranty System
Facebook Live
Email Issues
Knowledge Tips
CRM System
NEWPAGES Official API
Mantap
NEWPAGES Apps Management
Admin Email System
Webmail
Adjust Spam Score
Reset Password
Set Autoresponders In Webmail
Delete Email
Domain
Demonstration
Progressive Web App Ready (PWA)
Spam Expert - Domain Level
Dashboard
Incoming
Logs
Delivery Issue Log
Spam Quarantine
Domain Statistics
Train Messages
Incoming - Protection Settings
Recipient Allow List
Recipient Block List
Sender Allow List
Sender Block List
Allow List Filtering Rules
Block List Filtering Rules
Customise Actions
Filter Settings
Attachments Restrictions
Email Size Restrictions
Continuity
Delivery Queue - Incoming
Compose Email
My Settings
Select Categories
Email Setup
Desktop
Thundebird
Outlook
Mobile
Android
Iphone
AI Features
AI Handbook
AI Positioning
AI Suggestion
AI Product Tools
AI Customer Service
Website Management
Login NEWPAGES Merchant System (NMS)
NMS Switch Language
Manage Products
Manage Service
Manage Photoalbum
Manage News / Promotion
Manage Ratings & Reviews
Manage Google Reviews
NMS Merchant App
Support
Update Form
NP Merchant Points
NMS Credit
Report
Profile Setting
Content Generator
Manage Others (Gallery)
Manage Download
Website Setting
Account Setting
Manage Testimonials
Manage YouTube
Manage Career
SEO Guide
On-page Optimization
e-Commerce (My Sales)
Dashboard
Order Management
Invoice
Shipping
Delivery List
Packaging & Picklist
Self Pick Up Setting
Shipping Setting
No available shipping method
Easyparcel
Lalamove
Tracking.my
Members
Marketing Tools
Voucher
Birthday Campaign
Discount Campaign
Add-on Deals
Mix & Match
Purchase Link
Broadcast Management
Product Sold & Customer Report
Ecommerce Mail Setting
Popup & Social Proof
Checkout Cart Setting
Website Header Setting
Additonal Charges Setting
Notification Setting
e-Commerce Process (Add to Cart Flow)
Plugins
Activate Plugin
Marketplace Synchronization
Shopee Sync
Lazada Sync
Tiktok Sync
Affiliate Marketing & Referral
Membership & Loyalty Program
Checkout & Payment Link
Quotation Pro
Sales Landing Page
Whatsapp Cart & Chat
Product Comparison
Social Media Synchronization
Facebook My Chatbot
Booking System
BusinessTag
Background Removal
PDF Encryptor
E-Invoice Customer Profile
Warranty System
Facebook Live
Email Issues
Knowledge Tips
CRM System
NEWPAGES Official API
Mantap
NEWPAGES Apps Management
Admin Email System
Webmail
Adjust Spam Score
Reset Password
Set Autoresponders In Webmail
Delete Email
Domain
Demonstration
Progressive Web App Ready (PWA)
Spam Expert - Domain Level
Dashboard
Incoming
Logs
Delivery Issue Log
Spam Quarantine
Domain Statistics
Train Messages
Incoming - Protection Settings
Recipient Allow List
Recipient Block List
Sender Allow List
Sender Block List
Allow List Filtering Rules
Block List Filtering Rules
Customise Actions
Filter Settings
Attachments Restrictions
Email Size Restrictions
Continuity
Delivery Queue - Incoming
Compose Email
My Settings
How to Add New Booking Service
April 25, 2024Section 1: Introduction
Introducing our Service Booking System plugin! It's designed to streamline service bookings and boost customer satisfaction. With integrated payment options, it ensures smooth online transactions. Try it now for enhanced efficiency and convenience!
Section 2: How to Access to Booking System System Setting
Note: Before accessing Booking System plugin, you need to make sure the plugin is activated.
Here are two fastest ways to access the plugin:

Method 1: Search "Booking" in the search menu at the top of NMS > Click "System Settings"

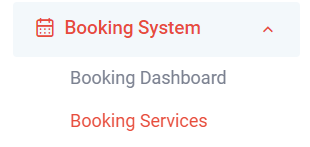
Method 2: After activating the plugin, refresh your browser. It will appear in the left side menu
Go to NMS Side menu > Booking System > Booking Services
Go to NMS Side menu > Booking System > Booking Services
Section 3: Steps to Add New Booking Service
Step 1: Before you add a new booking service, you need to add a new service in "Manage Service".
Learn more about How to Add New Service
If you only allow your customers to book appointments without making payment, then you can skip adding a service price.
If you want customers to book appointments with payment, you need to add a service price and integrate with a payment gateway. Choose a supported gateway from https://www.ecommerce-pro.my/payment-gateway-comparison/. Let us know your decision, and we'll guide you through the integration process.

Please set a fixed price if you want to allow customers to make payments via appointment booking.

Step 2: Click "Manage Branch"

Step 2: Click " +Add Branch"

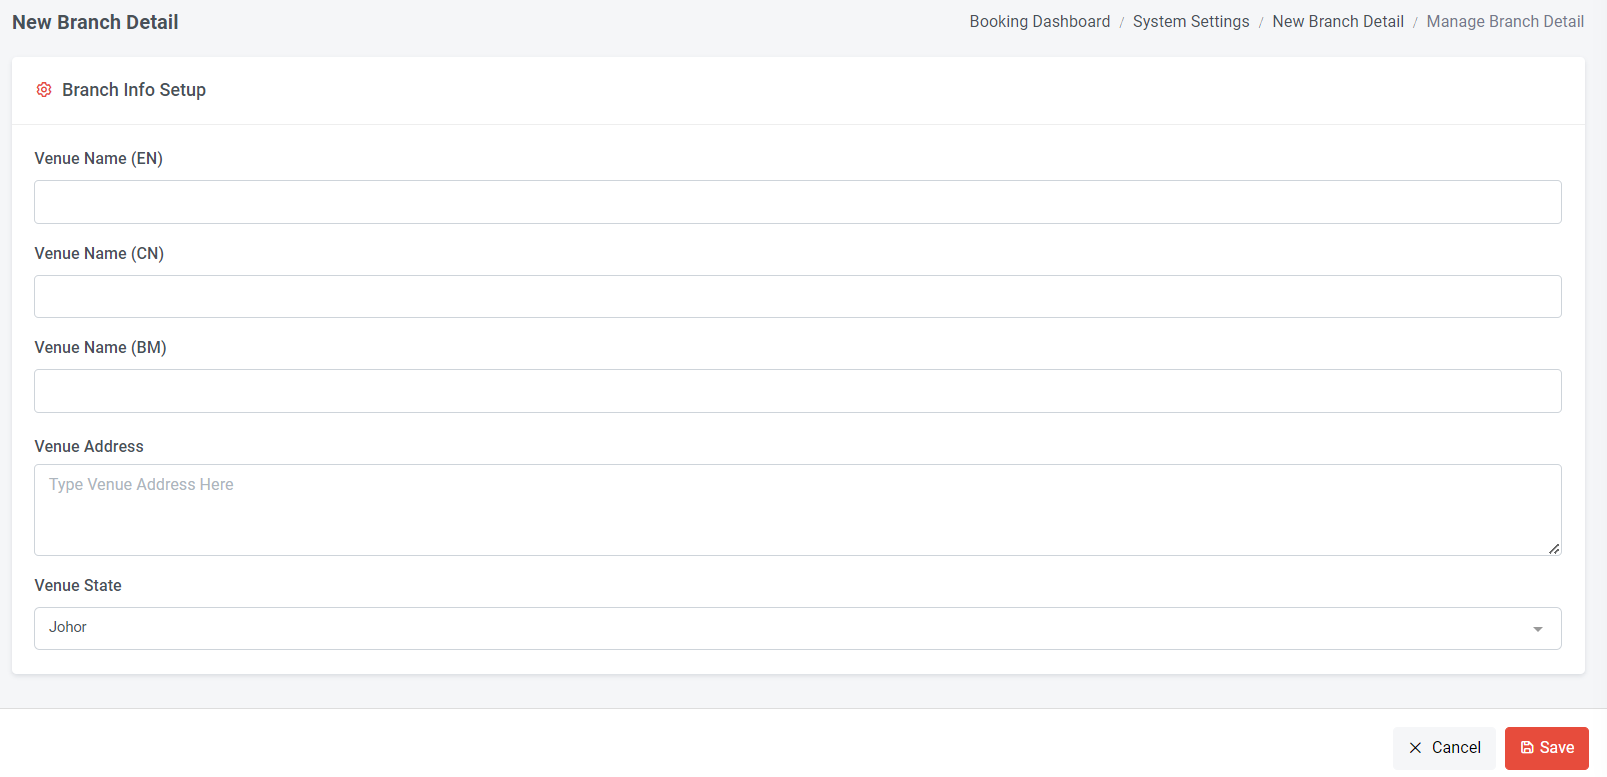
Step 3: Fill in Branch info information
Step 4: Click "Save"
Step 4: Click "Save"

Step 5: Click "+ Add New Booking Service"

Step 6: Click "Select Service" > Choose the Service > Click "OK"
Step 7: Choose Available Branches (You can choose more than one, and once submitted, you cannot edit your branch selection).
Step 8: Select Available Days
Step 7: Choose Available Branches (You can choose more than one, and once submitted, you cannot edit your branch selection).
Step 8: Select Available Days

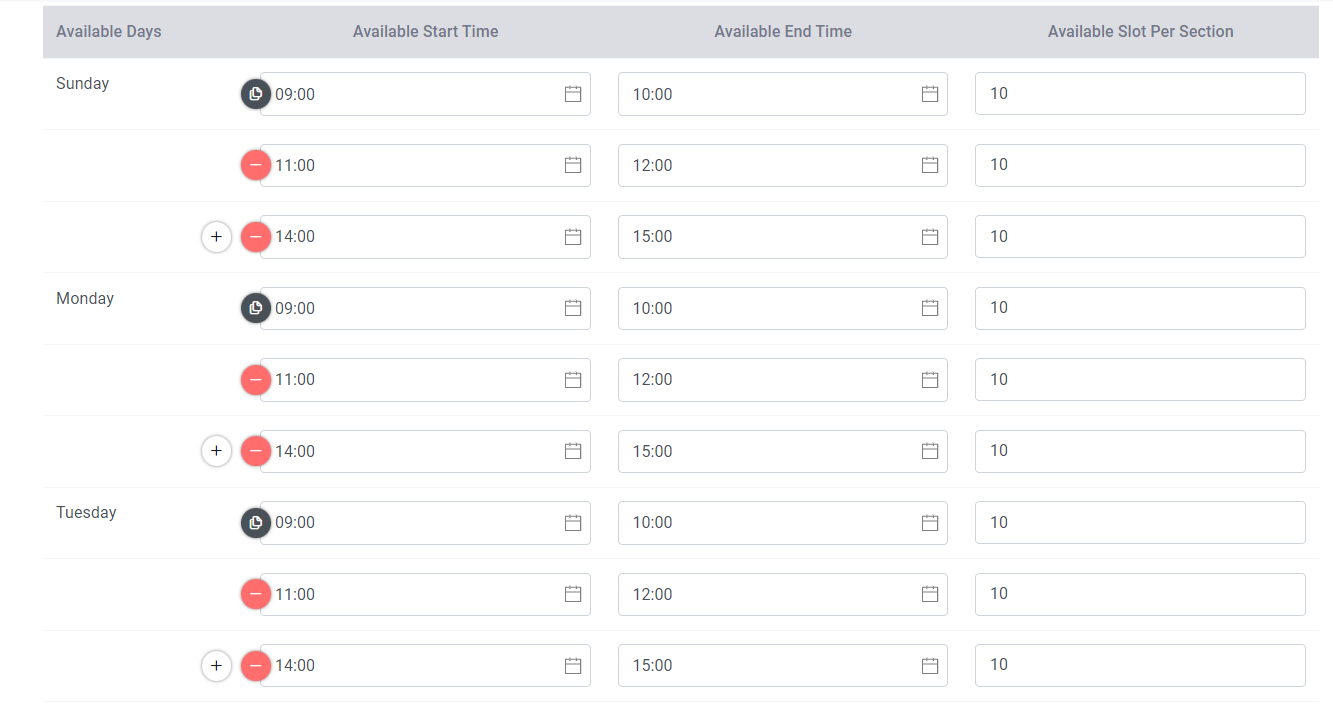
Step 9: Select Available Start Time and End Time
Step 10: Insert Available Slots per Section (Total quantity of slots that visitors can book).
You can click + to add row or click - to delete the row
Step 10: Insert Available Slots per Section (Total quantity of slots that visitors can book).
You can click + to add row or click - to delete the row

If all available days share the same available time slot information, you can click to make them same.

Step 11: Turn on or turn off appointment approval
If "Appointment Approval"is on, the merchant must approve appointments before they're confirmed.
If "Appointment Approval" is off, appointments are automatically confirmed without the need for the merchant's approval.
Please note that the number of available slots you set in step 10 will only deducted once the appointment is approved.
If you enable the appointment approval, appointments must await merchant approval to be considered confirmed, potentially resulting in overbooking. For paying customers, you will need to cancel their bookings and notify them to arrange a refund or reschedule the appointment.

Step 12: Insert Slots Per Person (The maximum number of slots available for booking per person)
Step 13: Click "Submit"
Step 13: Click "Submit"

You can Click to edit booking service information or click to delete the booking service.

If you provide numerous booking services, you can use the service filter to find specific ones, or search by branches to start editing or deleting booking services.