Email Setup
Desktop
Thundebird
Outlook
Mobile
Iphone
Android
AI Features
AI Handbook
AI Positioning
AI Suggestion
AI Customer Service
AI Product Tools
AI Brochures PDF
AI Page Editor
AI-assisted Content Engine (A.C.E)
AI Profile & AI Prompt Refine
Global AI Content Generator
AI Service Tools
AI FAQ
AI Virtual Try-On
Website Management
Login NEWPAGES Merchant System (NMS)
NMS Switch Language
Dashboard
Manage Products
Manage Service
Manage Photoalbum
Manage News / Promotion
Manage Ratings & Reviews
Manage Google Reviews
NMS Merchant App
Profile Setting
NMS Credit
NP Merchant Points
Report
Support
Update Form
Account Setting
Website Setting
Manage Download
Manage YouTube
Content Generator
Manage Others (Gallery)
Manage Testimonials
Manage Career
SEO Guide
On-page Optimization
e-Commerce (My Sales)
Dashboard
Order Management
Invoice
Shipping
Delivery List
Packaging & Picklist
Self Pick Up Setting
Shipping Setting
No available shipping method
Easyparcel
Lalamove
Tracking.my
Members
Marketing Tools
Voucher
Birthday Campaign
Discount Campaign
Add-on Deals
Mix & Match
Purchase Link
Broadcast Management
Product Sold & Customer Report
Ecommerce Mail Setting
Popup & Social Proof
Checkout Cart Setting
Website Header Setting
Additonal Charges Setting
Notification Setting
e-Commerce Process (Add to Cart Flow)
Plugins
Activate Plugin
Marketplace Synchronization
Tiktok Sync
Lazada Sync
Shopee Sync
Affiliate Marketing & Referral
Membership & Loyalty Program
Checkout & Payment Link
Quotation Pro
Sales Landing Page
Whatsapp Cart & Chat
Product Comparison
Social Media Synchronization
Facebook My Chatbot
Booking System
BusinessTag
Warranty System
E-Invoice Customer Profile
PDF Encryptor
Background Removal
NEWPAGES Official API
Mantap
FREE MANTAP
NEWPAGES Apps Management
WhatsApp Broadcaster
CRM System
Webmail
Setup Signature
Delete Email
Reset Password
Adjust Spam Score
Set Autoresponders In Webmail
Spam Expert - Domain Level
Dashboard
Incoming
Logs
Delivery Issue Log
Spam Quarantine
Domain Statistics
Train Messages
Incoming - Protection Settings
Recipient Allow List
Recipient Block List
Sender Allow List
Sender Block List
Allow List Filtering Rules
Block List Filtering Rules
Customise Actions
Filter Settings
Attachments Restrictions
Email Size Restrictions
Continuity
Delivery Queue - Incoming
Compose Email
My Settings
Domain
Admin Email System
Knowledge Tips
Email Issues
Demonstration
Progressive Web App Ready (PWA)
Select Categories
Email Setup
Desktop
Thundebird
Outlook
Mobile
Iphone
Android
AI Features
AI Handbook
AI Positioning
AI Suggestion
AI Customer Service
AI Product Tools
AI Brochures PDF
AI Page Editor
AI-assisted Content Engine (A.C.E)
AI Profile & AI Prompt Refine
Global AI Content Generator
AI Service Tools
AI FAQ
AI Virtual Try-On
Website Management
Login NEWPAGES Merchant System (NMS)
NMS Switch Language
Dashboard
Manage Products
Manage Service
Manage Photoalbum
Manage News / Promotion
Manage Ratings & Reviews
Manage Google Reviews
NMS Merchant App
Profile Setting
NMS Credit
NP Merchant Points
Report
Support
Update Form
Account Setting
Website Setting
Manage Download
Manage YouTube
Content Generator
Manage Others (Gallery)
Manage Testimonials
Manage Career
SEO Guide
On-page Optimization
e-Commerce (My Sales)
Dashboard
Order Management
Invoice
Shipping
Delivery List
Packaging & Picklist
Self Pick Up Setting
Shipping Setting
No available shipping method
Easyparcel
Lalamove
Tracking.my
Members
Marketing Tools
Voucher
Birthday Campaign
Discount Campaign
Add-on Deals
Mix & Match
Purchase Link
Broadcast Management
Product Sold & Customer Report
Ecommerce Mail Setting
Popup & Social Proof
Checkout Cart Setting
Website Header Setting
Additonal Charges Setting
Notification Setting
e-Commerce Process (Add to Cart Flow)
Plugins
Activate Plugin
Marketplace Synchronization
Tiktok Sync
Lazada Sync
Shopee Sync
Affiliate Marketing & Referral
Membership & Loyalty Program
Checkout & Payment Link
Quotation Pro
Sales Landing Page
Whatsapp Cart & Chat
Product Comparison
Social Media Synchronization
Facebook My Chatbot
Booking System
BusinessTag
Warranty System
E-Invoice Customer Profile
PDF Encryptor
Background Removal
NEWPAGES Official API
Mantap
FREE MANTAP
NEWPAGES Apps Management
WhatsApp Broadcaster
CRM System
Webmail
Setup Signature
Delete Email
Reset Password
Adjust Spam Score
Set Autoresponders In Webmail
Spam Expert - Domain Level
Dashboard
Incoming
Logs
Delivery Issue Log
Spam Quarantine
Domain Statistics
Train Messages
Incoming - Protection Settings
Recipient Allow List
Recipient Block List
Sender Allow List
Sender Block List
Allow List Filtering Rules
Block List Filtering Rules
Customise Actions
Filter Settings
Attachments Restrictions
Email Size Restrictions
Continuity
Delivery Queue - Incoming
Compose Email
My Settings
Domain
Admin Email System
Knowledge Tips
Email Issues
Demonstration
Progressive Web App Ready (PWA)
Connect Our AI Customer Service with WhatsApp Business
February 25, 2025Section 1: Things to Note Before You Start
- We recommend using a new phone number to connect.
- If you use an existing number, your old chat history will be cleared.
- Make sure the new phone number not registered at phone Whatsapp or whatsapp business App
- Once the phone number connected to AI customer service, you unable to use phone to login the number.
Section 2: Steps to Connect AI Customer Service with Whatsapp Business
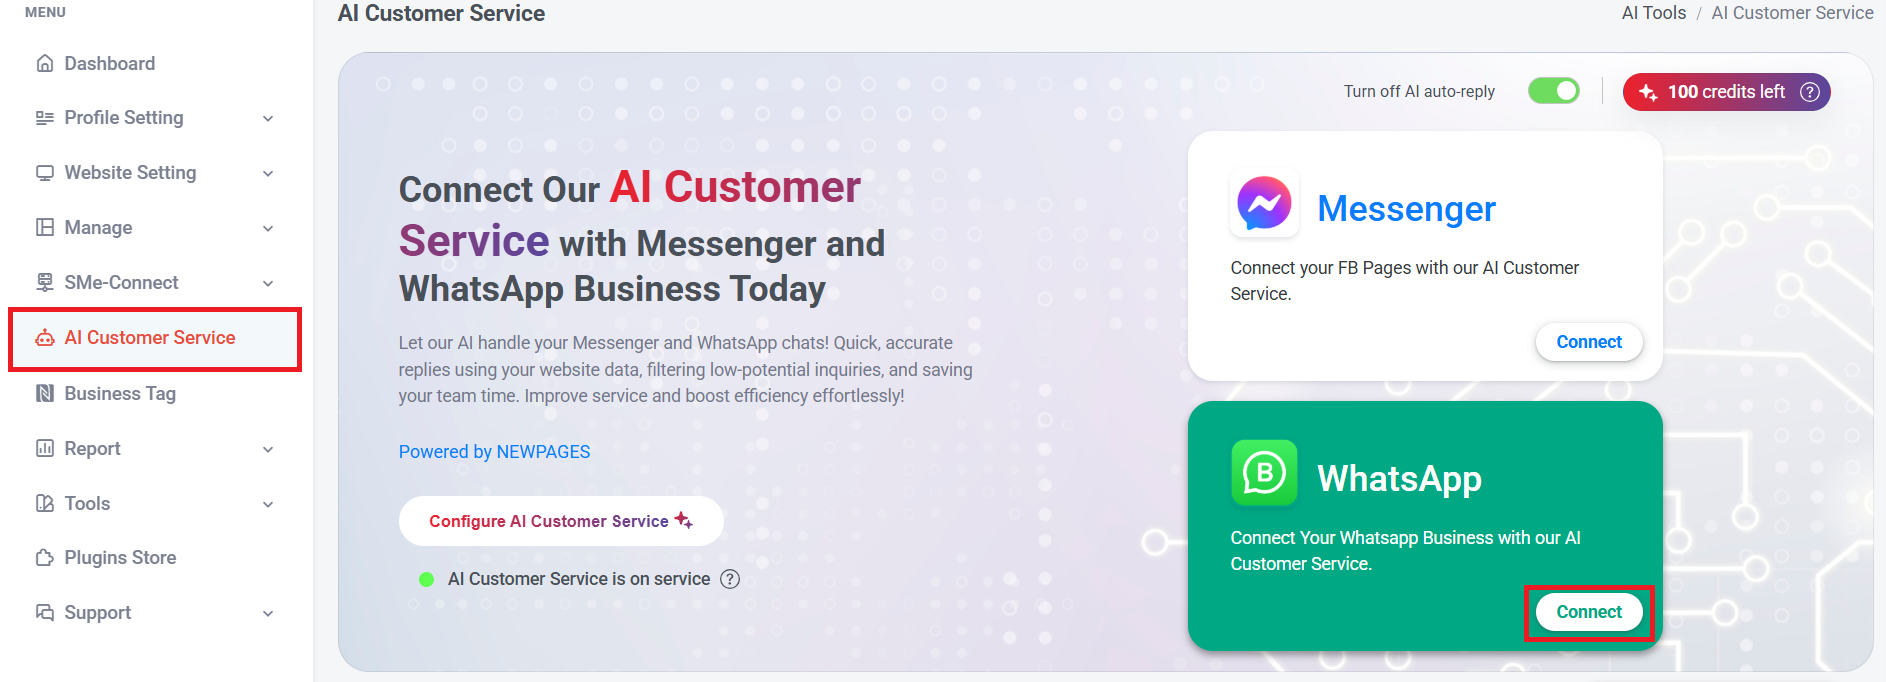
Step 1: Log in NMS system > Go to NMS side menu > Click AI Customer Service
Step 2: Click "Connect"
Step 2: Click "Connect"
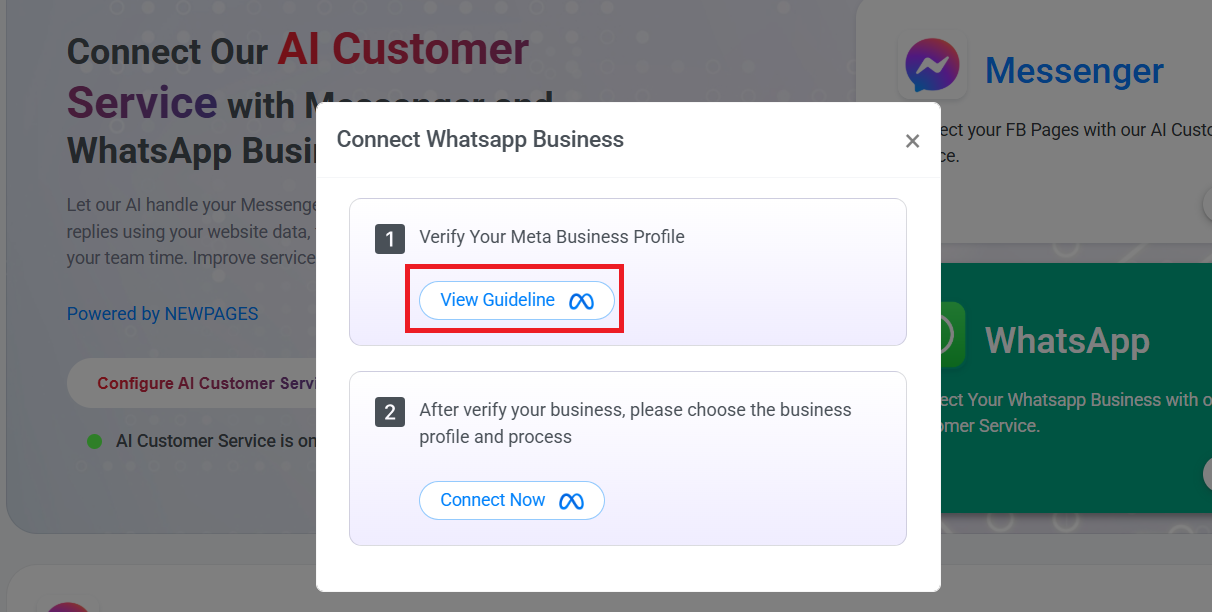
Step 3: Click "View Guideline" , follow the steps to verify your meta business profile.
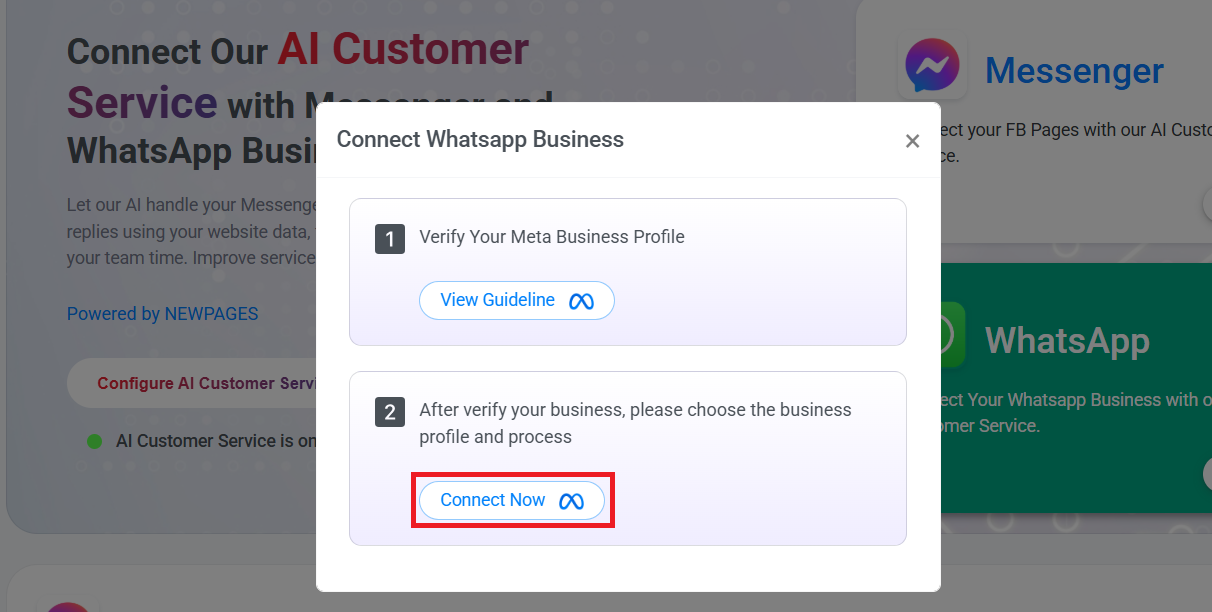
Step 4: After you done verify your business, back to NMS system > Click "Connect Now".
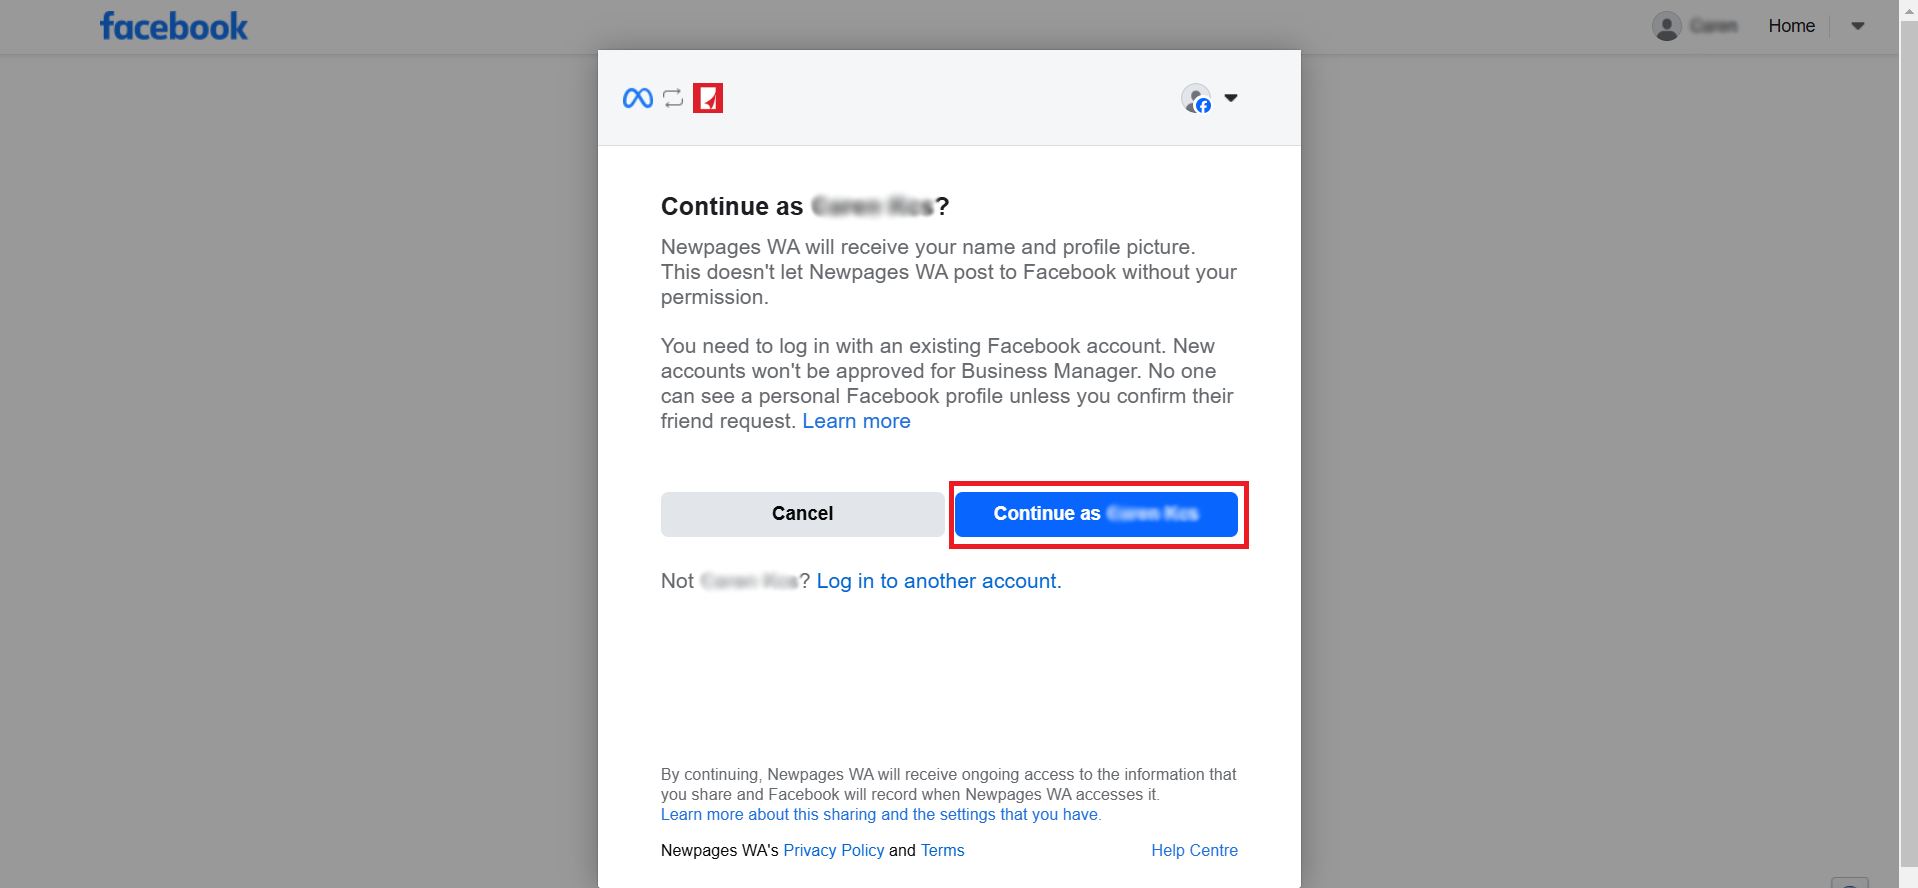
Step 5: Click "Continue as xxx"
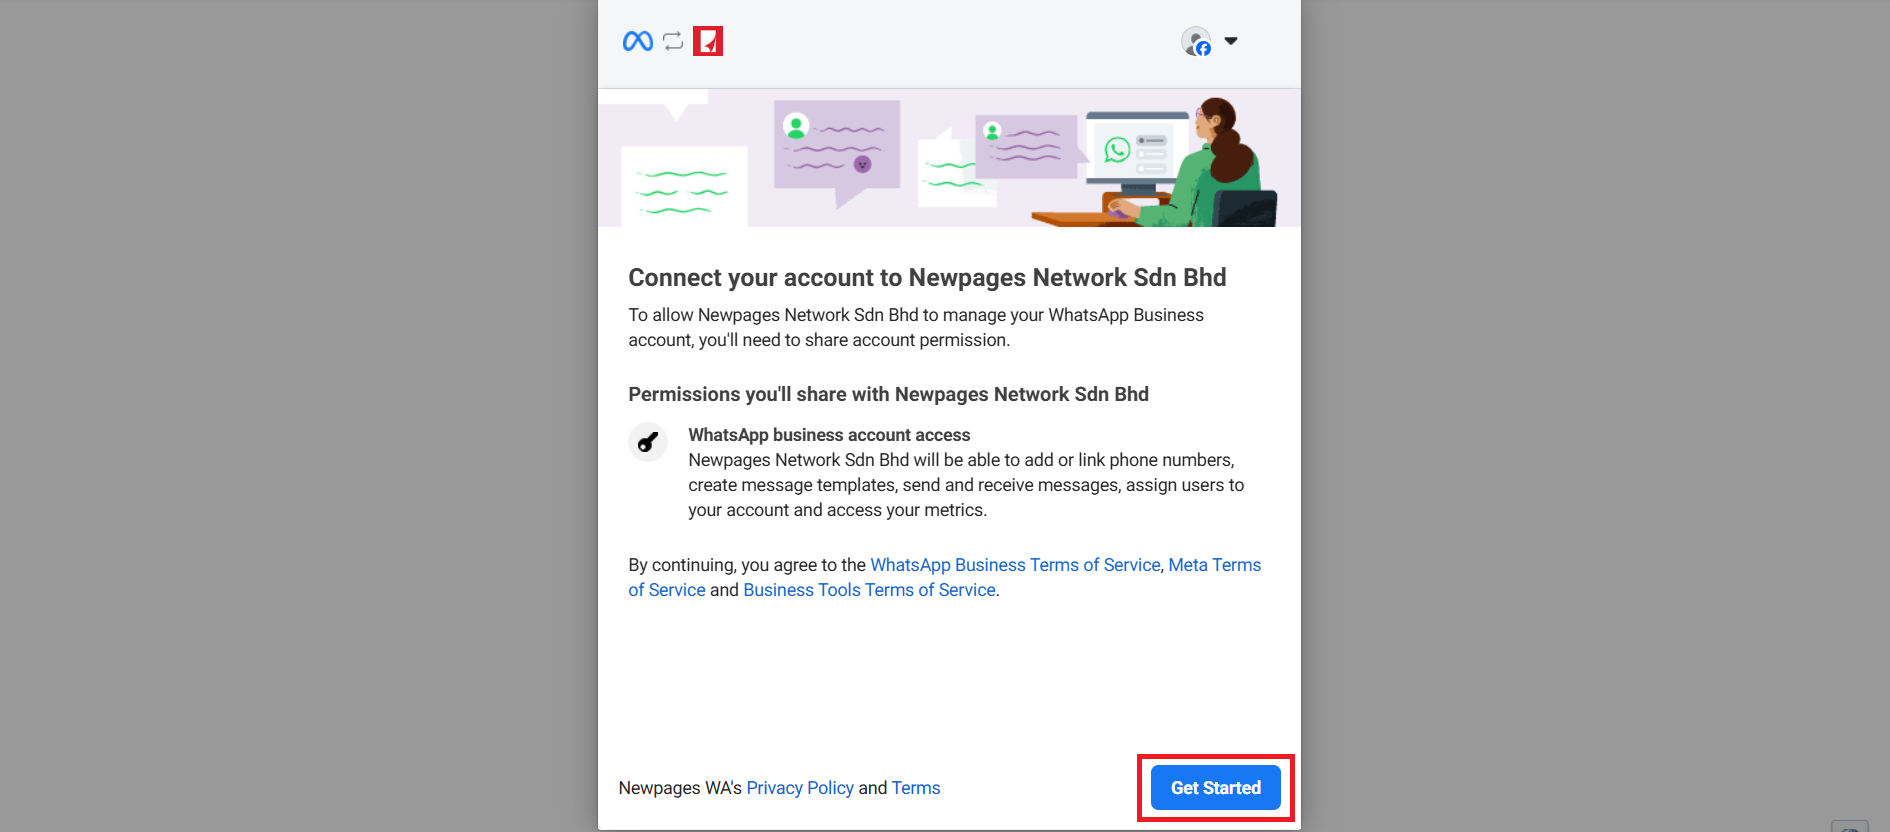
Step 6: Click "Get Started"
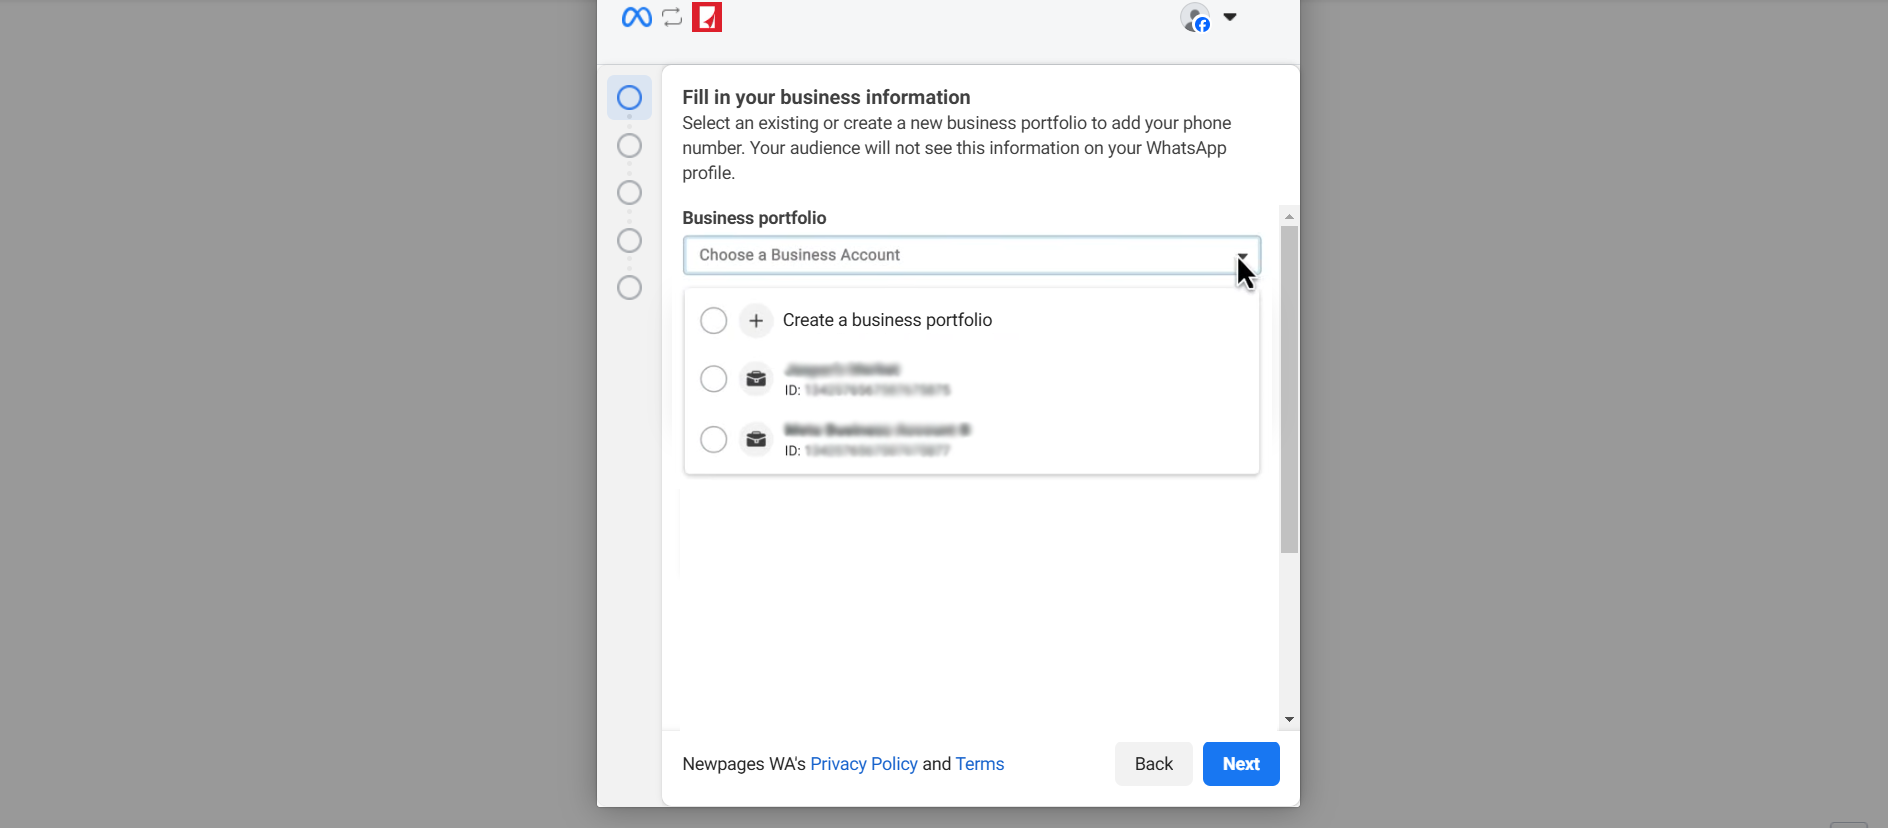
Step 7: Create or select a Facebook business account
If you already have a business account and are the admin, you can select any business account and click "Next".
If you don't have a business account, click "Create a business portfolio" to create one.
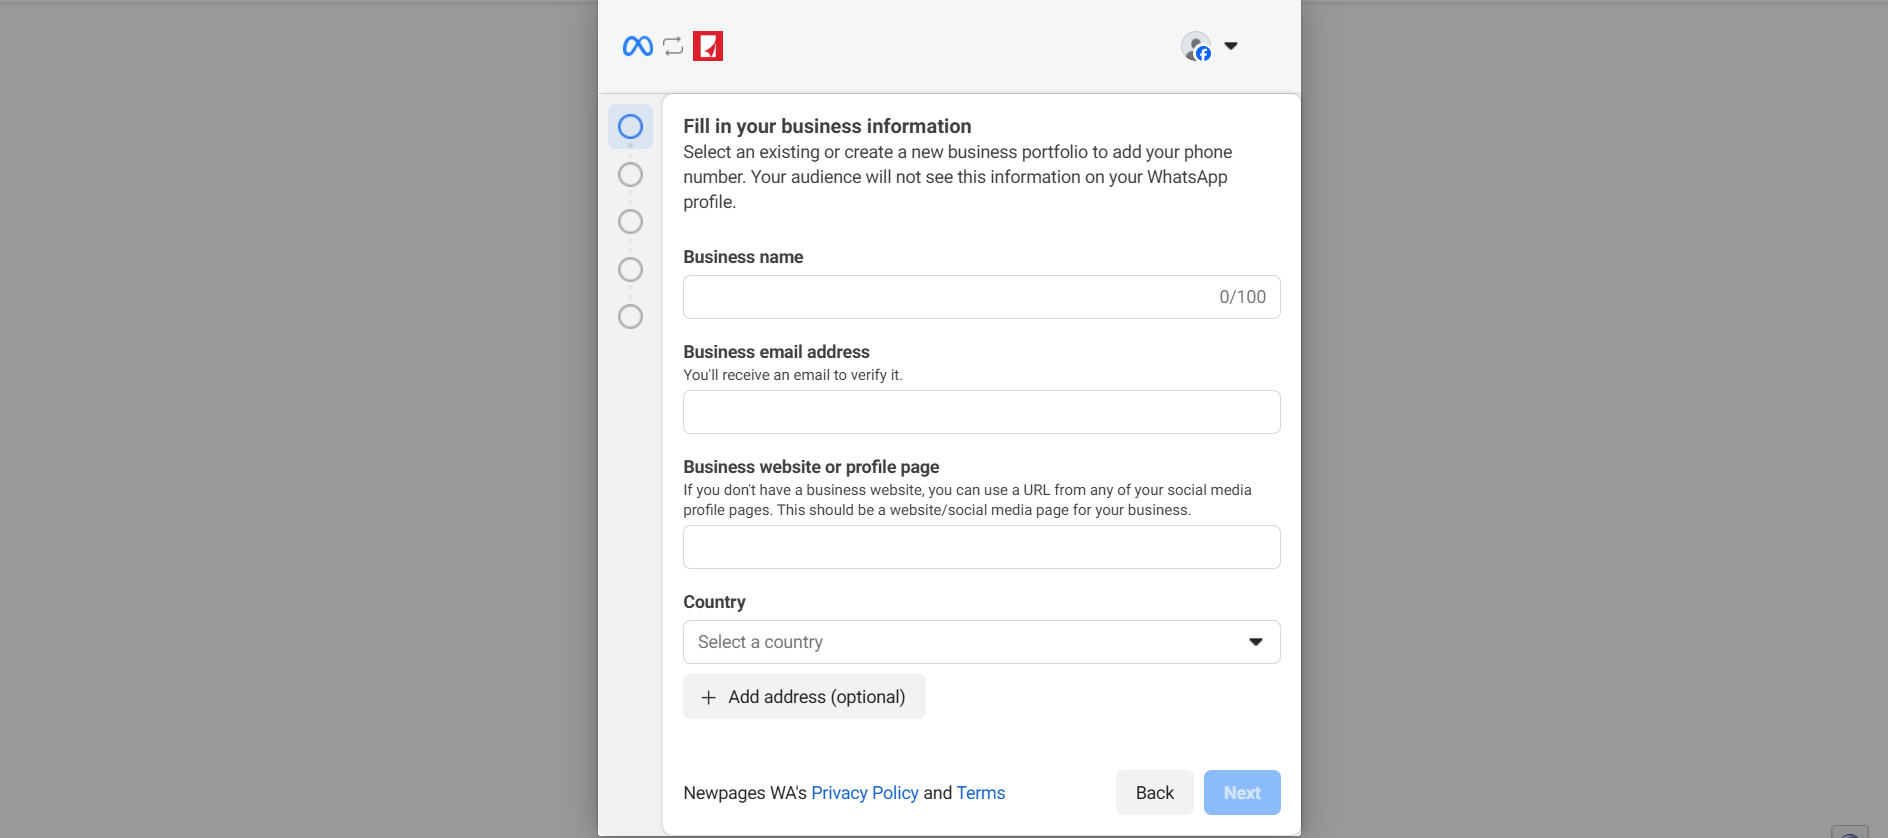
Fill in your business information (business name, business email address, website URL, country). Once done, click "Next"
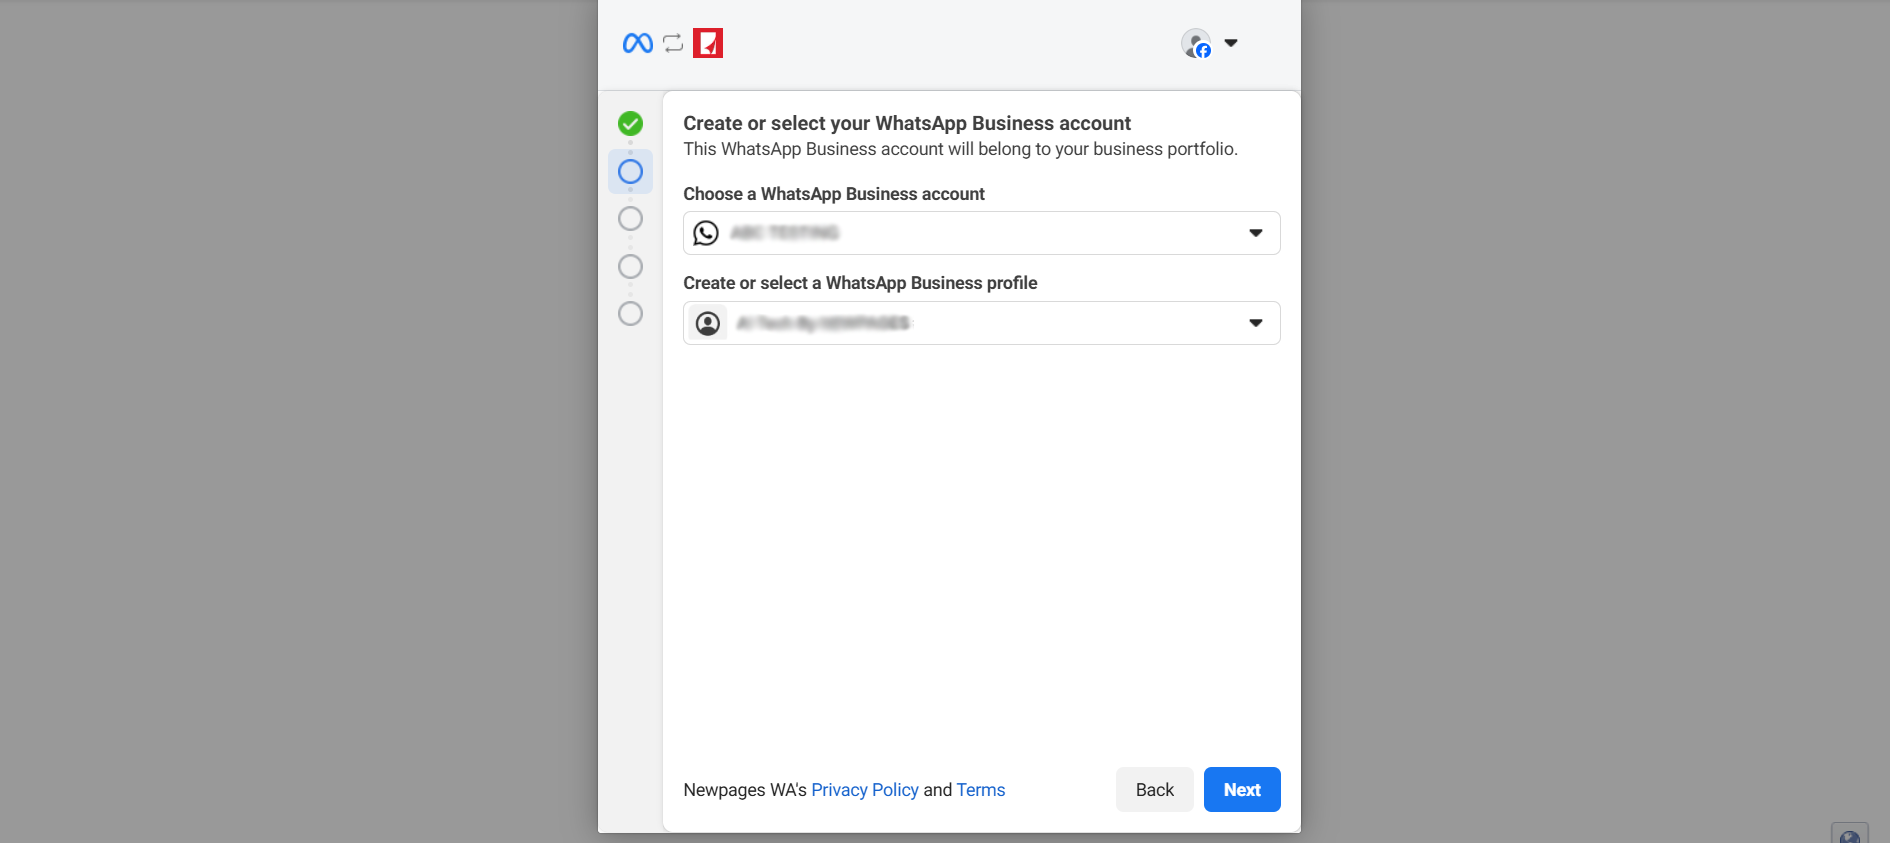
Step 8: Create or select a WhatsApp Business Account
If the business already has a WhatsApp Business Account, the business information will appear automatically. You can select your business account and click 'Next' to continue.
If the business already has a WhatsApp Business Account, the business information will appear automatically. You can select your business account and click 'Next' to continue.
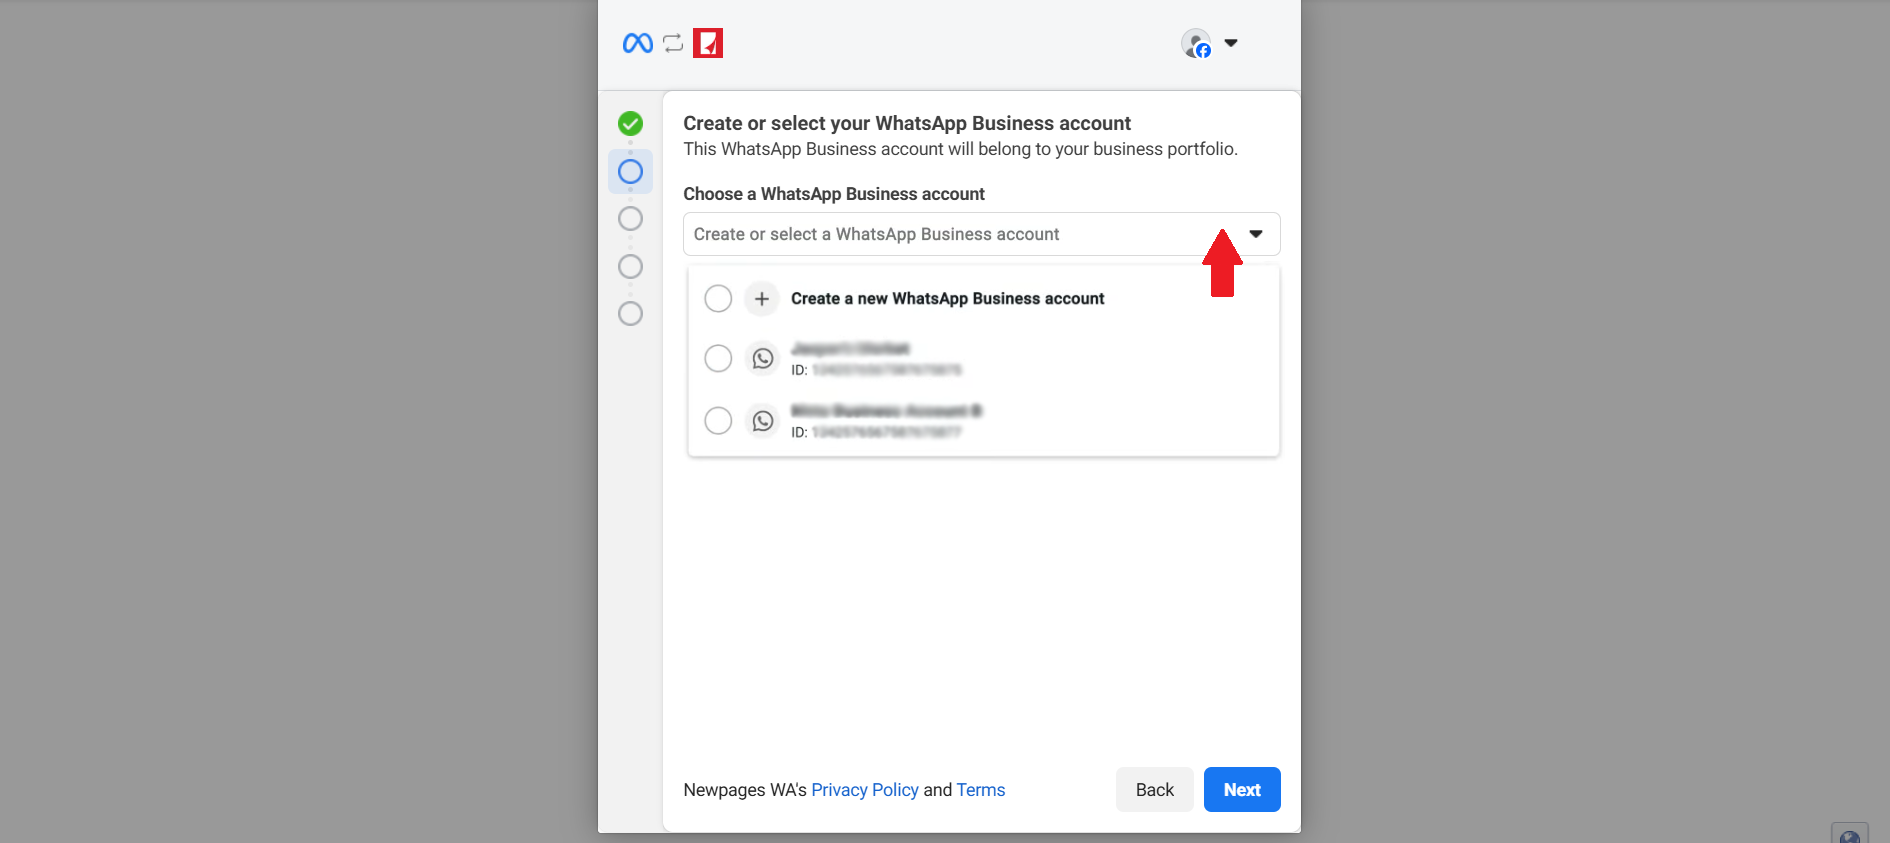
If you don't have a business account, you can click "Create a new Whatsapp Business Account" to create one.
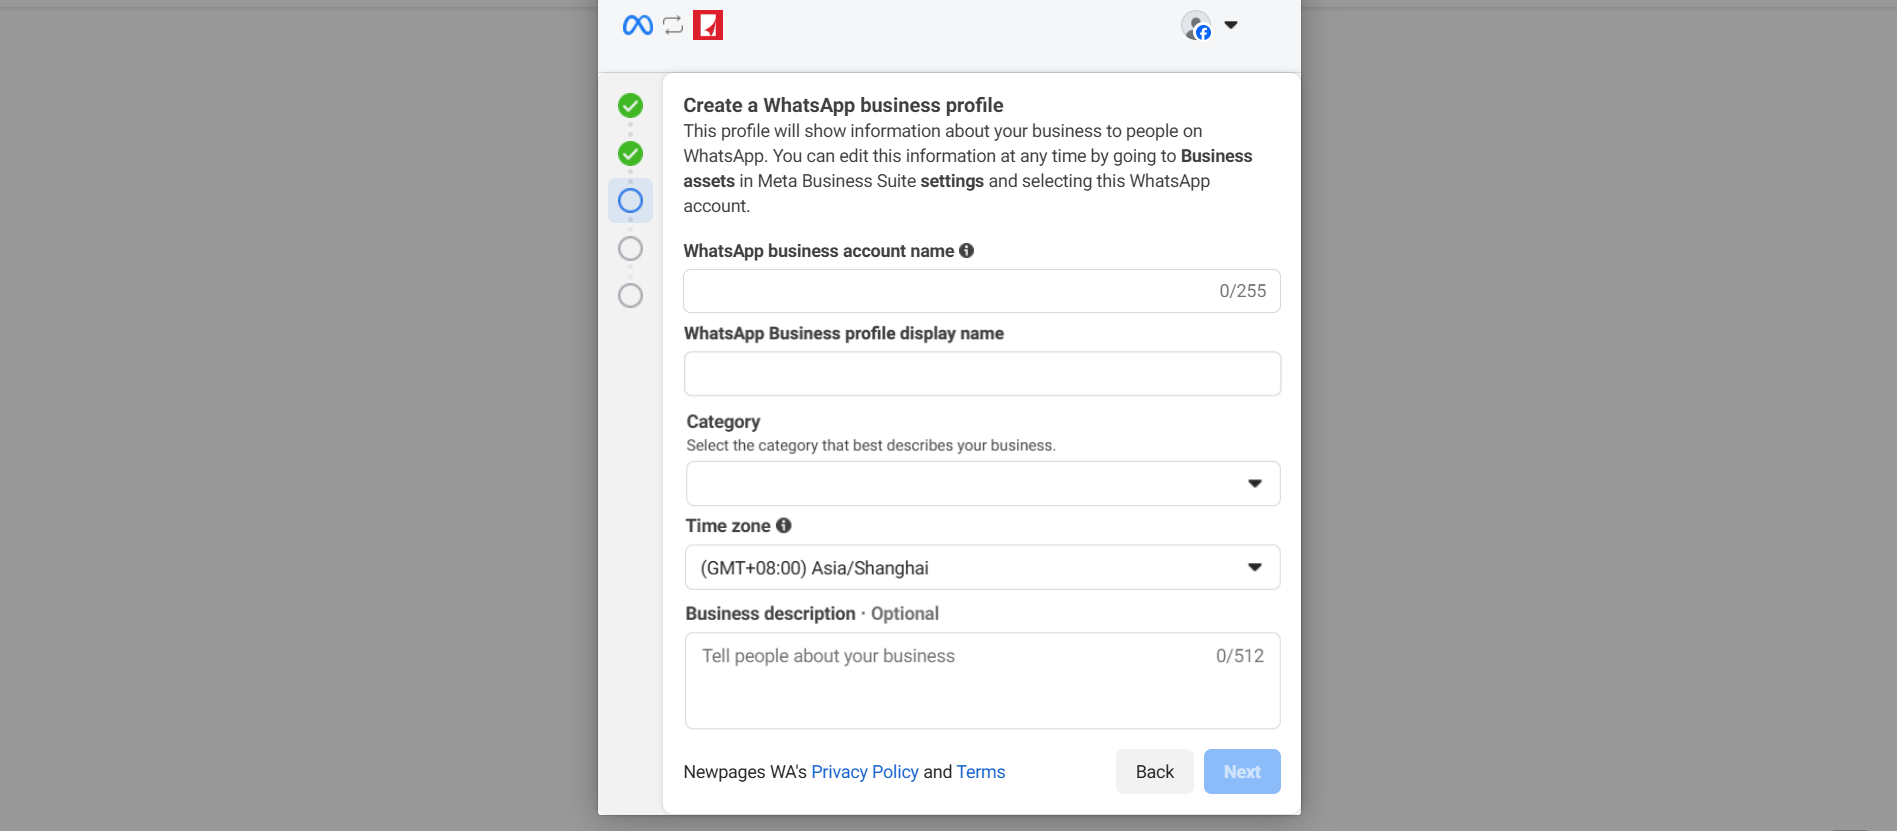
Fill in the WhatsApp Business account name, WhatsApp Business profile display name, choose a category, set the time zone, add a business description (optional), and enter the website URL. Once done, click 'Next'.
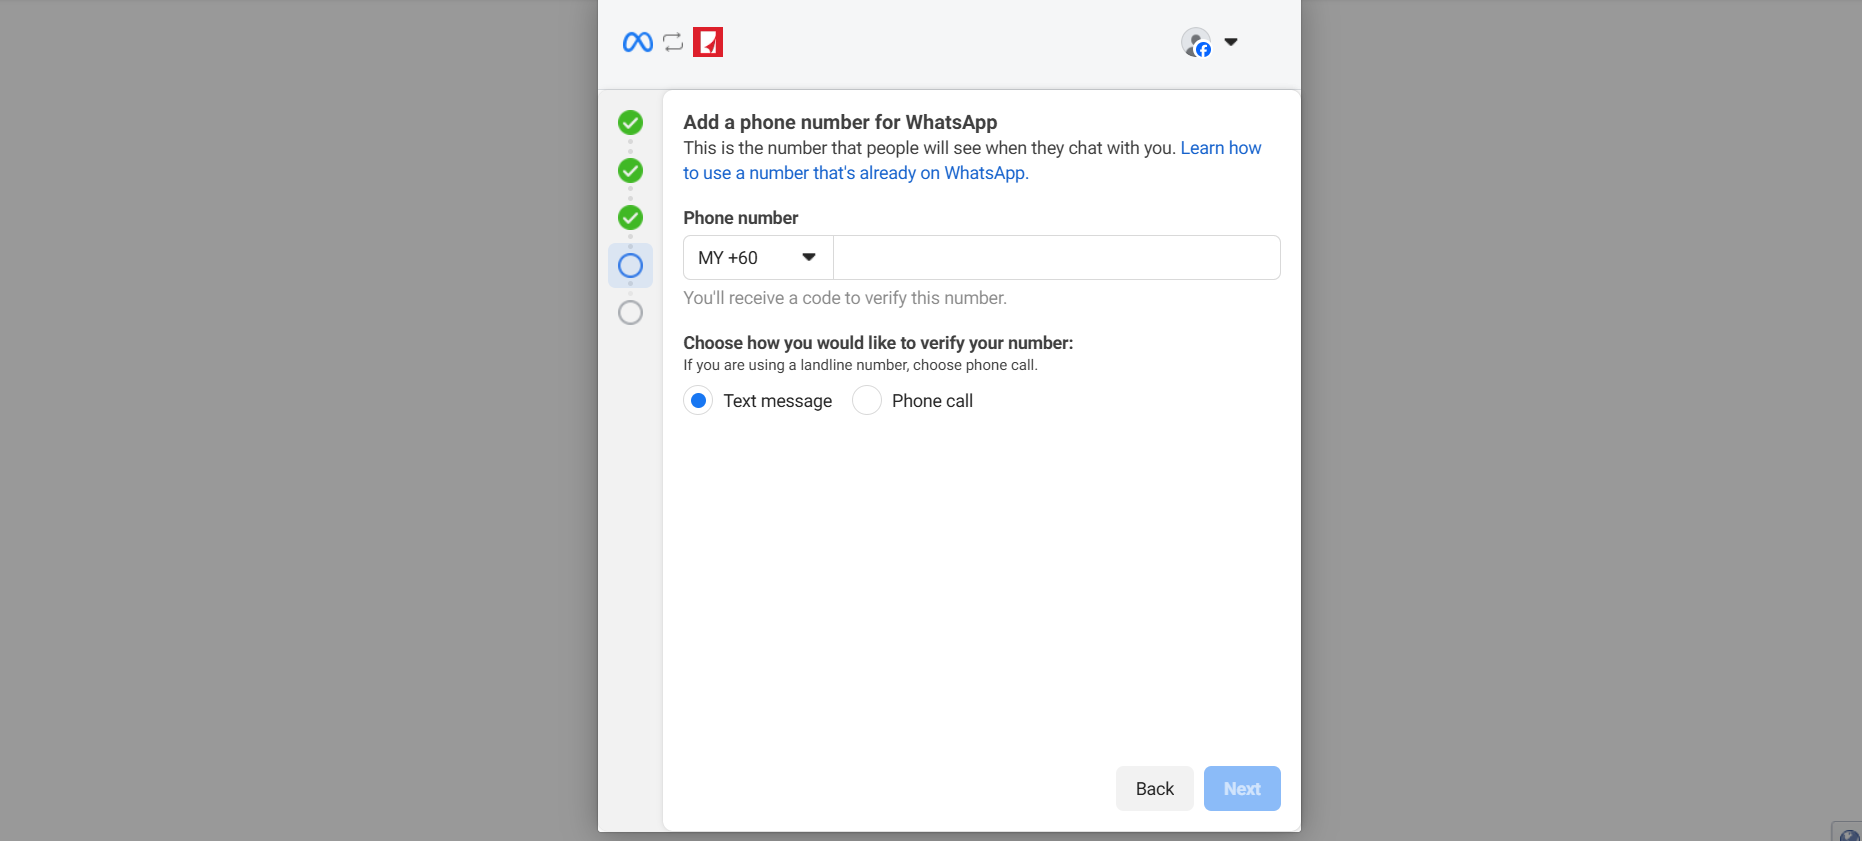
Step 9: Fill in the phone number, choose how to verify your number (text message or phone call), and click "Next" once done.
You will then receive a code to verify the number.
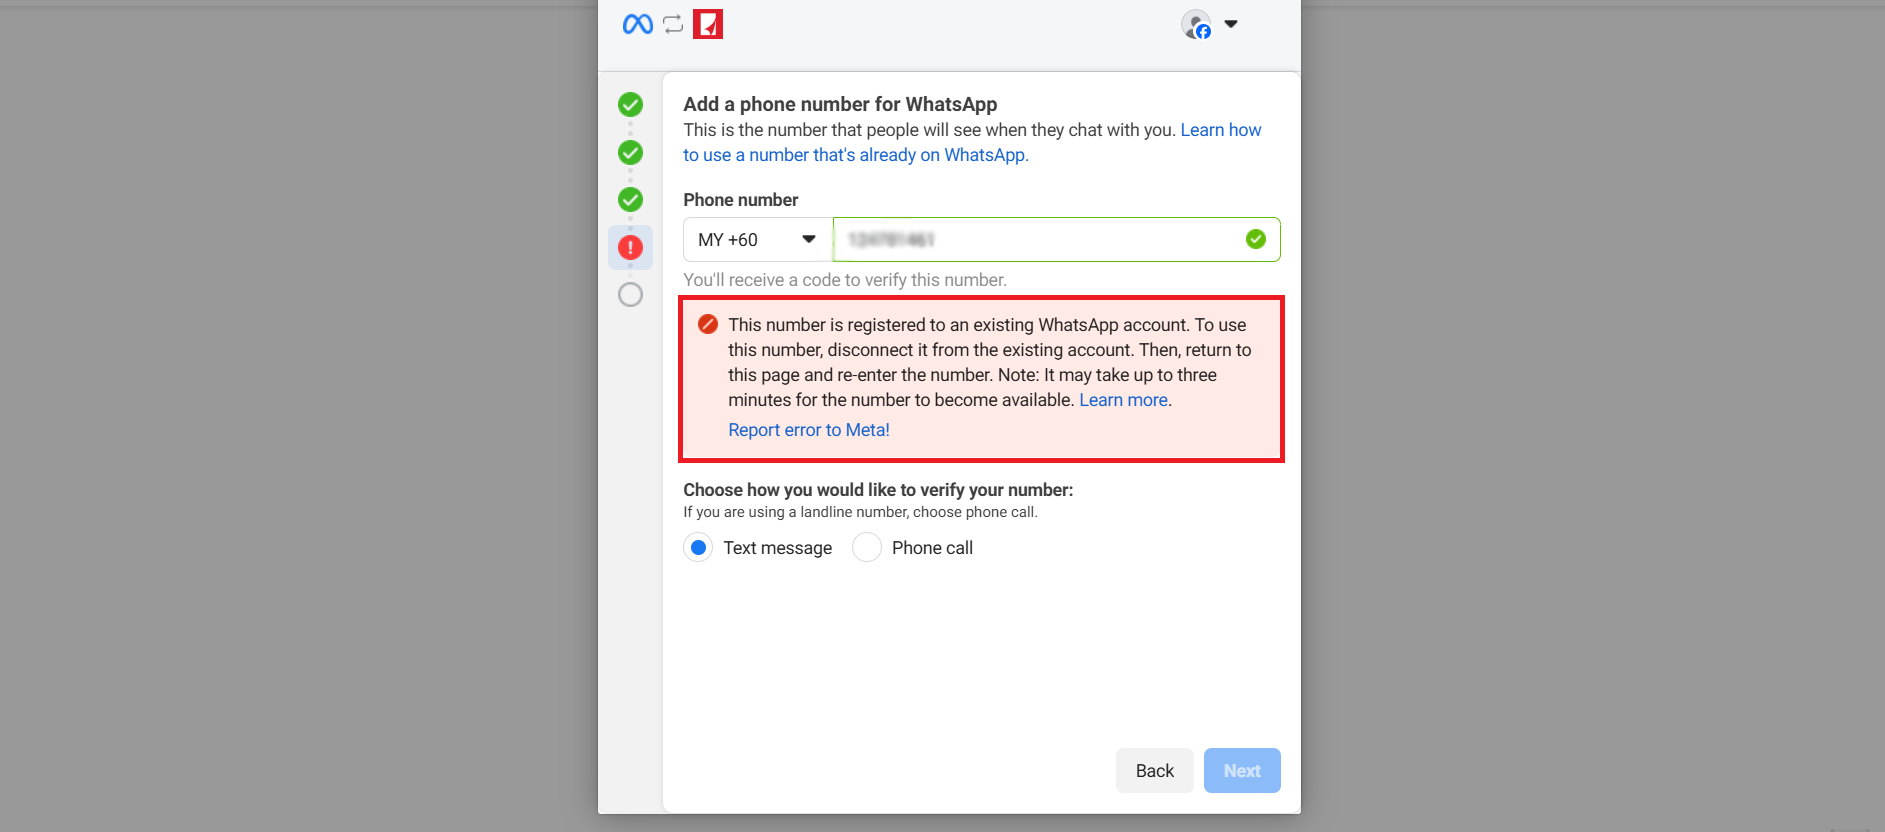
If the phone number you enter in Step 9 is registered to an existing WhatsApp number, this notice will appear.
We recommend using a new phone number to connect. If you use an existing number, your old chat history will be cleared, and you won't be able to use the phone to log in to the connected WhatsApp number.
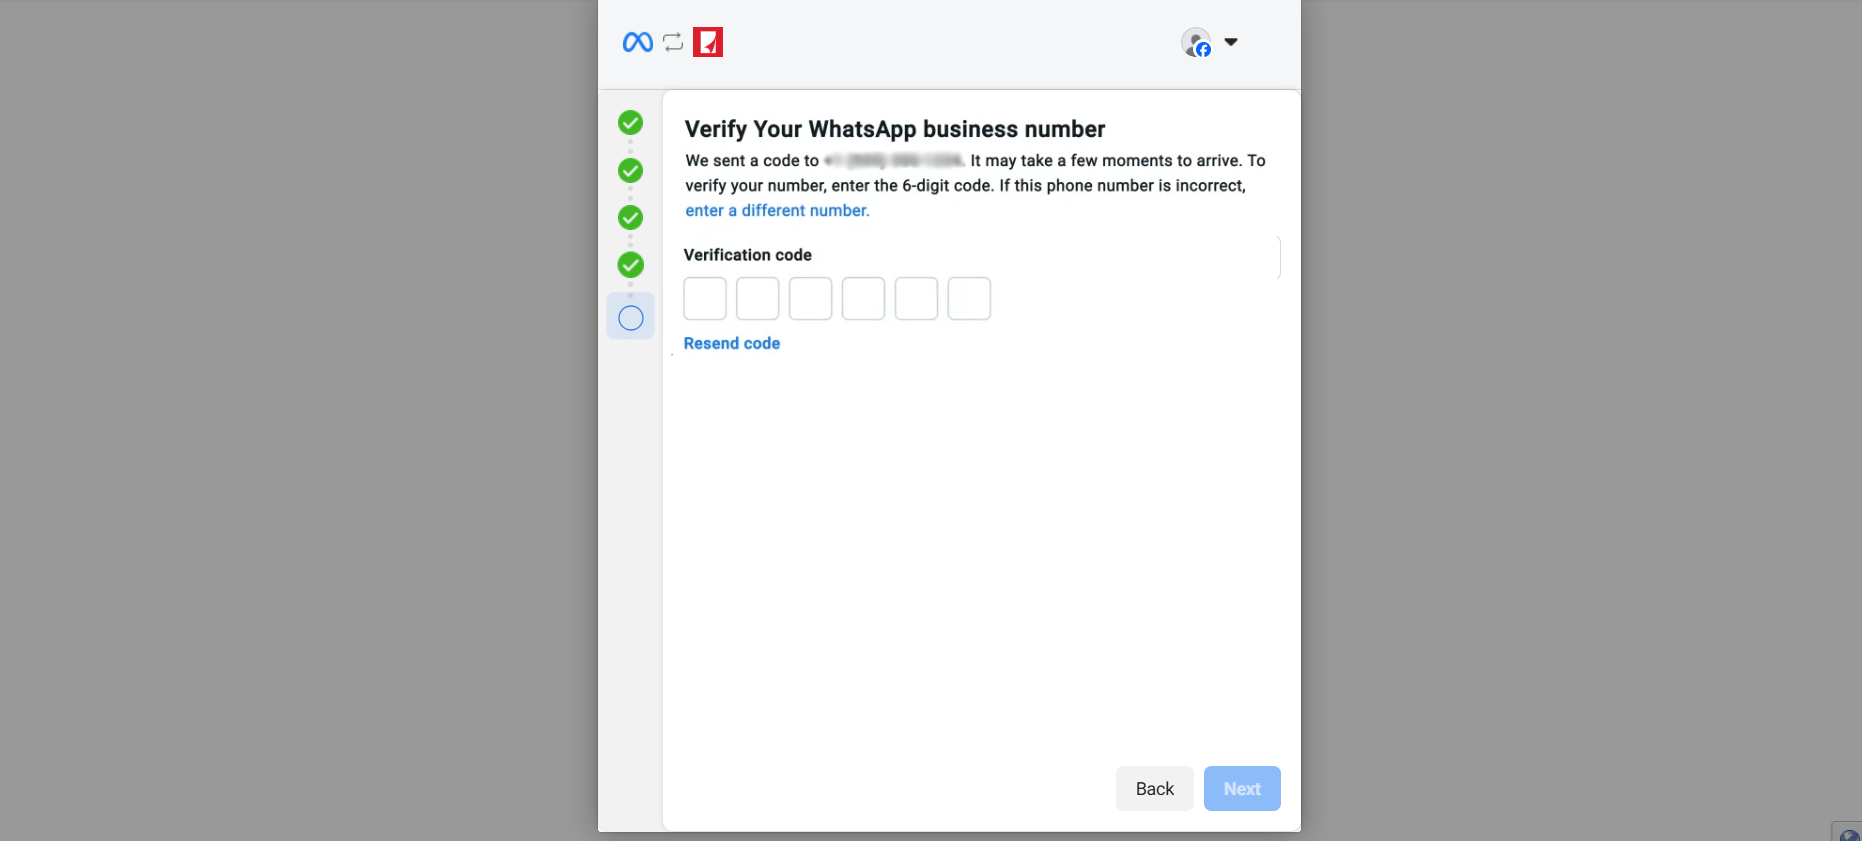
Step 10: Once you receive the code, enter the verification code and click "Next"
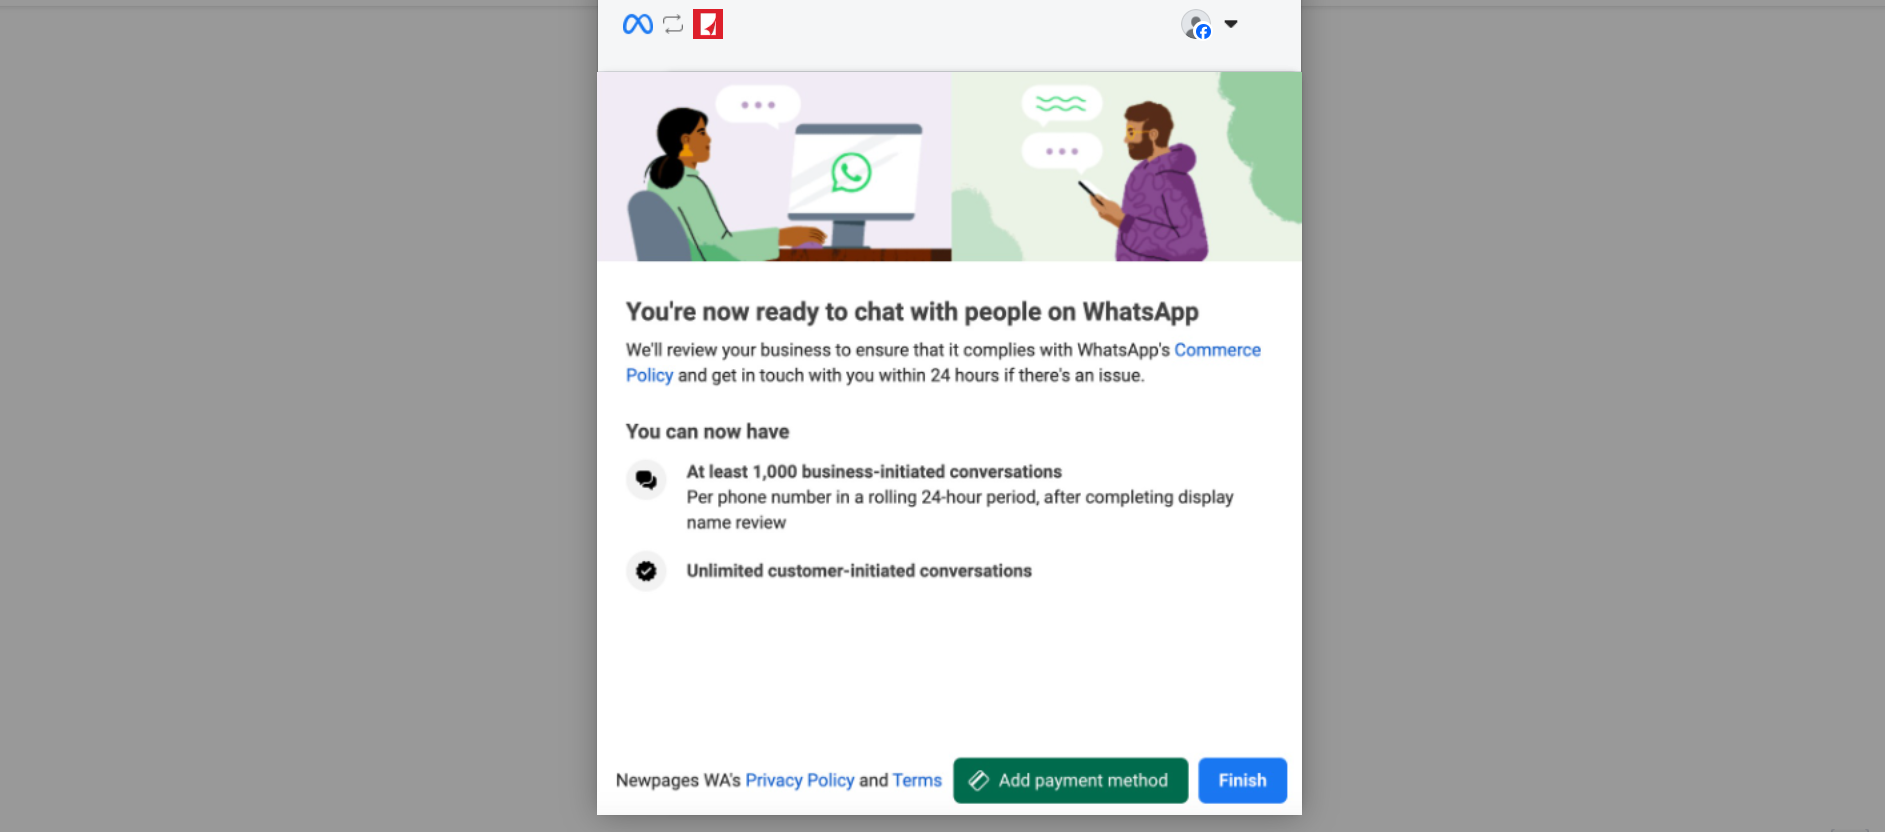
Step 11: Click "Finish"
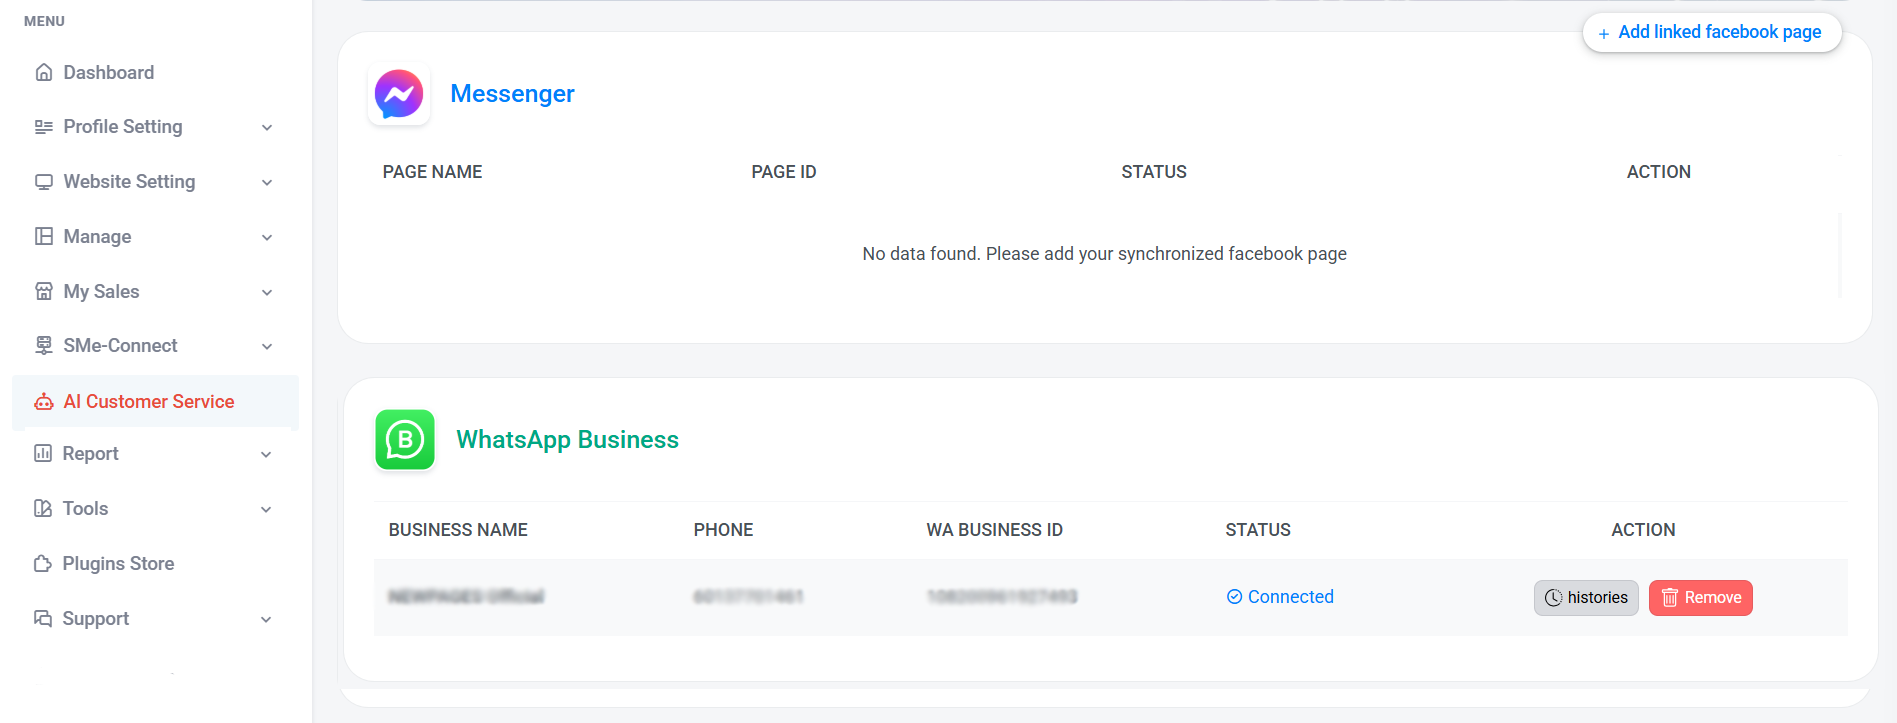
Once connected, it will display the business name, phone number, WhatsApp Business ID, and status.
Click 'Histories' to view the conversation history or reply manually. (tutorial)
Click 'Remove' to unlink the WhatsApp Business account.