Email Setup
Desktop
Thundebird
Outlook
Mobile
Android
Iphone
AI Features
AI Product Tools
AI Customer Service
AI Handbook
AI Positioning
AI Suggestion
Website Management
Login NEWPAGES Merchant System (NMS)
NMS Switch Language
Manage Products
Manage Service
Manage Photoalbum
Manage News / Promotion
Manage Ratings & Reviews
Manage Google Reviews
NMS Merchant App
Profile Setting
Support
Update Form
Report
NP Merchant Points
NMS Credit
Content Generator
Manage Others (Gallery)
Account Setting
Website Setting
Manage Download
Manage Career
Manage Testimonials
Manage YouTube
SEO Guide
SEO Knowledge Tips
On-page Optimization
e-Commerce (My Sales)
Dashboard
Order Management
Invoice
Shipping
Delivery List
Packaging & Picklist
Self Pick Up Setting
Shipping Setting
No available shipping method
Easyparcel
Lalamove
Tracking.my
Members
Marketing Tools
Voucher
Birthday Campaign
Discount Campaign
Add-on Deals
Mix & Match
Purchase Link
Broadcast Management
Product Sold & Customer Report
Ecommerce Mail Setting
Popup & Social Proof
Checkout Cart Setting
Website Header Setting
Additonal Charges Setting
Notification Setting
e-Commerce Process (Add to Cart Flow)
Plugins
Activate Plugin
Marketplace Synchronization
Tiktok Sync
Lazada Sync
Shopee Sync
Affiliate Marketing & Referral
Membership & Loyalty Program
Checkout & Payment Link
Quotation Pro
Sales Landing Page
Whatsapp Cart & Chat
Product Comparison
Social Media Synchronization
Facebook My Chatbot
Booking System
BusinessTag
E-Invoice Customer Profile
PDF Encryptor
Background Removal
Warranty System
Facebook Live
NEWPAGES Apps Management
CRM System
Knowledge Tips
Email Issues
NEWPAGES Official API
Mantap
Domain
Admin Email System
Webmail
Reset Password
Adjust Spam Score
Delete Email
Set Autoresponders In Webmail
Facebook
Facebook Pixel
Demonstration
Progressive Web App Ready (PWA)
Spam Expert - Domain Level
Dashboard
Incoming
Logs
Delivery Issue Log
Spam Quarantine
Domain Statistics
Train Messages
Incoming - Protection Settings
Recipient Allow List
Recipient Block List
Sender Allow List
Sender Block List
Allow List Filtering Rules
Block List Filtering Rules
Customise Actions
Filter Settings
Attachments Restrictions
Email Size Restrictions
Continuity
Delivery Queue - Incoming
Compose Email
My Settings
Select Categories
Email Setup
Desktop
Thundebird
Outlook
Mobile
Android
Iphone
AI Features
AI Product Tools
AI Customer Service
AI Handbook
AI Positioning
AI Suggestion
Website Management
Login NEWPAGES Merchant System (NMS)
NMS Switch Language
Manage Products
Manage Service
Manage Photoalbum
Manage News / Promotion
Manage Ratings & Reviews
Manage Google Reviews
NMS Merchant App
Profile Setting
Support
Update Form
Report
NP Merchant Points
NMS Credit
Content Generator
Manage Others (Gallery)
Account Setting
Website Setting
Manage Download
Manage Career
Manage Testimonials
Manage YouTube
SEO Guide
SEO Knowledge Tips
On-page Optimization
e-Commerce (My Sales)
Dashboard
Order Management
Invoice
Shipping
Delivery List
Packaging & Picklist
Self Pick Up Setting
Shipping Setting
No available shipping method
Easyparcel
Lalamove
Tracking.my
Members
Marketing Tools
Voucher
Birthday Campaign
Discount Campaign
Add-on Deals
Mix & Match
Purchase Link
Broadcast Management
Product Sold & Customer Report
Ecommerce Mail Setting
Popup & Social Proof
Checkout Cart Setting
Website Header Setting
Additonal Charges Setting
Notification Setting
e-Commerce Process (Add to Cart Flow)
Plugins
Activate Plugin
Marketplace Synchronization
Tiktok Sync
Lazada Sync
Shopee Sync
Affiliate Marketing & Referral
Membership & Loyalty Program
Checkout & Payment Link
Quotation Pro
Sales Landing Page
Whatsapp Cart & Chat
Product Comparison
Social Media Synchronization
Facebook My Chatbot
Booking System
BusinessTag
E-Invoice Customer Profile
PDF Encryptor
Background Removal
Warranty System
Facebook Live
NEWPAGES Apps Management
CRM System
Knowledge Tips
Email Issues
NEWPAGES Official API
Mantap
Domain
Admin Email System
Webmail
Reset Password
Adjust Spam Score
Delete Email
Set Autoresponders In Webmail
Facebook
Facebook Pixel
Demonstration
Progressive Web App Ready (PWA)
Spam Expert - Domain Level
Dashboard
Incoming
Logs
Delivery Issue Log
Spam Quarantine
Domain Statistics
Train Messages
Incoming - Protection Settings
Recipient Allow List
Recipient Block List
Sender Allow List
Sender Block List
Allow List Filtering Rules
Block List Filtering Rules
Customise Actions
Filter Settings
Attachments Restrictions
Email Size Restrictions
Continuity
Delivery Queue - Incoming
Compose Email
My Settings
AI Image Tools
February 7, 2025Section 1: Introduction
AI image tools make it easy to enhance, retouch, and edit product images, from removing backgrounds to improving resolution. With AI-powered automation, you can quickly achieve professional-quality edits, saving time and boosting visual appeal.
Section 2: Things to Note Before You Start
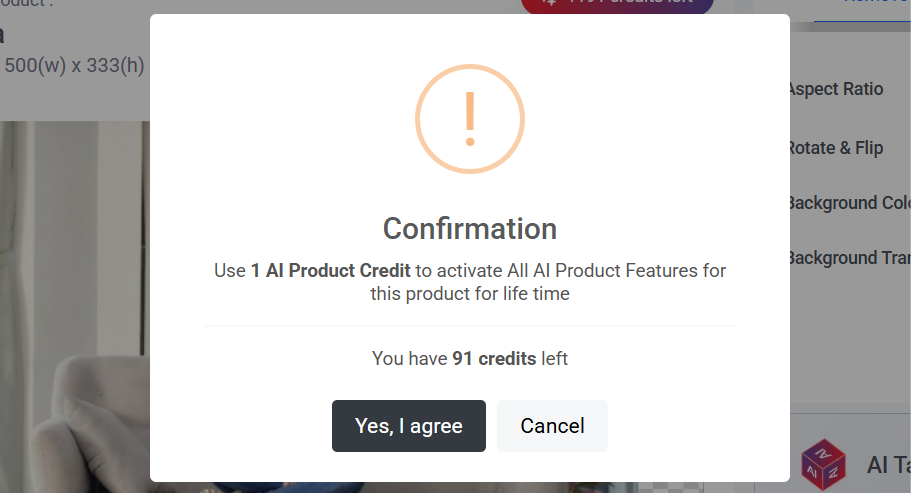
- AI product tools include both AI Image and AI SEO tools.
- Activate 1 AI product costs 1 credit. The number of credits you have depends on your package.
- Once activated, you can use all the AI product tools for life without any additional credit cost.
- Both main and sub image can use AI image tools
- If you delete the AI product, the credit used to activate it will not be returned.
Queue & Slots
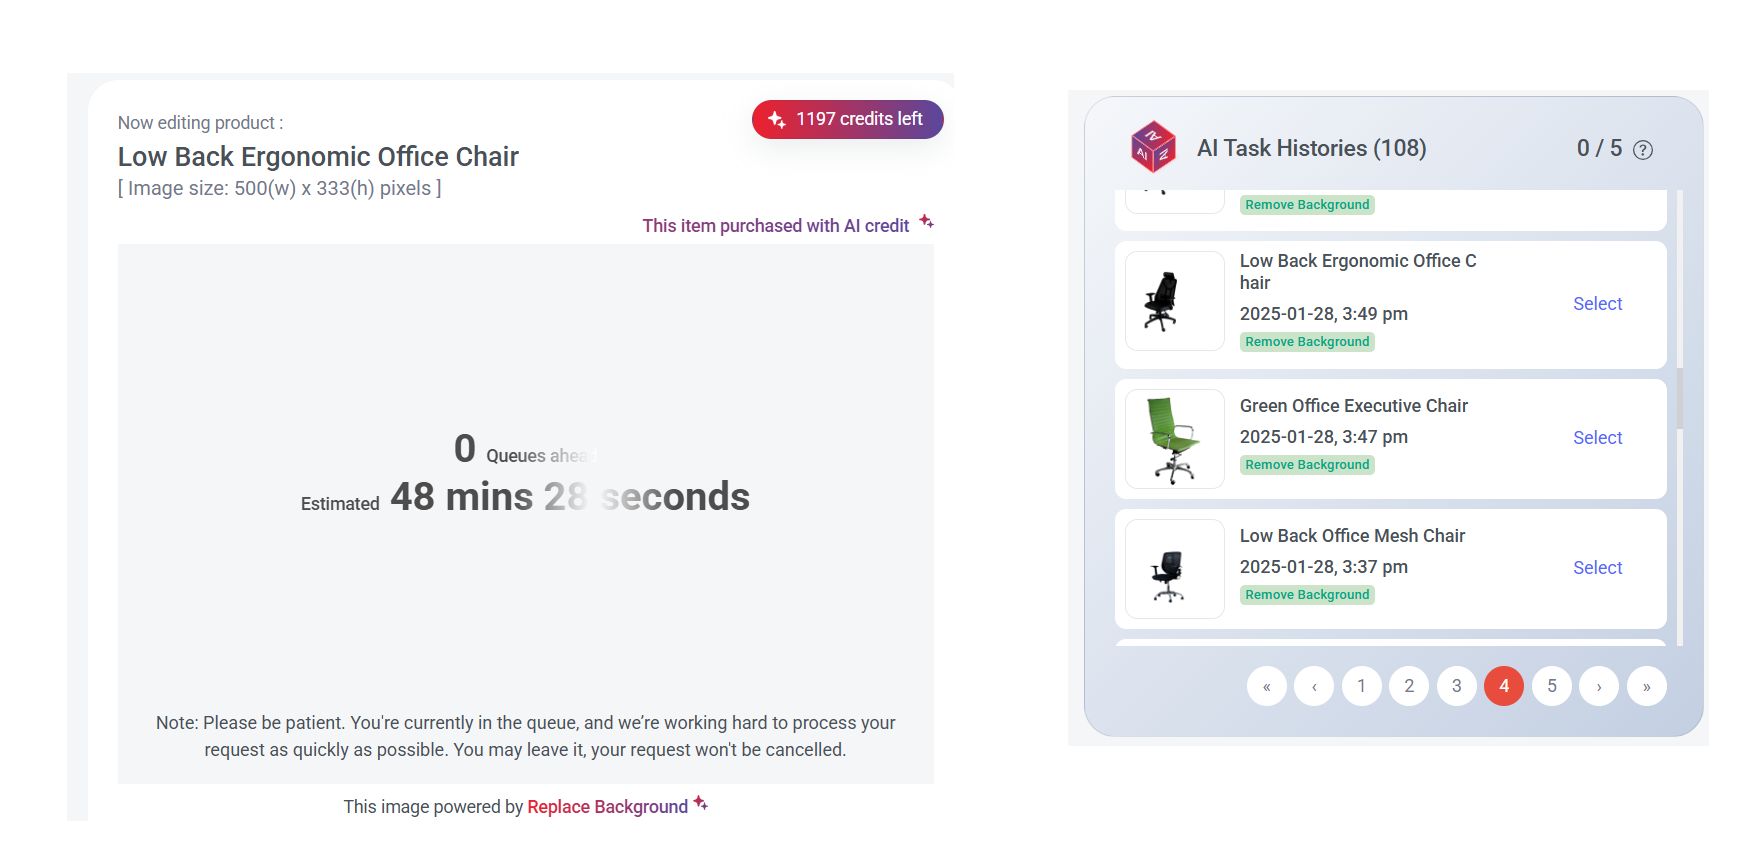
Each task you submit will be placed in a queue. You can have up to 5 tasks (slots) in use at the same time.
All tasks are recorded in the AI Task History, where you can review completed tasks, check progress, view available slots, and select images or results to save or use.
While waiting for the task to be completed, you can leave the page for another product without affecting the progress.
How to identify products that unlock AI-powered features
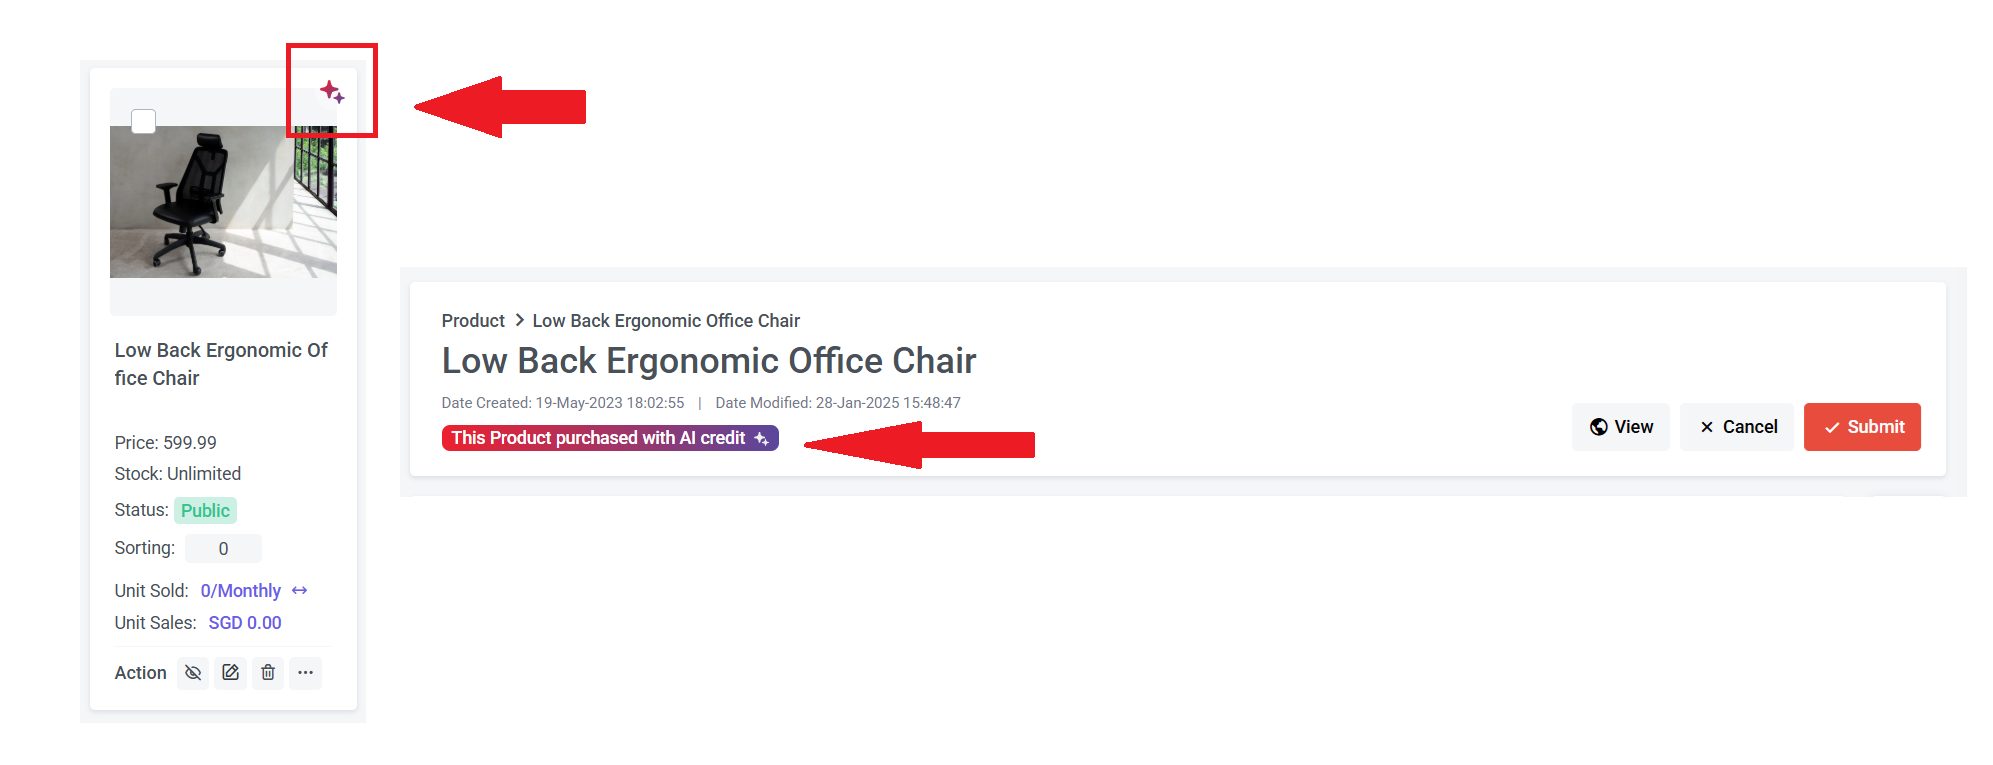
Products with the AI logo and the label 'This Product Purchased with AI Credit' have AI features unlocked. If you don't see these, you can edit the product and use credit to unlock an AI feature.
Section 3: How to Access AI Image Tools
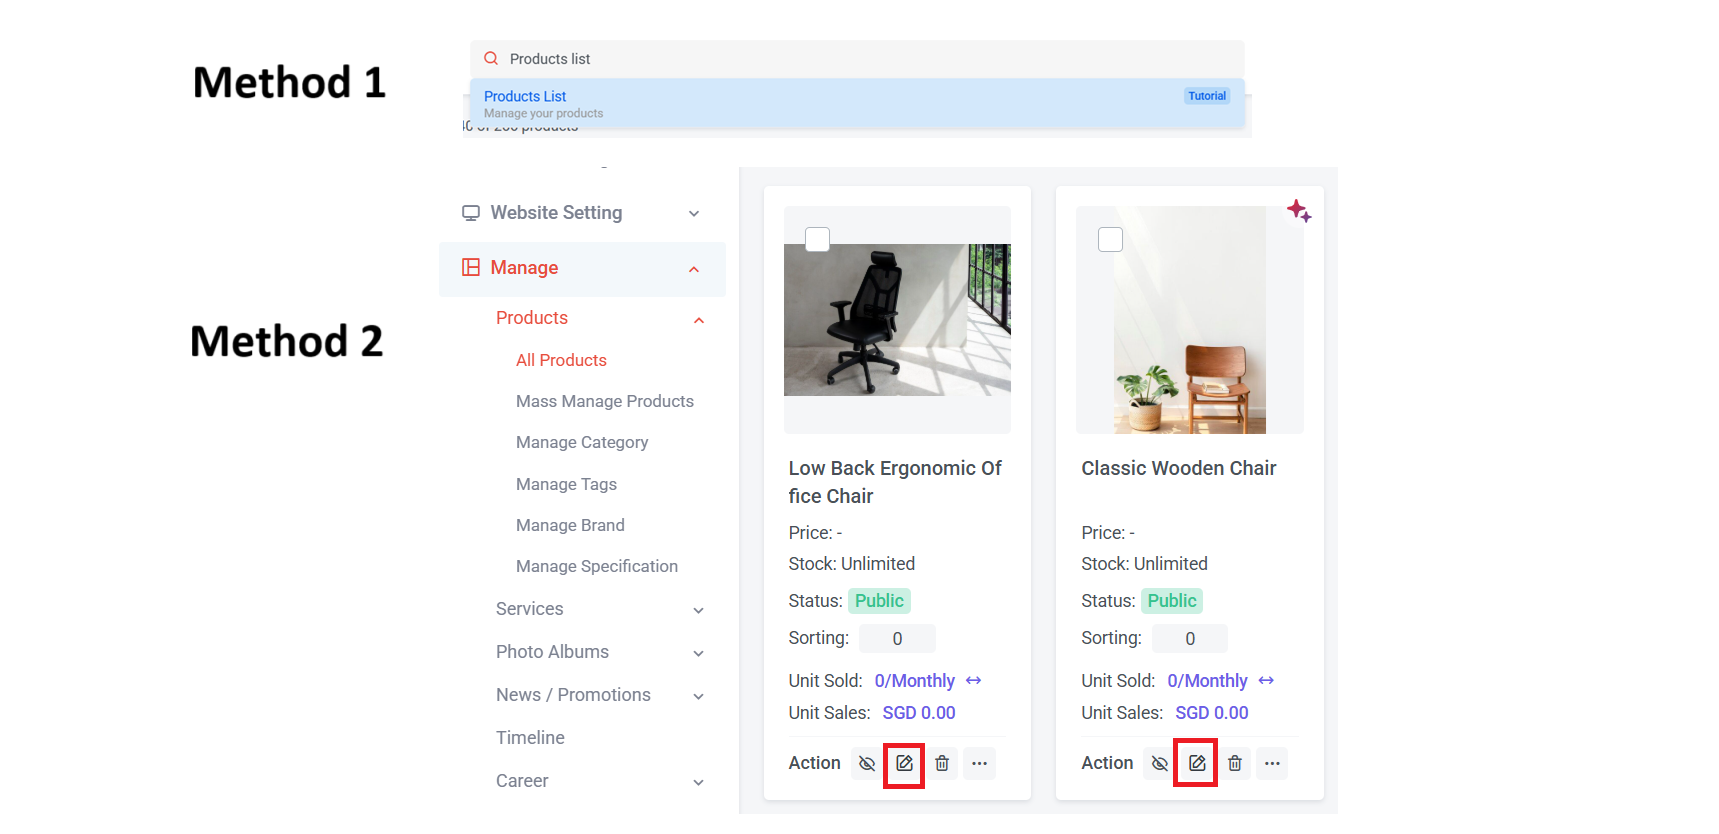
Step 1: Log in NMS backend
Step 2: Access the Product list page. Here are the ways to access it:
Method 1: Search "Product List" in the search menu bar at the top of NMS
Method 2: Go to NMS side menu > Manage > Products > All Products
Step 3: Select the Product that you wish to edit and click
Step 2: Access the Product list page. Here are the ways to access it:
Method 1: Search "Product List" in the search menu bar at the top of NMS
Method 2: Go to NMS side menu > Manage > Products > All Products
Step 3: Select the Product that you wish to edit and click
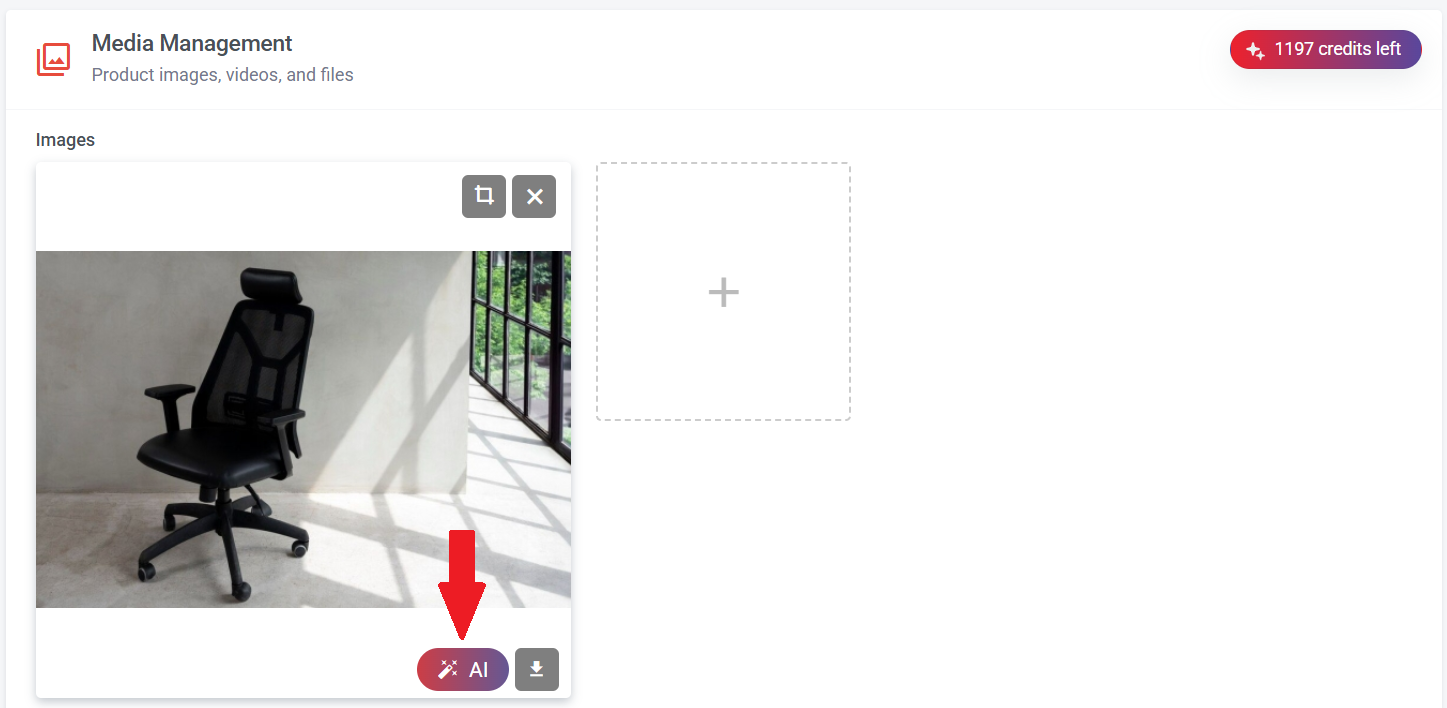
Step 4: Scroll to Images > Click "AI logo" to start
Section 4: AI Remove Background
In this section, you will learn how to adjust the image ratio, rotate and flip images, change the background color, and make the background transparent.
Let's go over the steps to set it up.
Let's go over the steps to set it up.
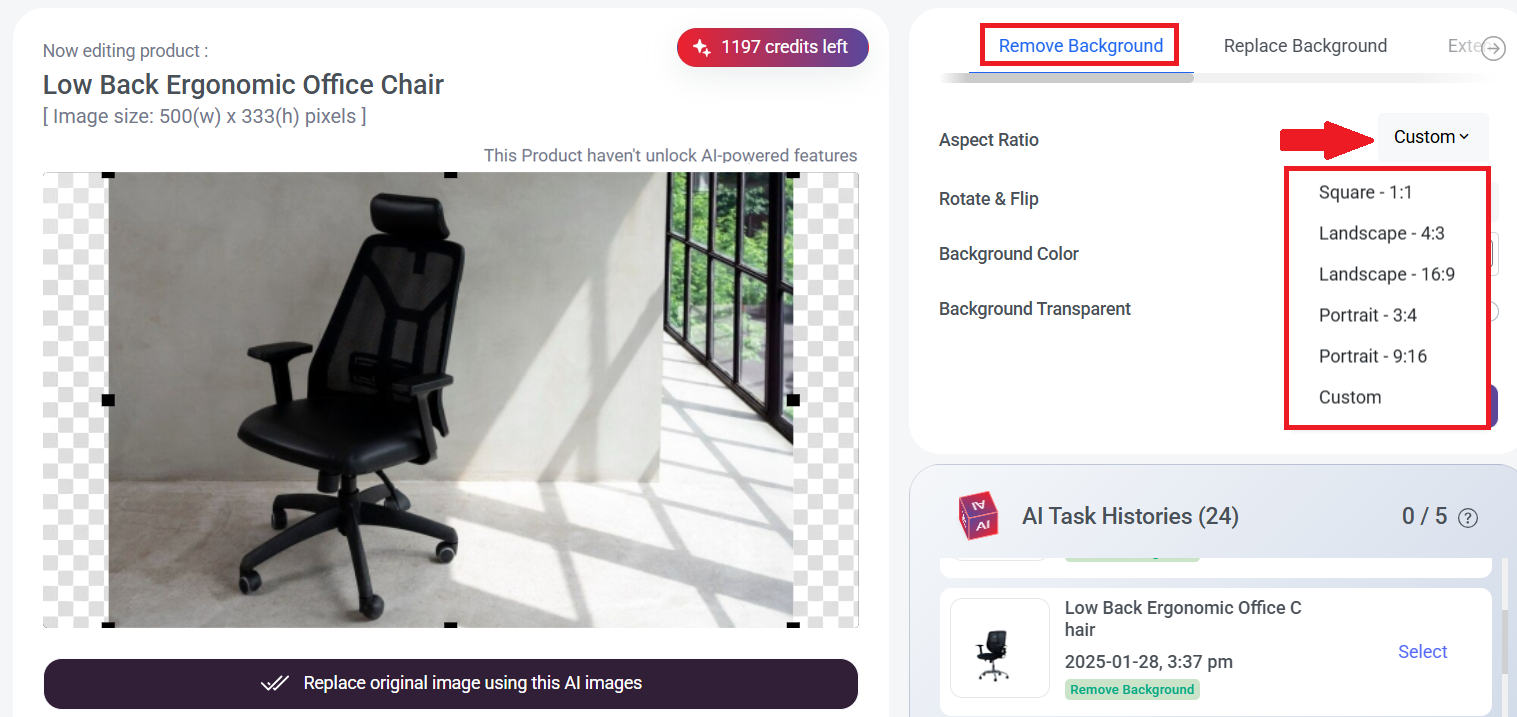
Step 1a: Click 'Custom' to select your preferred ratio.
For example, if I choose 'Square - 1:1,' the image will be cropped into a square shape.
For example, if I choose 'Square - 1:1,' the image will be cropped into a square shape.
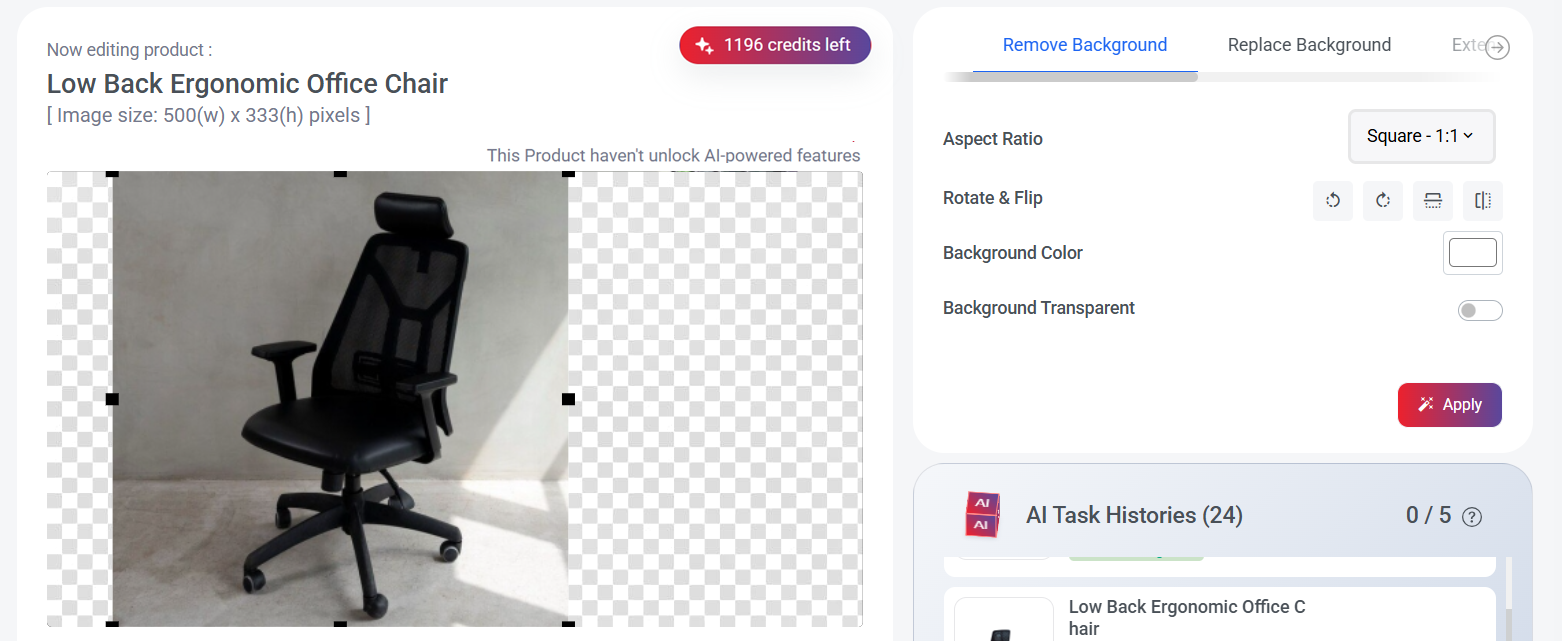
You can move your mouse cursor over the image and drag it left or right to the position you prefer.
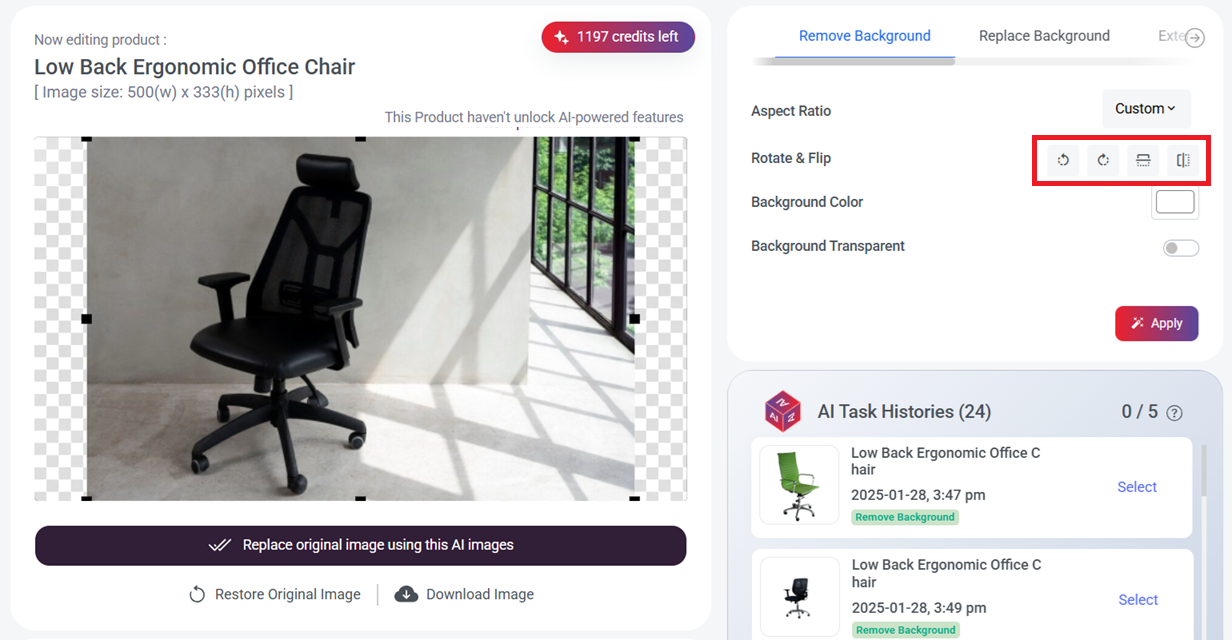
Step 1b: You can also rotate the image left or right, or flip it horizontally or vertically.
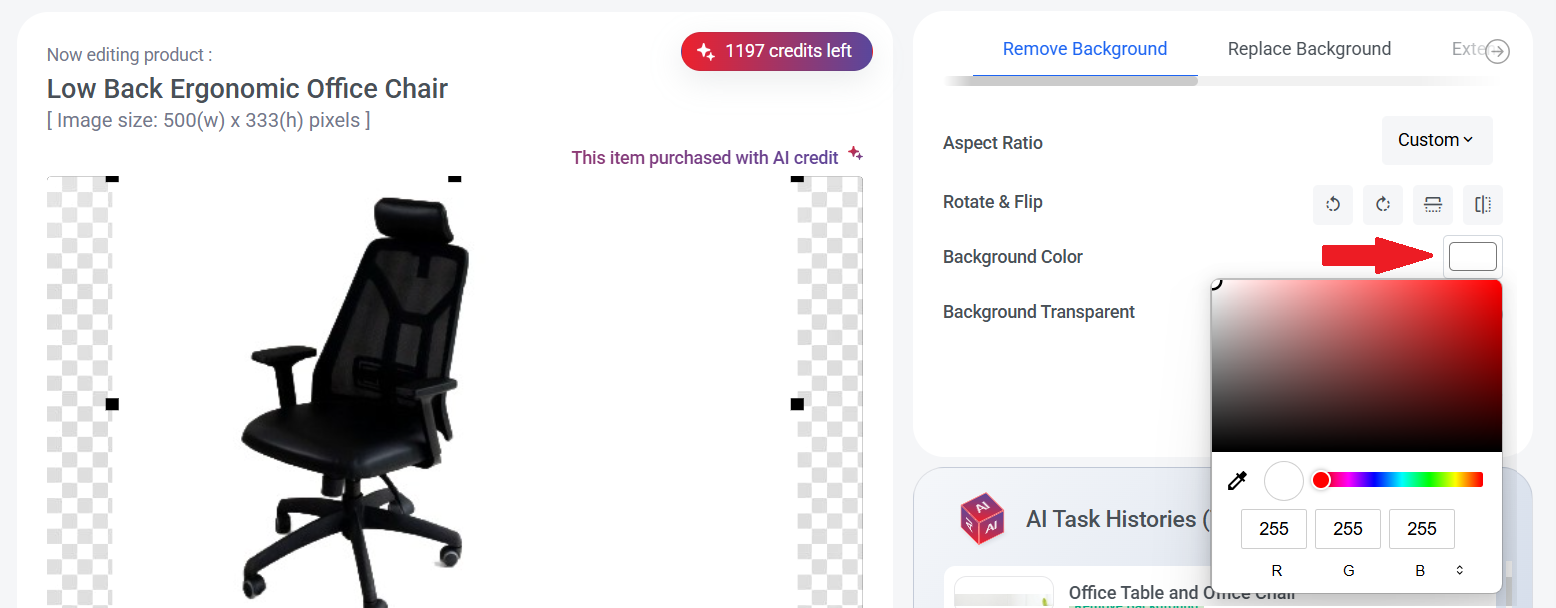
Step 1c: You can click the background color to choose your preferred color. Once selected, click 'Apply,' and the image background will change to your choice.
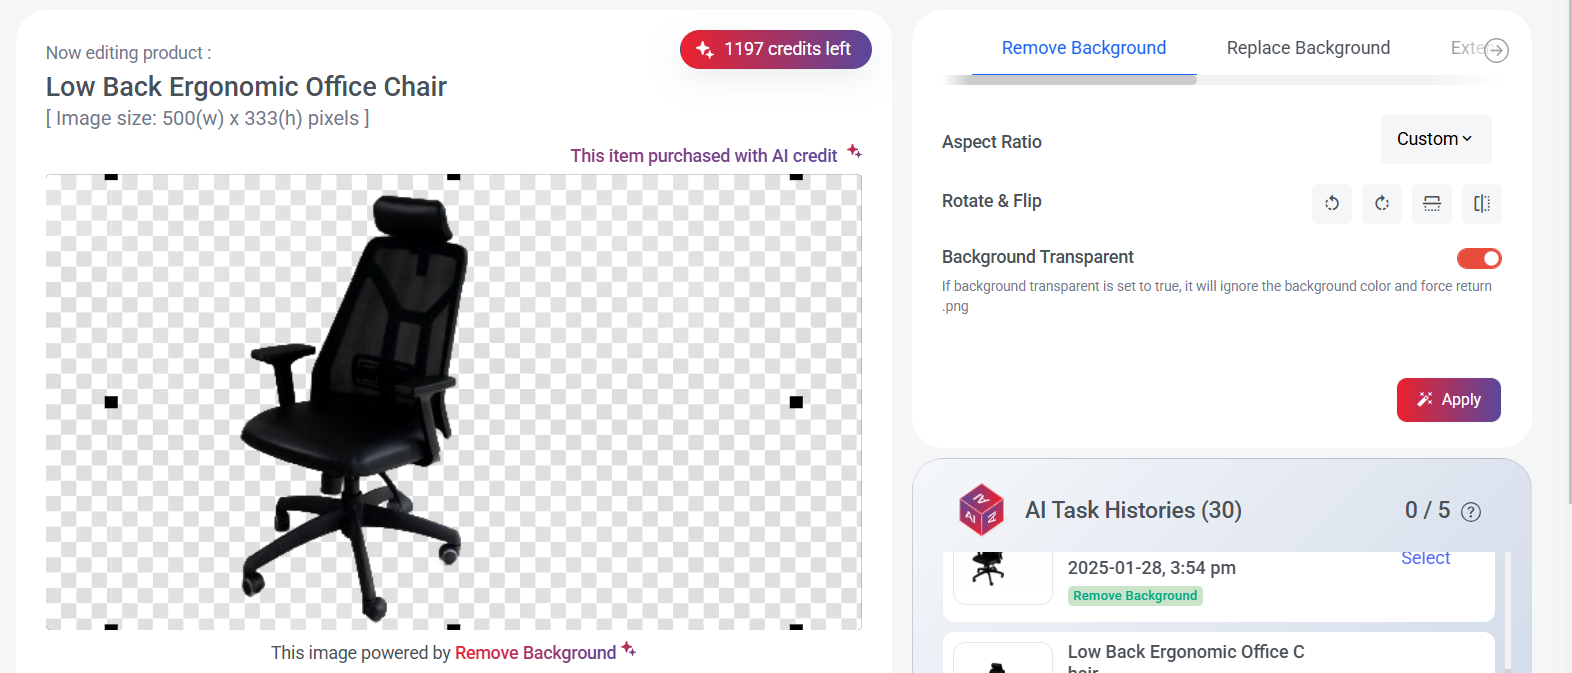
Step 1d: if you wish to make the background transparent, turn on the 'Background Transparent' button and click 'Apply.' If you’ve chosen a background color before, it will be replaced with a transparent background.

Step 2: If you're happy with the result, click 'Replace Original Image with AI Image' to automatically update the website picture. You can also click 'Download Image' to save it. If you prefer the original image, click 'Restore Original Image' to return it.
Section 5: AI Replace Background
In this section, you will learn how to change image backgrounds effortlessly—simply describe the scene you want, and the AI will generate a seamless and realistic background to match your vision, enhancing the overall appearance of your image.
Let's go over the steps to replace the image background.
Let's go over the steps to replace the image background.
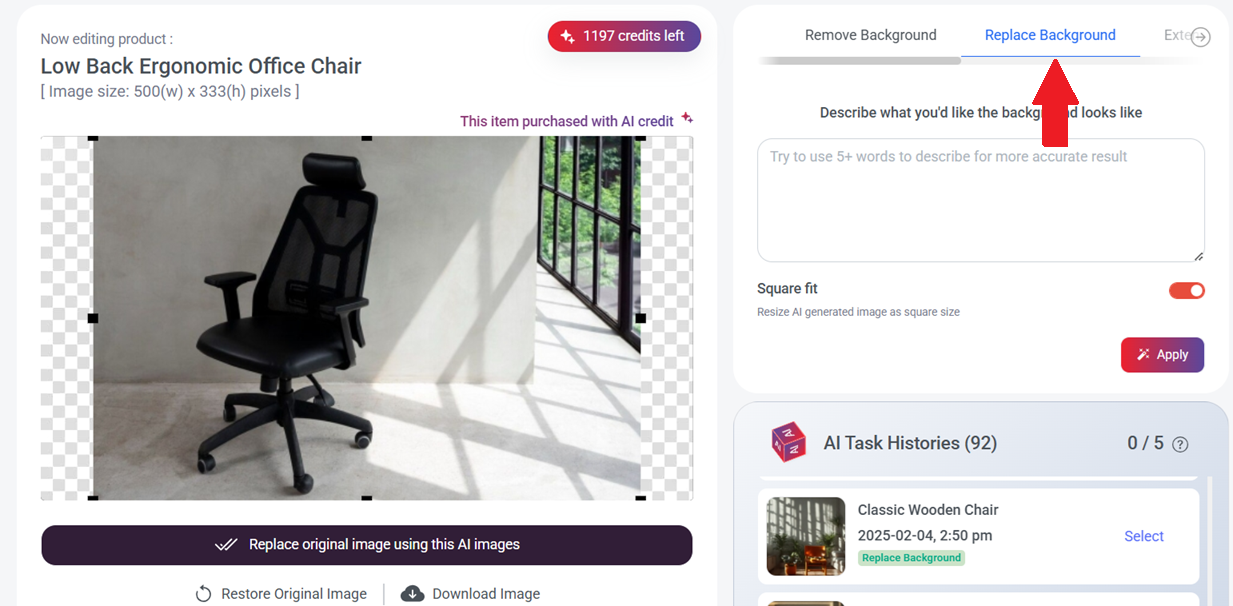
Step 1: Click "Replace Background"
Step 2: Type a description of the background you'd like, and try to use five or more words to give the AI a clearer idea of your vision.
Step 3: Turn on Square Fit to resize your picture into a square shape. If you want to keep your original picture, you can turn it off.
Step 4: Click "Apply" to replace the background with AI background
If you want to regenerate another AI background, you can restore the original picture, re-type the description, and click the 'Apply' button.
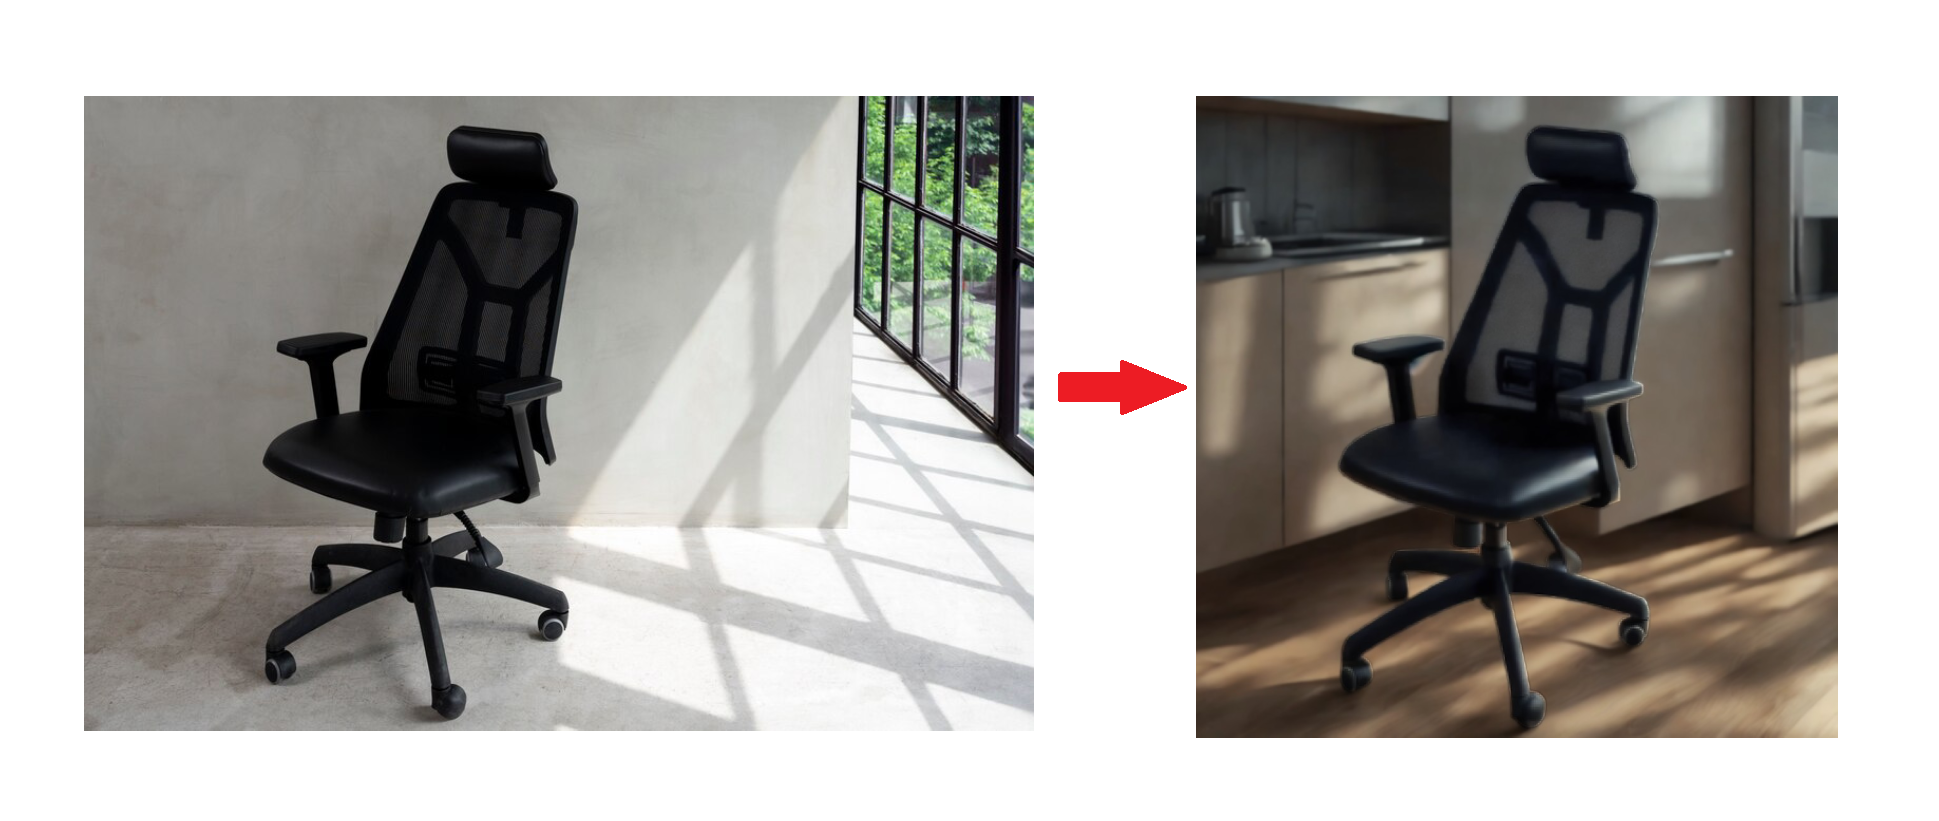
Here is an example of the AI-replaced background with a square fit effect.
If you're happy with the result, click 'Replace Original Image with AI Image' to automatically update the website picture. You can also click 'Download Image' to save it. If you prefer the original image, click 'Restore Original Image' to return it.
If you're happy with the result, click 'Replace Original Image with AI Image' to automatically update the website picture. You can also click 'Download Image' to save it. If you prefer the original image, click 'Restore Original Image' to return it.
Section 6: AI Extend Image (Outpainting)
In this section, you will learn how to extend your images beyond their original borders with outpainting, seamlessly generating additional details that match the style and context. Whether expanding landscapes or creating a wider scene, the AI enhances your visuals with stunning, natural-looking results
Let's go over the steps to extend the image.
Let's go over the steps to extend the image.
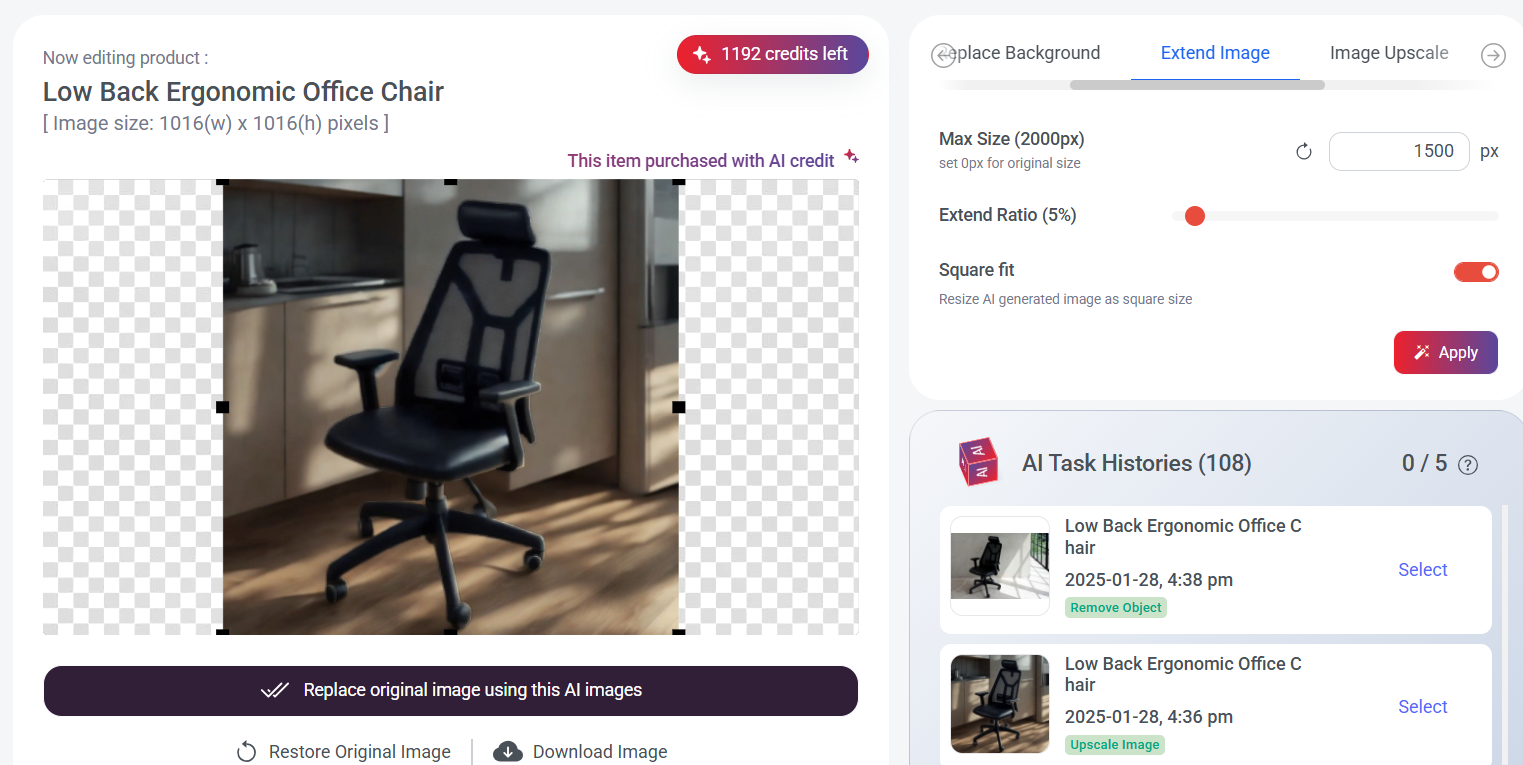
Step 1: Click until you reach Extend Image.
Step 2: Enter the image size you want to set. The maximum size is 2000px. If set 0, it will be the image's original size.
Step 3: Drag the red dot left or right to adjust the extend ratio. Don't set it too high—it's recommended to keep it under 10%, or the product may appear too small.
Step 4: Turn on Square Fit to resize your picture into a square shape. If you want to keep your original picture, you can turn it off.
Step 5: Click "Apply" button
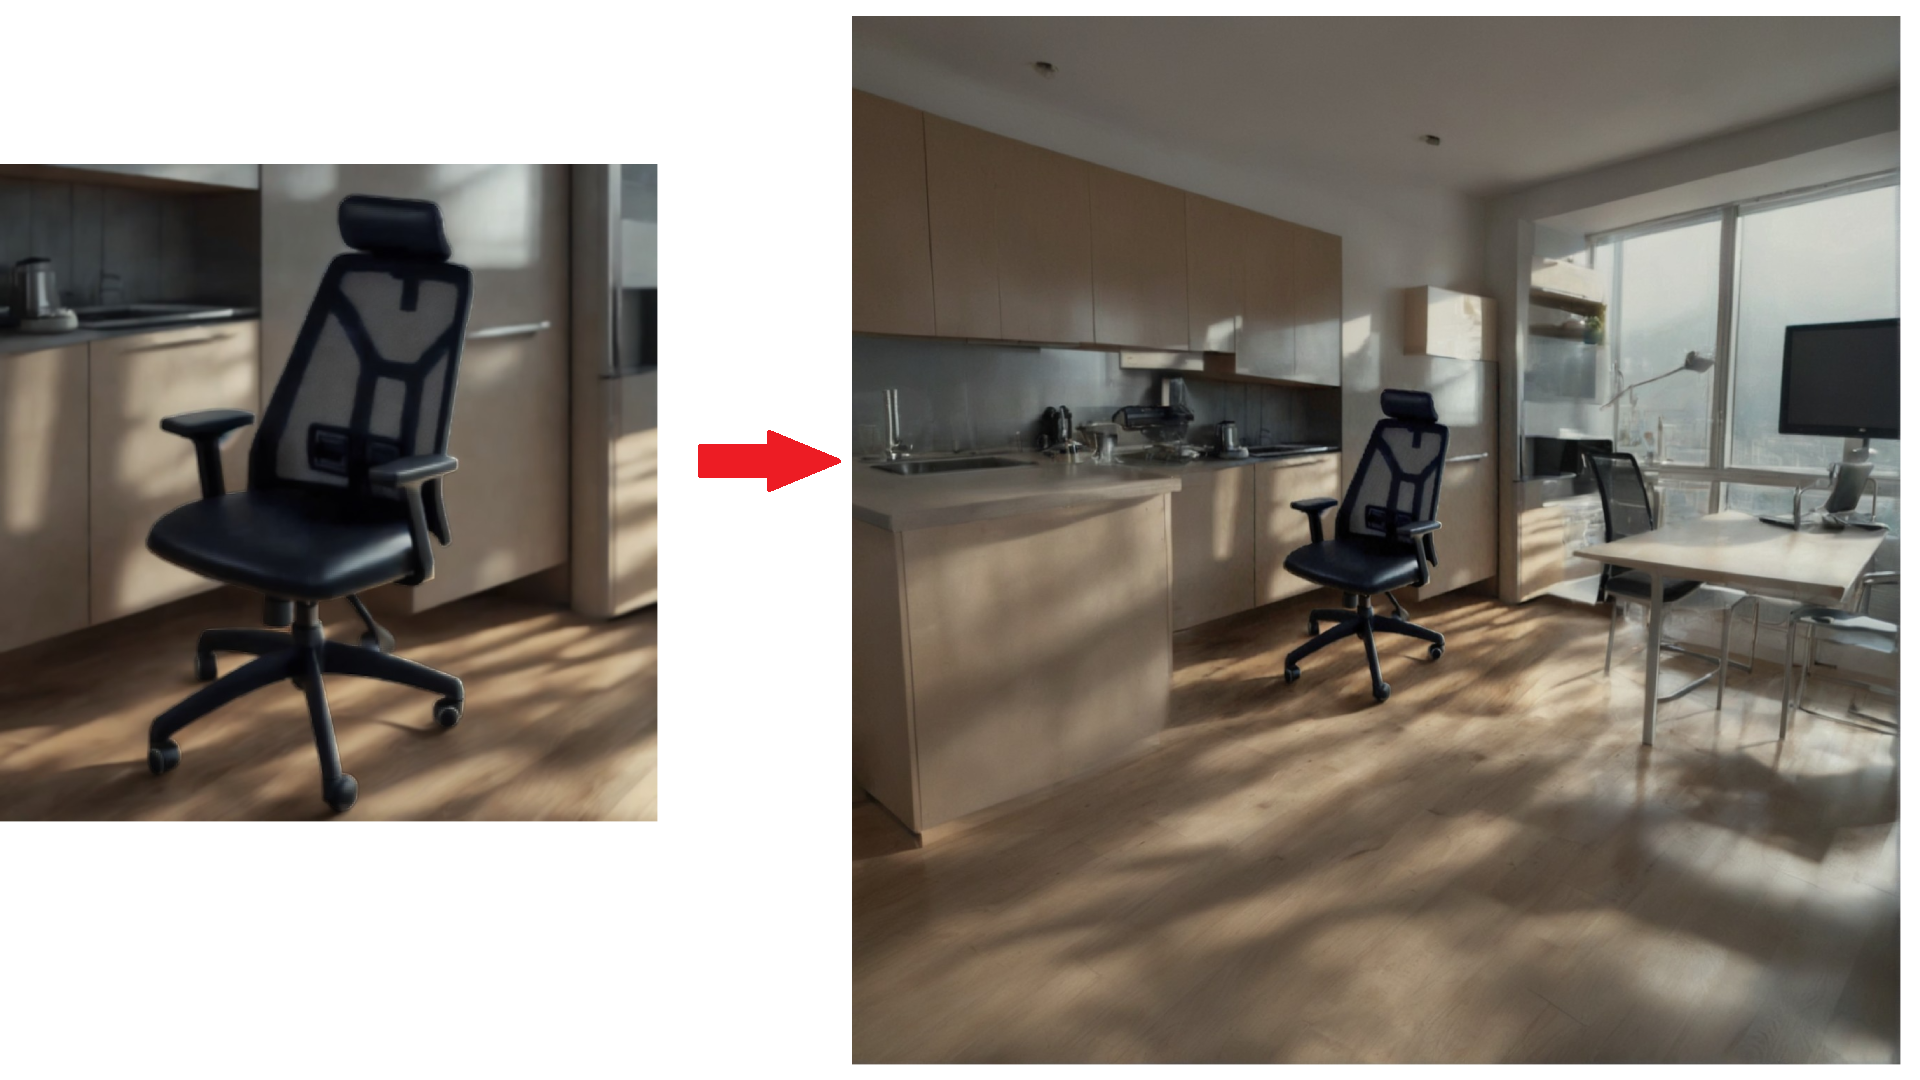
Here is an example of the AI Extend Image (OutPainting).
If you're happy with the result, click 'Replace Original Image with AI Image' to automatically update the website picture. You can also click 'Download Image' to save it. If you prefer the original image, click 'Restore Original Image' to return it.
If you're happy with the result, click 'Replace Original Image with AI Image' to automatically update the website picture. You can also click 'Download Image' to save it. If you prefer the original image, click 'Restore Original Image' to return it.
Section 7: AI Image Upscale
In this section, you will learn how to effortlessly enhance image resolution with just one click. Instantly upscale and sharpen your images, bringing out finer details and improving quality with minimal manual effort.
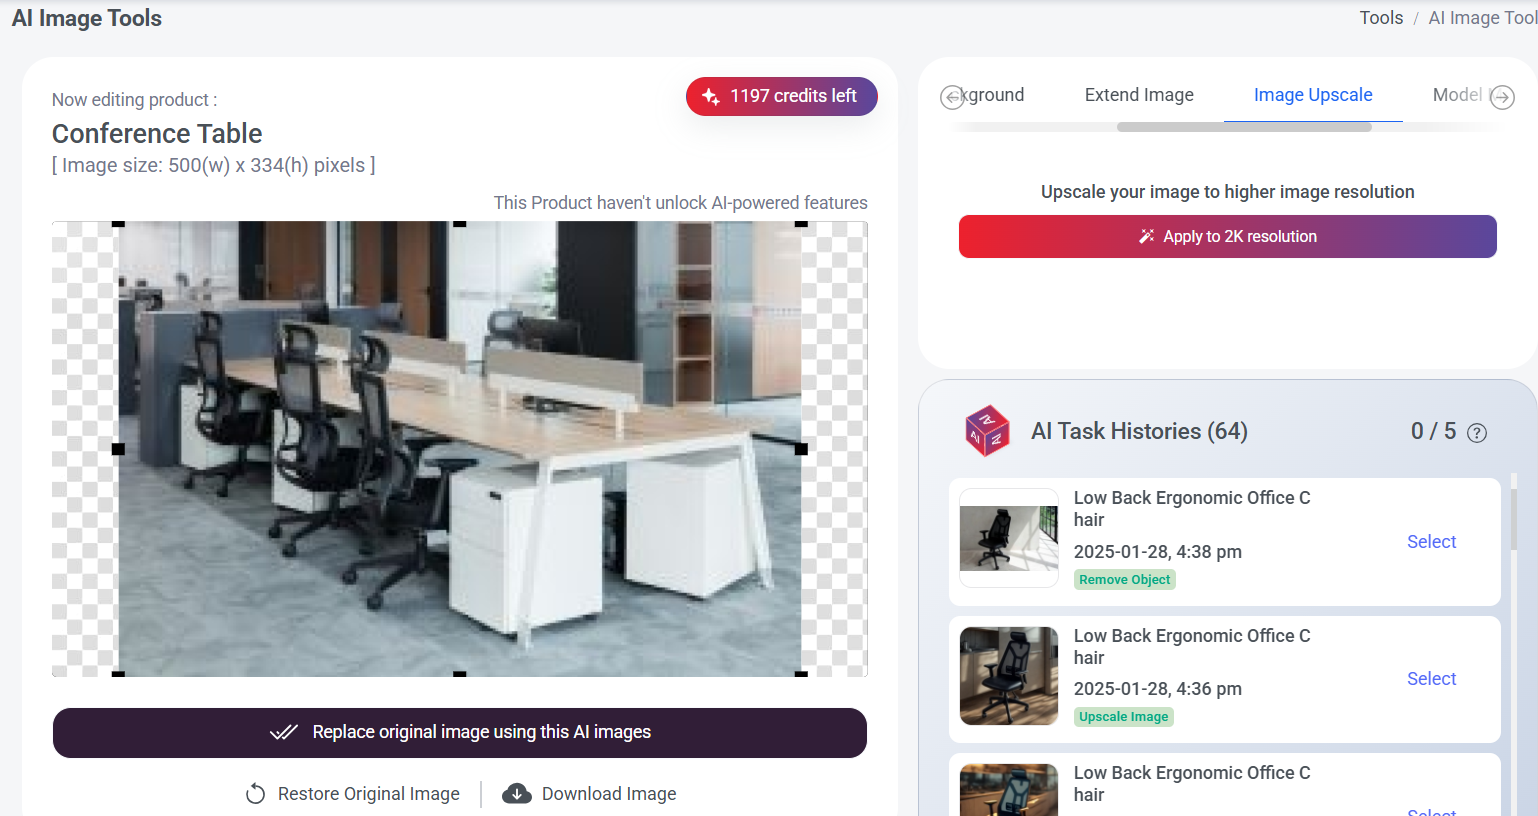
Step 1: Click until you reach Image Upscale.
Step 2: Click "Apply to 2k resolution"
You can check the difference below:
Step 2: Click "Apply to 2k resolution"
You can check the difference below:

Before Apply 2k Resolution
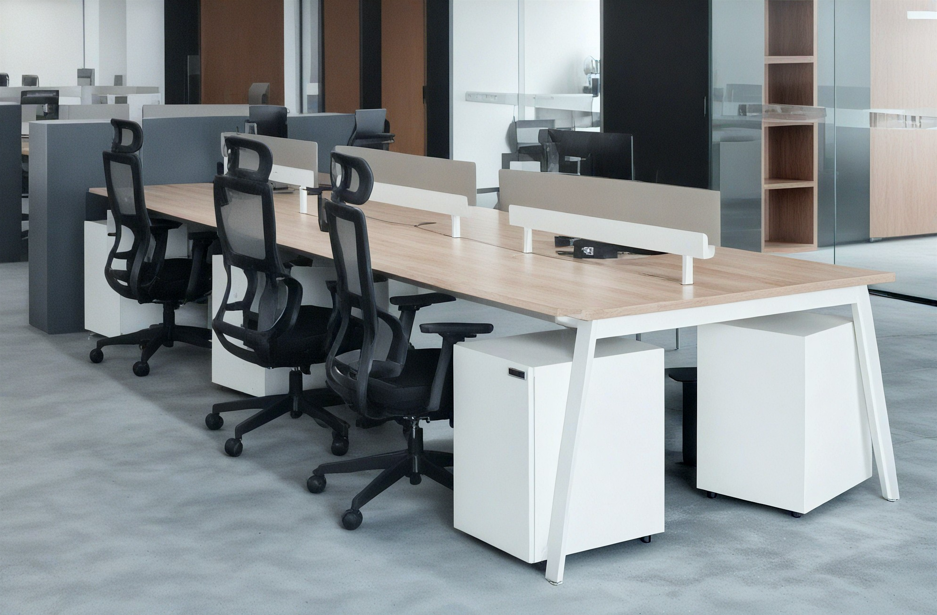
After Apply 2k Resolution
If you're happy with the result, click 'Replace Original Image with AI Image' to automatically update the website picture. You can also click 'Download Image' to save it. If you prefer the original image, click 'Restore Original Image' to return it.
If you're happy with the result, click 'Replace Original Image with AI Image' to automatically update the website picture. You can also click 'Download Image' to save it. If you prefer the original image, click 'Restore Original Image' to return it.
Section 8: AI Model Modify
In this section, you will learn how to use our AI tools to seamlessly replace the model in your picture with another, without worrying about copyright issues.
Things to note before you start
- The image must have at least one person.
- You must fill in the 'item to retain.'
- AI Model settings will be saved in the browser after use.
- A maximum of one AI Model task is allowed in the queue per user.
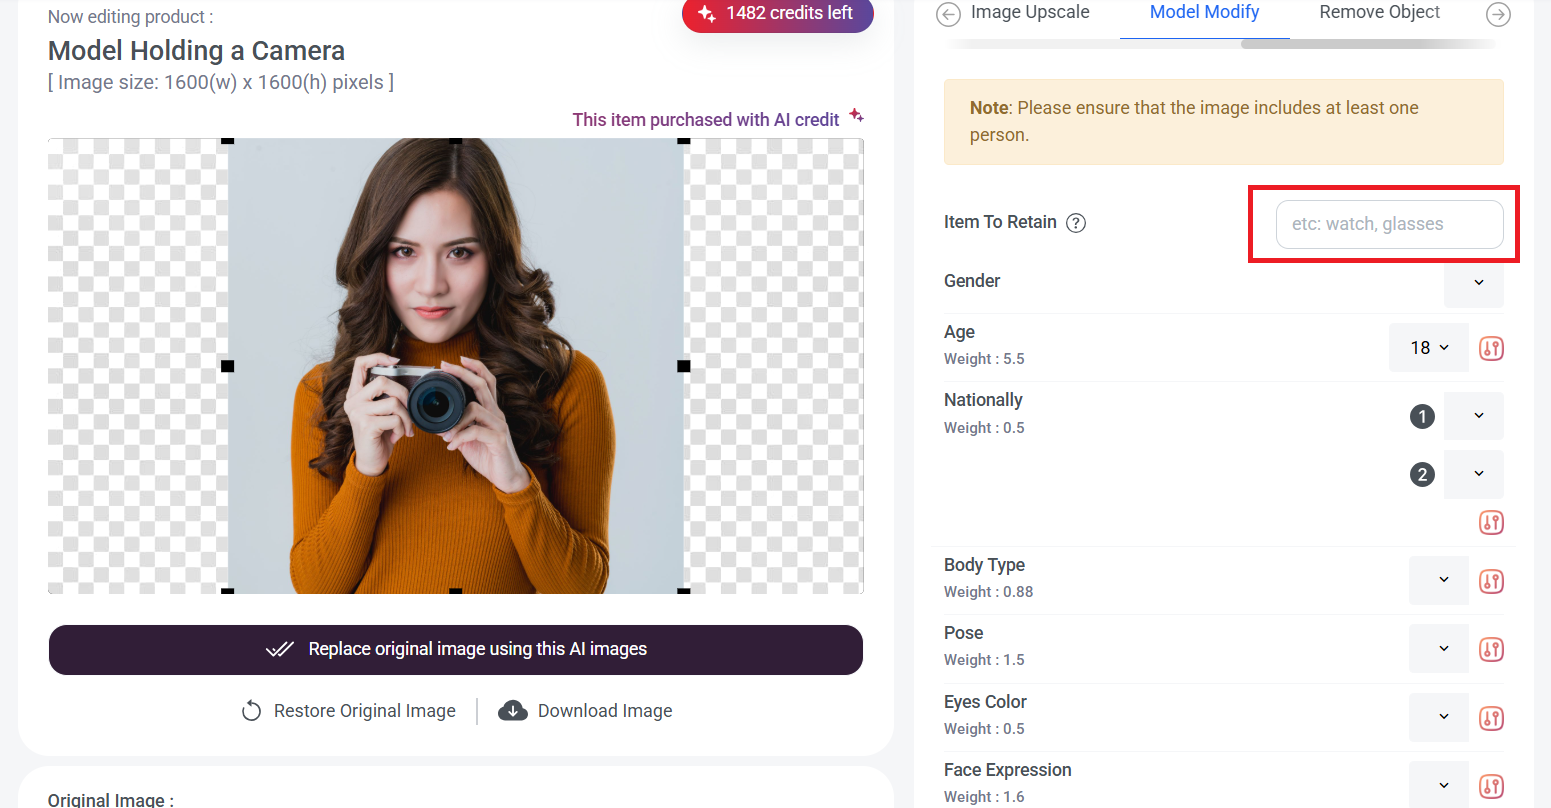
Step 1: Click until you reach Model Modify.
Step 2: Fill in "Item To Retain"
Step 2: Fill in "Item To Retain"
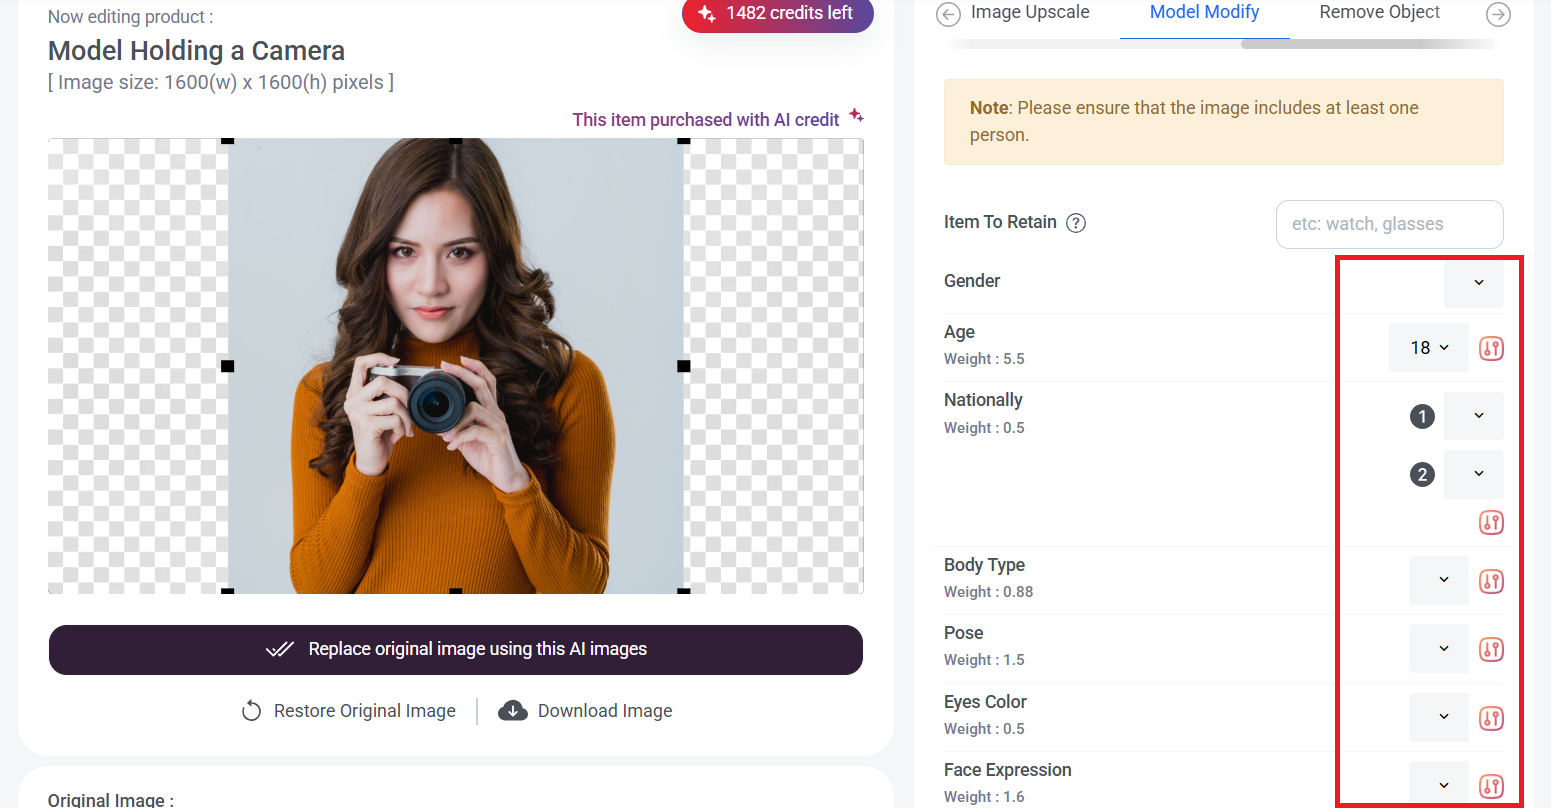
Step 3: You can choose the settings you want by clicking the box and adjusting the weight of the settings.
You can also click 'Advanced Settings' to make adjustments or leave an additional remark if needed.
Step 4: Once you've made your settings, click 'Apply,' and the system will update the model to match your chosen settings.

Only one AI model task can be active at a time, even if slots are available. A new AI model task will only start once the current one is complete.
You can check the difference below:
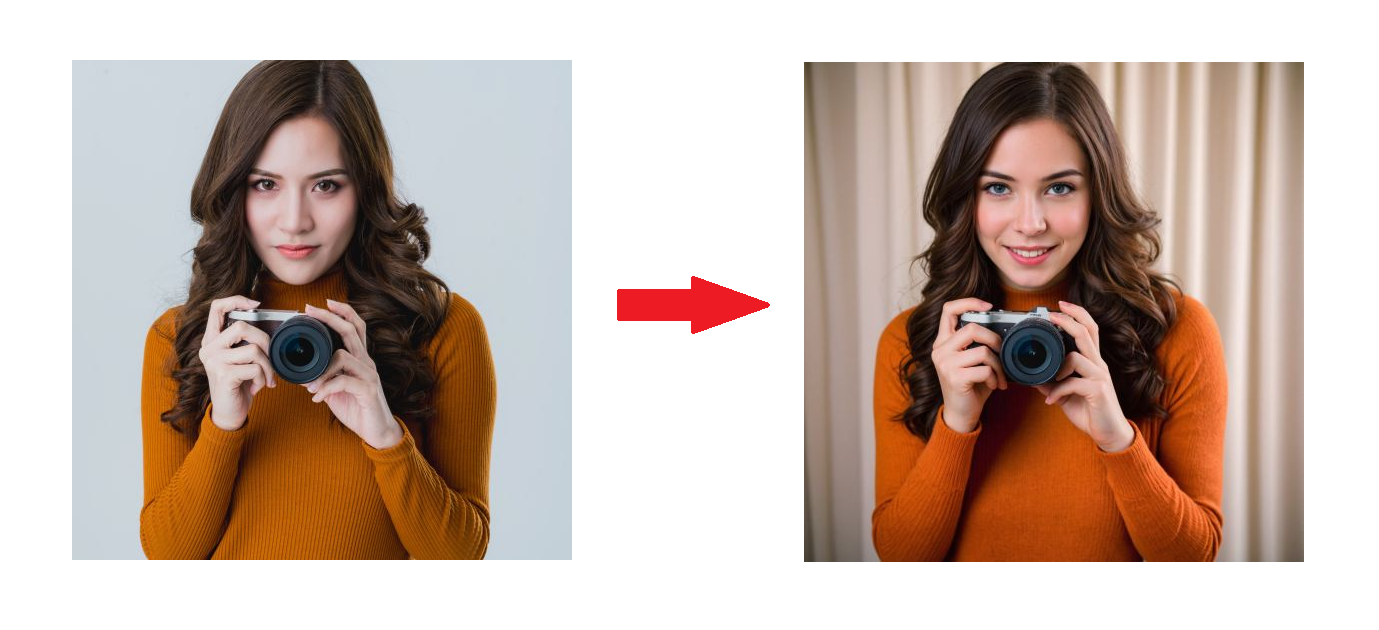
If you're happy with the result, click 'Replace Original Image with AI Image' to automatically update the website picture. You can also click 'Download Image' to save it. If you prefer the original image, click 'Restore Original Image' to return it.
Section 9: AI Remove Object
In this section, you’ll learn how to remove unwanted elements from your photos or replace them with something else, while keeping the look natural.
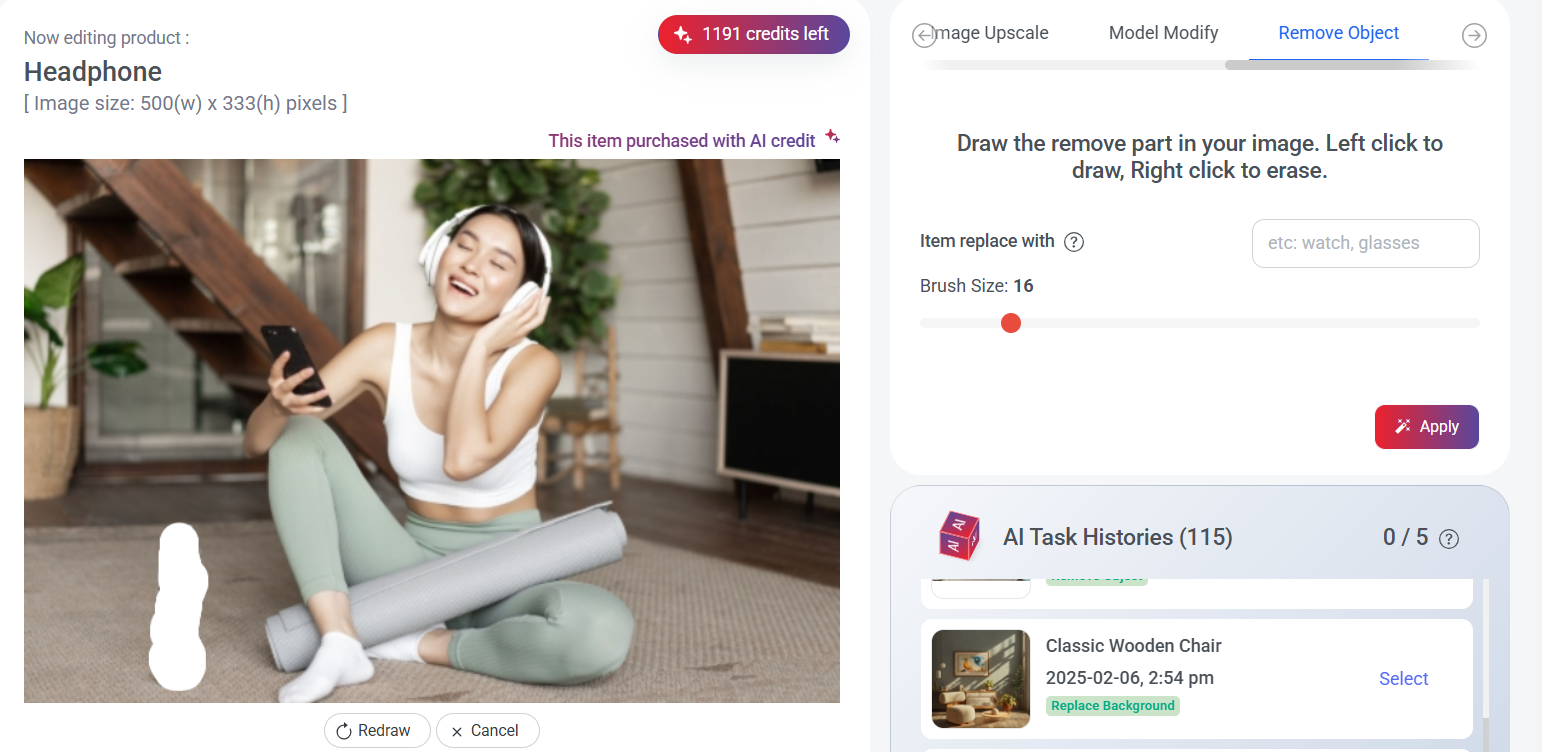
Step 1: Click until you reach Remove Object.
Step 2: Fill in "Item replace with"
Step 2: Fill in "Item replace with"
Replace the item in the drawn area or you may leave it blank to proceed with removing the drawn area.
Step 3: Drag the red dot left or right to adjust the brush size (if needed).
Step 4: Move your mouse cursor to the area you want to remove, left-click to start drawing, and right-click to erase the drawn area.
Step 5: Once you've done, click 'Apply'.
You can check the difference below:
Step 4: Move your mouse cursor to the area you want to remove, left-click to start drawing, and right-click to erase the drawn area.
Step 5: Once you've done, click 'Apply'.
You can check the difference below:

If you're happy with the result, click 'Replace Original Image with AI Image' to automatically update the website picture. You can also click 'Download Image' to save it. If you prefer the original image, click 'Restore Original Image' to return it.