Email Setup
Desktop
Thundebird
Outlook
Mobile
Android
Iphone
AI Features
AI Product Tools
AI Customer Service
AI Handbook
AI Positioning
AI Suggestion
Website Management
Login NEWPAGES Merchant System (NMS)
NMS Switch Language
Manage Products
Manage Service
Manage Photoalbum
Manage News / Promotion
Manage Ratings & Reviews
Manage Google Reviews
NMS Merchant App
Profile Setting
Support
Update Form
Report
NP Merchant Points
NMS Credit
Content Generator
Manage Others (Gallery)
Account Setting
Website Setting
Manage Download
Manage Career
Manage Testimonials
Manage YouTube
SEO Guide
SEO Knowledge Tips
On-page Optimization
e-Commerce (My Sales)
Dashboard
Order Management
Invoice
Shipping
Delivery List
Packaging & Picklist
Self Pick Up Setting
Shipping Setting
No available shipping method
Easyparcel
Lalamove
Tracking.my
Members
Marketing Tools
Voucher
Birthday Campaign
Discount Campaign
Add-on Deals
Mix & Match
Purchase Link
Broadcast Management
Product Sold & Customer Report
Ecommerce Mail Setting
Popup & Social Proof
Checkout Cart Setting
Website Header Setting
Additonal Charges Setting
Notification Setting
e-Commerce Process (Add to Cart Flow)
Plugins
Activate Plugin
Marketplace Synchronization
Tiktok Sync
Lazada Sync
Shopee Sync
Affiliate Marketing & Referral
Membership & Loyalty Program
Checkout & Payment Link
Quotation Pro
Sales Landing Page
Whatsapp Cart & Chat
Product Comparison
Social Media Synchronization
Facebook My Chatbot
Booking System
BusinessTag
E-Invoice Customer Profile
PDF Encryptor
Background Removal
Warranty System
Facebook Live
NEWPAGES Apps Management
CRM System
Knowledge Tips
Email Issues
NEWPAGES Official API
Mantap
Domain
Admin Email System
Webmail
Reset Password
Adjust Spam Score
Delete Email
Set Autoresponders In Webmail
Facebook
Facebook Pixel
Demonstration
Progressive Web App Ready (PWA)
Spam Expert - Domain Level
Dashboard
Incoming
Logs
Delivery Issue Log
Spam Quarantine
Domain Statistics
Train Messages
Incoming - Protection Settings
Recipient Allow List
Recipient Block List
Sender Allow List
Sender Block List
Allow List Filtering Rules
Block List Filtering Rules
Customise Actions
Filter Settings
Attachments Restrictions
Email Size Restrictions
Continuity
Delivery Queue - Incoming
Compose Email
My Settings
Select Categories
Email Setup
Desktop
Thundebird
Outlook
Mobile
Android
Iphone
AI Features
AI Product Tools
AI Customer Service
AI Handbook
AI Positioning
AI Suggestion
Website Management
Login NEWPAGES Merchant System (NMS)
NMS Switch Language
Manage Products
Manage Service
Manage Photoalbum
Manage News / Promotion
Manage Ratings & Reviews
Manage Google Reviews
NMS Merchant App
Profile Setting
Support
Update Form
Report
NP Merchant Points
NMS Credit
Content Generator
Manage Others (Gallery)
Account Setting
Website Setting
Manage Download
Manage Career
Manage Testimonials
Manage YouTube
SEO Guide
SEO Knowledge Tips
On-page Optimization
e-Commerce (My Sales)
Dashboard
Order Management
Invoice
Shipping
Delivery List
Packaging & Picklist
Self Pick Up Setting
Shipping Setting
No available shipping method
Easyparcel
Lalamove
Tracking.my
Members
Marketing Tools
Voucher
Birthday Campaign
Discount Campaign
Add-on Deals
Mix & Match
Purchase Link
Broadcast Management
Product Sold & Customer Report
Ecommerce Mail Setting
Popup & Social Proof
Checkout Cart Setting
Website Header Setting
Additonal Charges Setting
Notification Setting
e-Commerce Process (Add to Cart Flow)
Plugins
Activate Plugin
Marketplace Synchronization
Tiktok Sync
Lazada Sync
Shopee Sync
Affiliate Marketing & Referral
Membership & Loyalty Program
Checkout & Payment Link
Quotation Pro
Sales Landing Page
Whatsapp Cart & Chat
Product Comparison
Social Media Synchronization
Facebook My Chatbot
Booking System
BusinessTag
E-Invoice Customer Profile
PDF Encryptor
Background Removal
Warranty System
Facebook Live
NEWPAGES Apps Management
CRM System
Knowledge Tips
Email Issues
NEWPAGES Official API
Mantap
Domain
Admin Email System
Webmail
Reset Password
Adjust Spam Score
Delete Email
Set Autoresponders In Webmail
Facebook
Facebook Pixel
Demonstration
Progressive Web App Ready (PWA)
Spam Expert - Domain Level
Dashboard
Incoming
Logs
Delivery Issue Log
Spam Quarantine
Domain Statistics
Train Messages
Incoming - Protection Settings
Recipient Allow List
Recipient Block List
Sender Allow List
Sender Block List
Allow List Filtering Rules
Block List Filtering Rules
Customise Actions
Filter Settings
Attachments Restrictions
Email Size Restrictions
Continuity
Delivery Queue - Incoming
Compose Email
My Settings
Email Accounts
February 20, 2024Overview
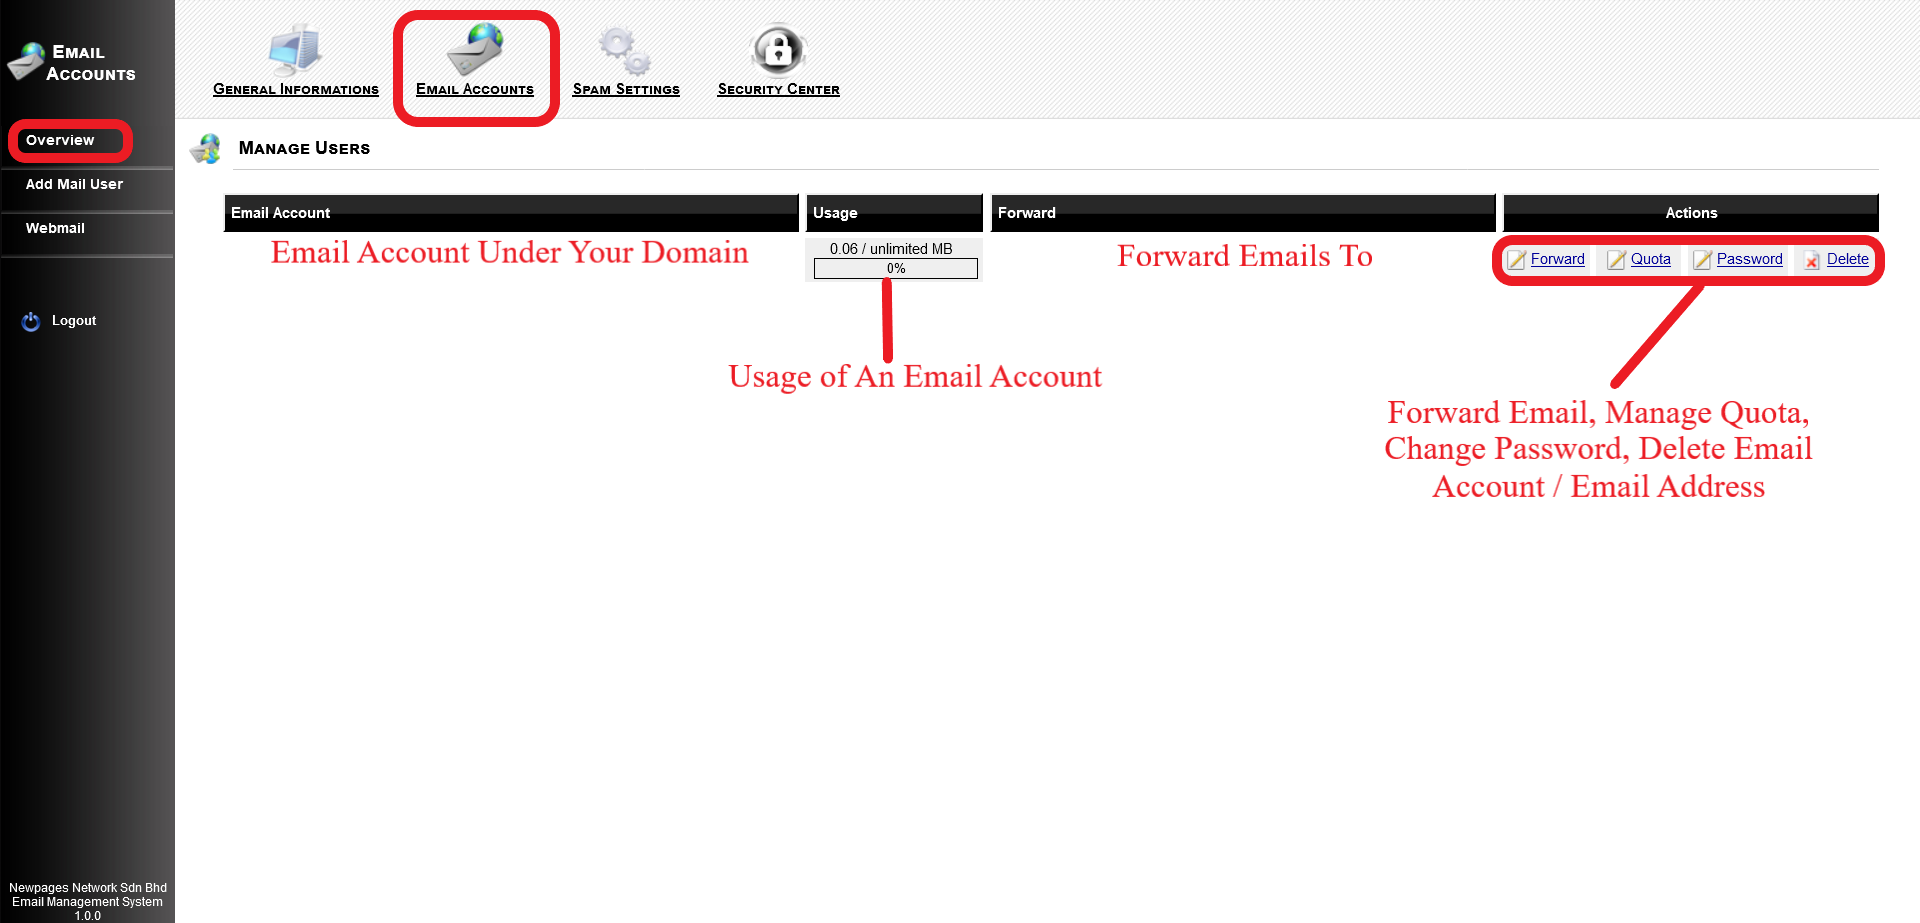
1. Email Accounts: Here, you'll find a list of all email accounts created under your domain.
2. Usage: This section displays the usage statistics for each email account.
3. Forward: Any email forwarding settings you've configured will be displayed here.
4. Actions: From this menu, you can manage email forwarding, adjust quotas, change passwords, and delete email accounts as needed.
2. Usage: This section displays the usage statistics for each email account.
3. Forward: Any email forwarding settings you've configured will be displayed here.
4. Actions: From this menu, you can manage email forwarding, adjust quotas, change passwords, and delete email accounts as needed.
Forward
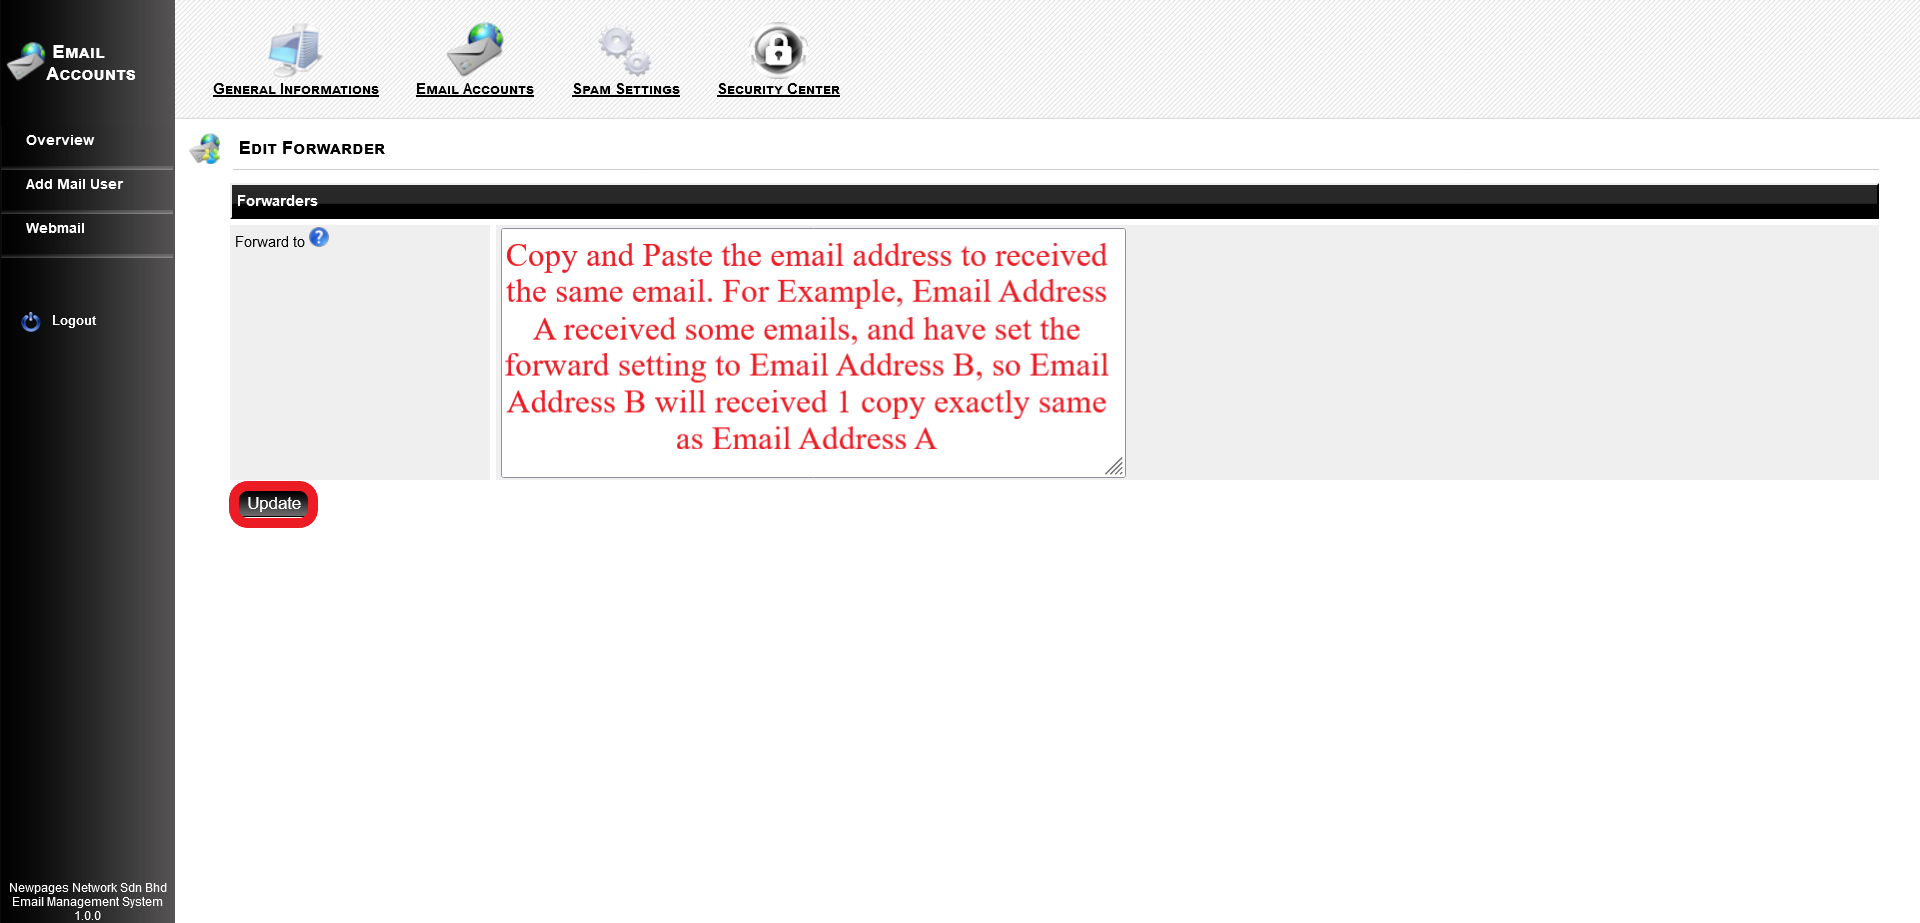
Step 1: Click Forward.
Step 2: You may type/ copy & paste the email address you want to auto forward the email to.
Step 2: You may type/ copy & paste the email address you want to auto forward the email to.
For example, you edit the forward for Email Address A and insert the Email Address B at the field of Forward to.
Whatever email received by Email Address A, it will forward a copy of email from Email Address A to Email Address B.
So Email Address B will received exactly same email as Email Address A.
Step 3: Click Update.
Quota
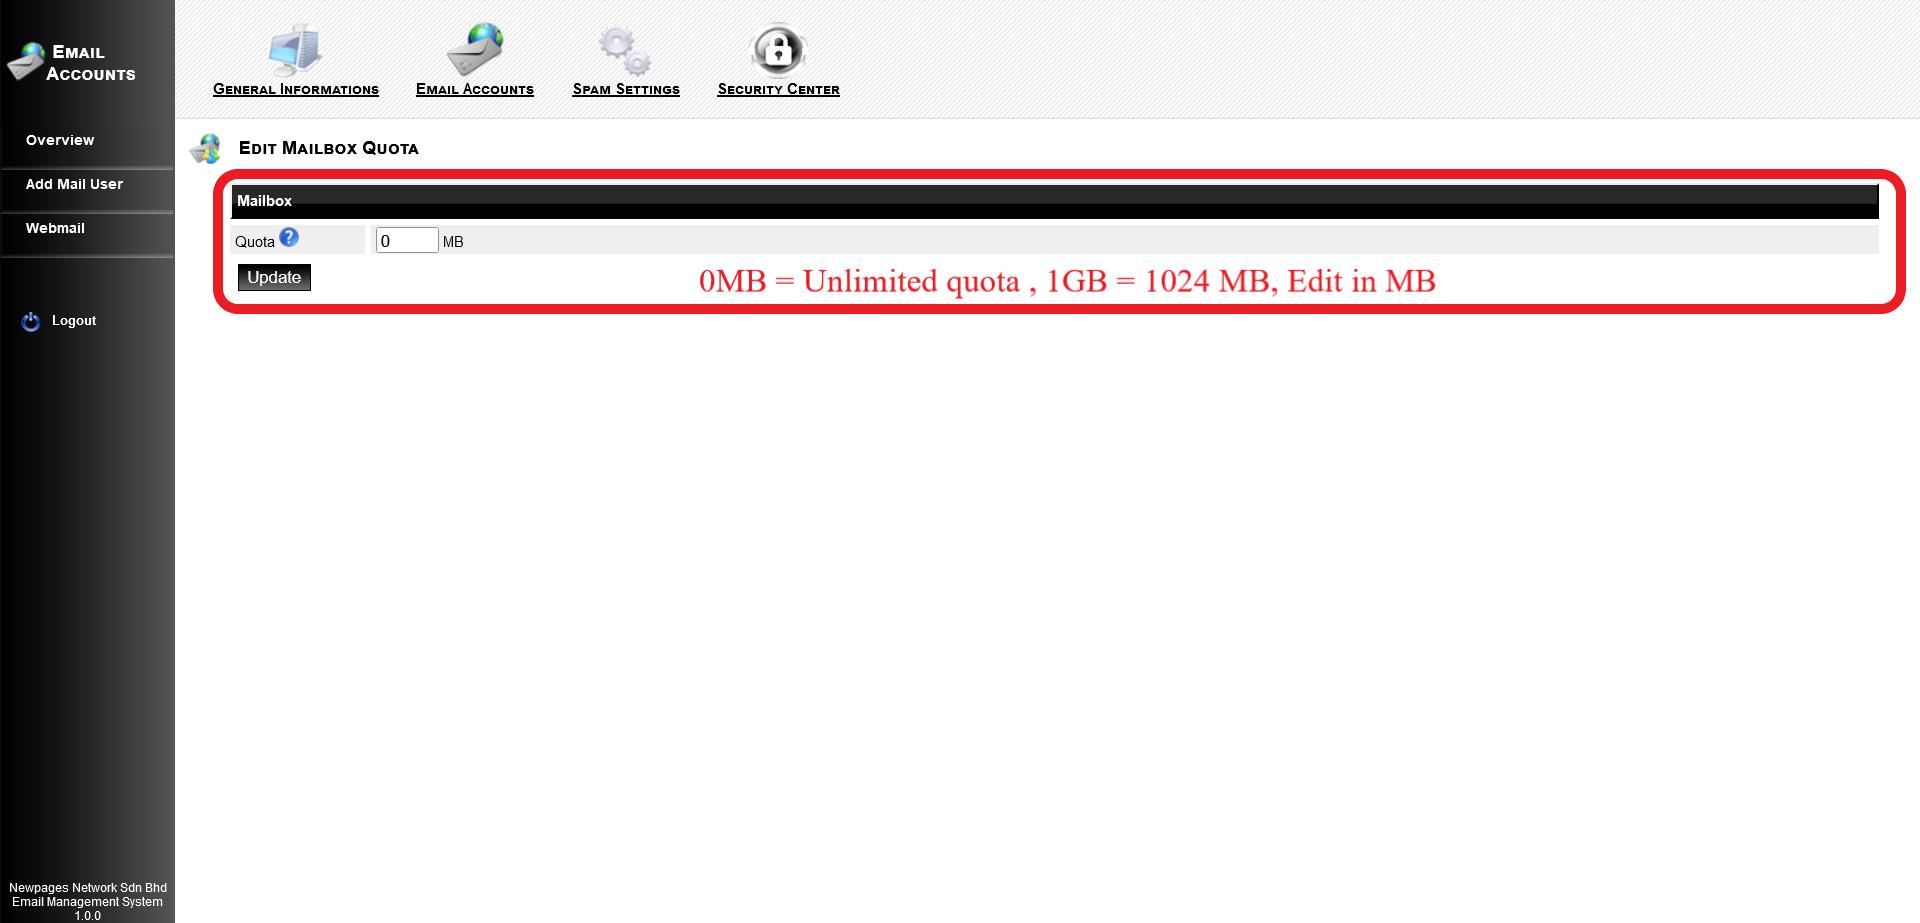
Step 1: Click Quota.
Step 2: You can set the quota of each email address.
Step 2: You can set the quota of each email address.
All the quota was count in MB, 1GB = 1024MB, 2GB = 2x1024MB = 2048MB, if you set to 0MB, means it will be unlimited quota for that email address to received the email.
But its still limited to the Total Email Usage of your domain.
Means that if your domain email have total of 5GB, and each email address you set to unlimited quota, all the email address will received the email until 5GB is full already.
Step 3: Click Update.
Password
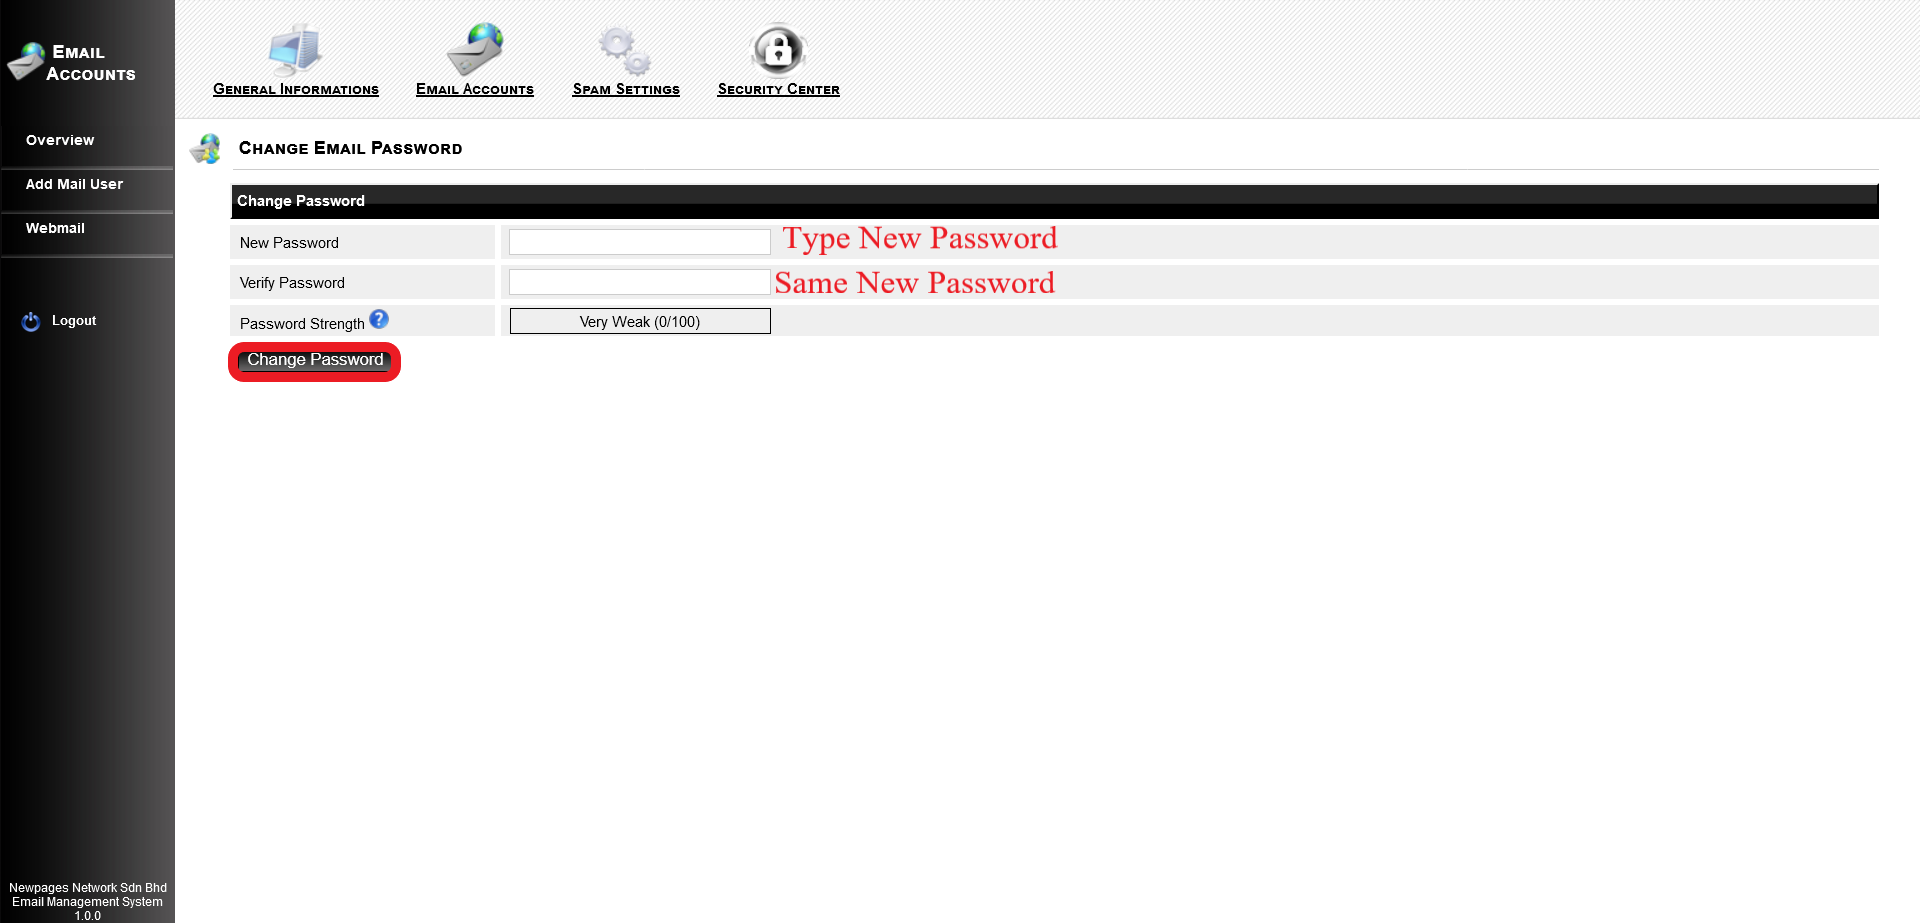
Step 1: Click Password.
Step 2: Type New Password.
Step 2: Type New Password.
A stong password is very important to maintain security. Web servers are usually more powerful and have access to greater bandwidth than your personal computer, which makes them a prime target for password crackers.
Add UPPER CASE letters, numbers, and symbol characters to increase the strength of your password.
Step 3: Verify Password. (The same password you type at Step 2)
Step 4: Click Change Password.
Step 5: You may go to mail."Your Domain" and login the email address with the new password you just changed.
Step 4: Click Change Password.
Step 5: You may go to mail."Your Domain" and login the email address with the new password you just changed.
Delete
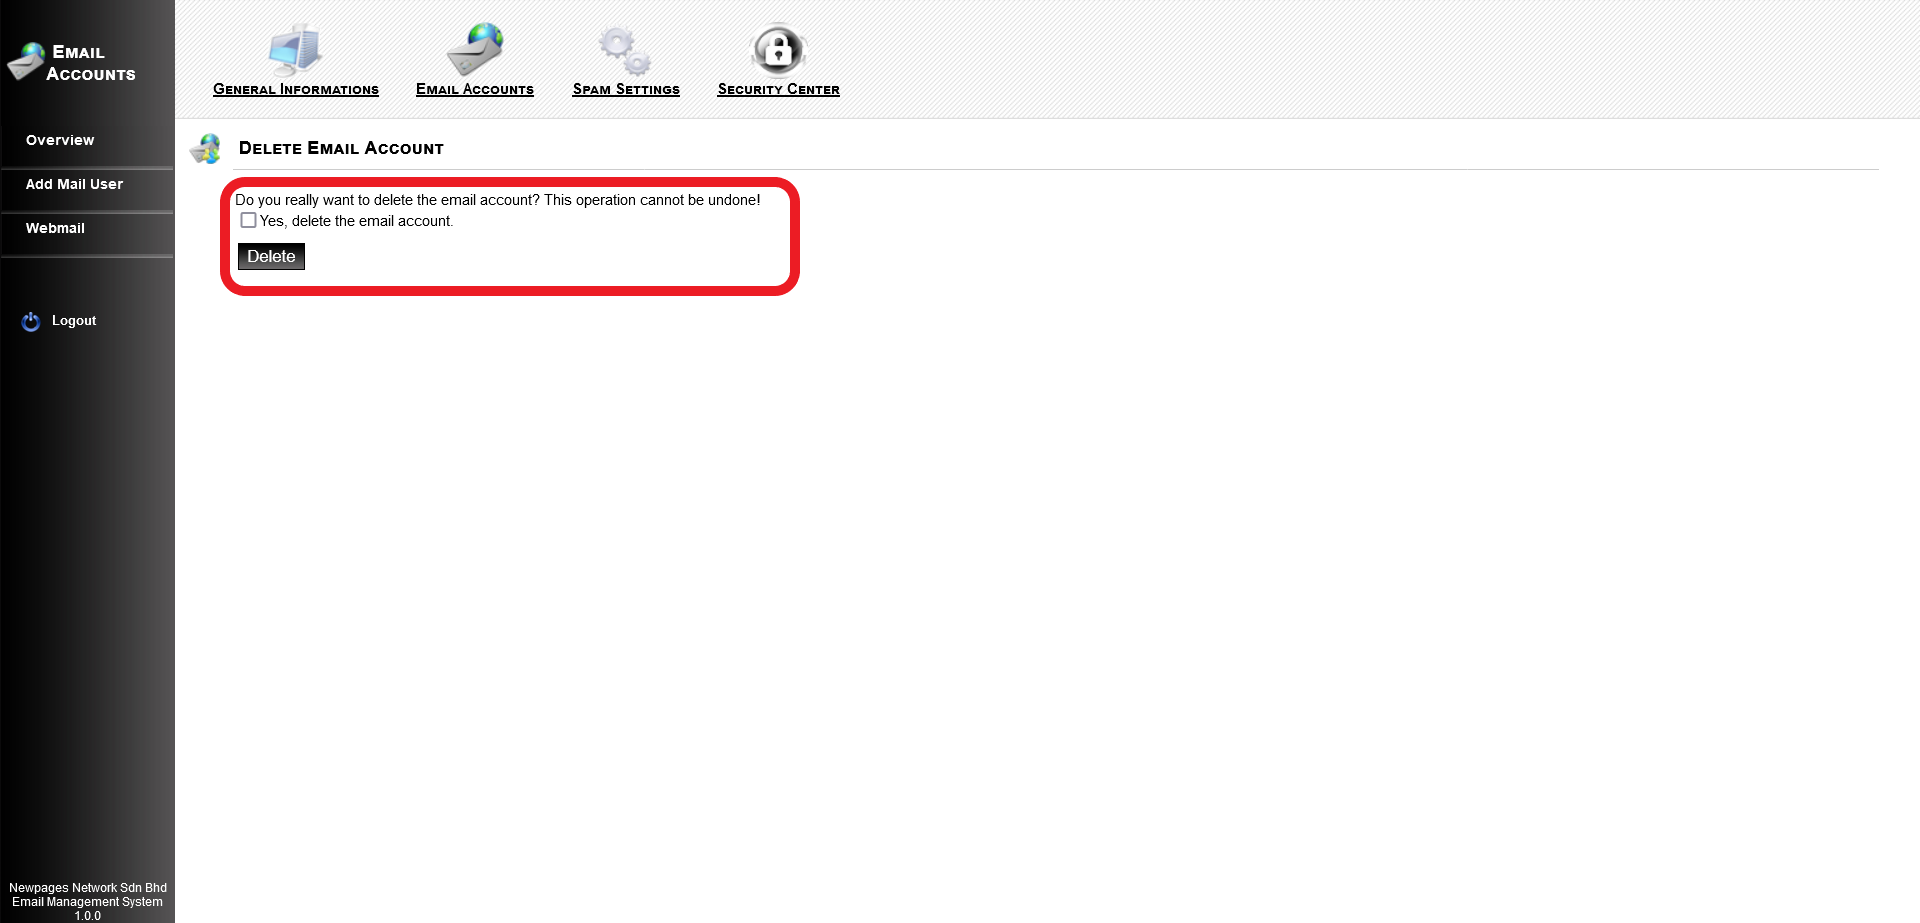
A gentle reminder that the opeation cannot be undone if you deleted the email account.
Step 1: Click Delete.
Step 2: Tick "Yes, delete the email account".
Step 3: Click Delete.
Step 2: Tick "Yes, delete the email account".
Step 3: Click Delete.
Add Mail User
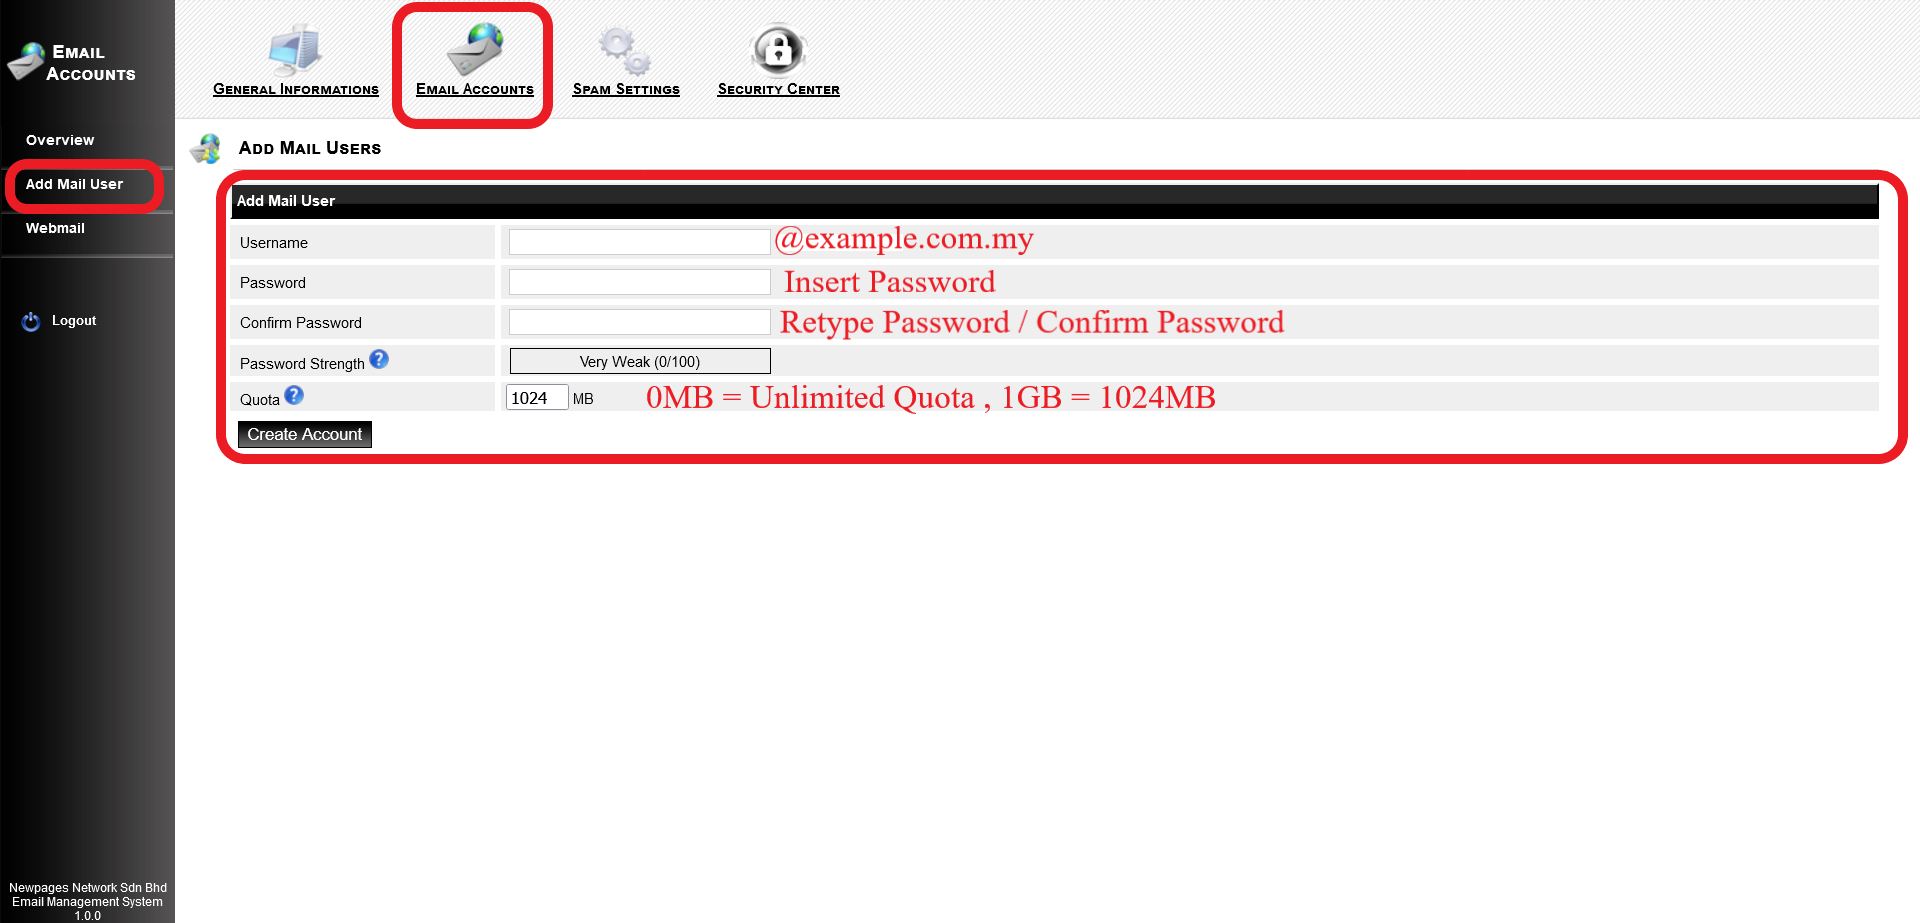
Step 1: Click Add Mail User.
Step 2: Username: The domain already show up at behind, you just need to fill in the information at infront. For example, testing@example.com.my
Step 3: Password: Type the password for that email account.
Step 4: Confirm Password: Confirm the password for that email account.
Step 5: Quota : All the quota was count in MB, 1GB = 1024MB, 2GB = 2x1024MB = 2048MB, if you set to 0MB, means it will be unlimited quota for that email address to received the email.
Step 6: Click Create Account.
Step 7: Go to mail."Your Domain" and try to login the new created email.
Webmail
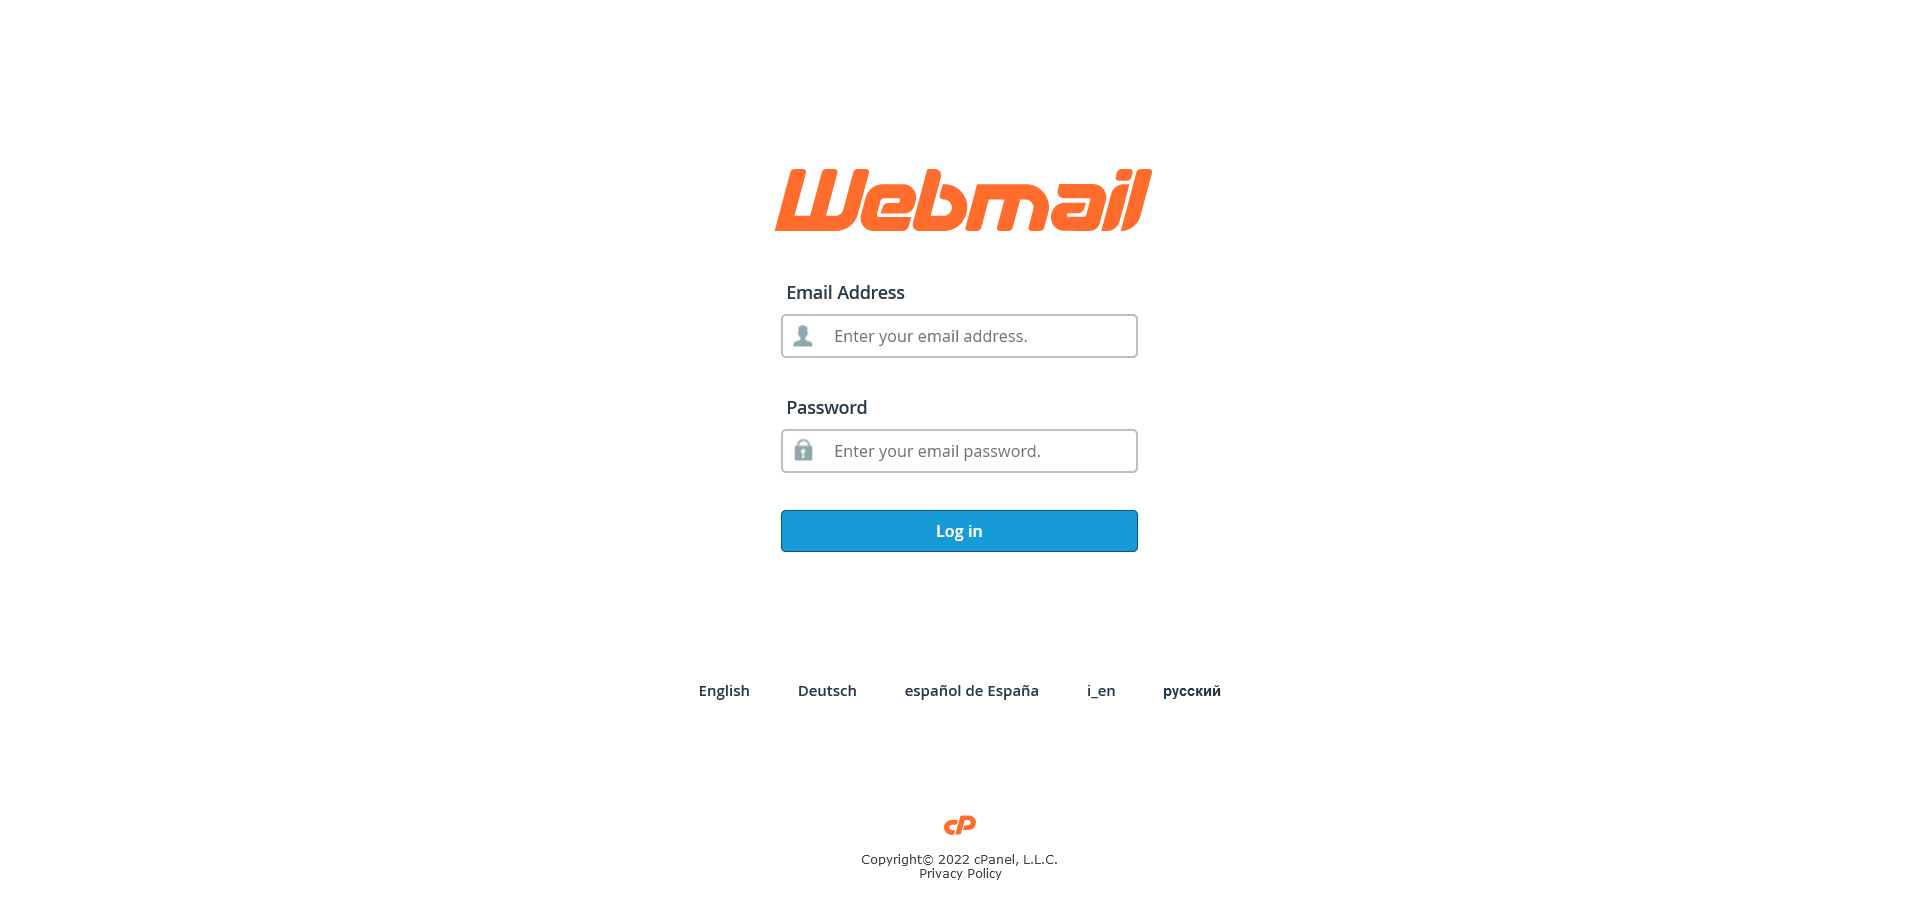
Step 1: Click Webmail and you will be redirect to the correct page of your mail."Your Domain".
For any inquiries or if you encounter any issues, please feel free to reach out to us via email at support@newpages.com.my or through WhatsApp at 010-799 1461 (David).